This guide serves a purpose of how to generate a By Name List (BNL) Report for Active Clients during certain periods of
their enrollment into a program. This report can be used to view your clients that are actively enrolled in a
program, when they began their enrollment and when they exited at any time during the program. With the
exported BNL report, you will also be able to discover if a client is missing any data elements that may affect other
reports. (ICA, Active Client List Report Guide)
NOTE: If submitting this report for the annual PIT/HIC please do not skip step 11.
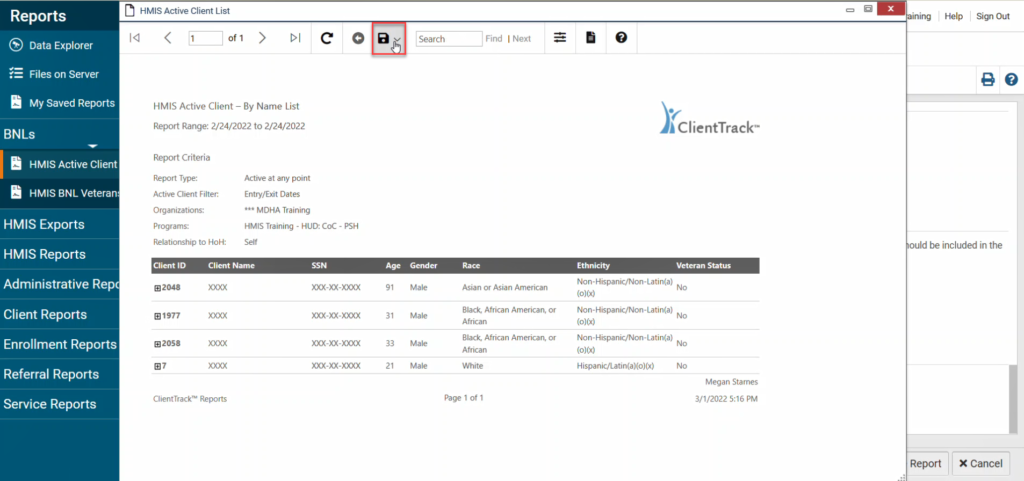
1. Log in to ClientTrack and navigate to your Reports workspace.

2. In the menu on the left, click BNLs then select HMIS Active Client List.

3. For the Date Range, select 2/24/2022 for both dates.

4. For Report Type, select Active at Any Point from the drop down menu.

5. For Active Client Method, select Entry/Exit Dates from the drop down menu.

6. Confirm that your Organization has defaulted to select your agency.

7. Check the box for Filter by Programs and select one program to run the report for. This report should be run for individual programs one at a time.

8. Leave the CoC Filter and Sub-population fields empty.

9. For Head of Household, check the box for Include Heads of Households Only.

10. For users, leave the Filter by User box empty (do NOT check).

11. For PII, check the box to Hide PII. NOTE: This step is extremely important to protect your clients’ information.

12. Click Report to see the report in real time, or click Schedule Report to have the report run automatically at a later time.

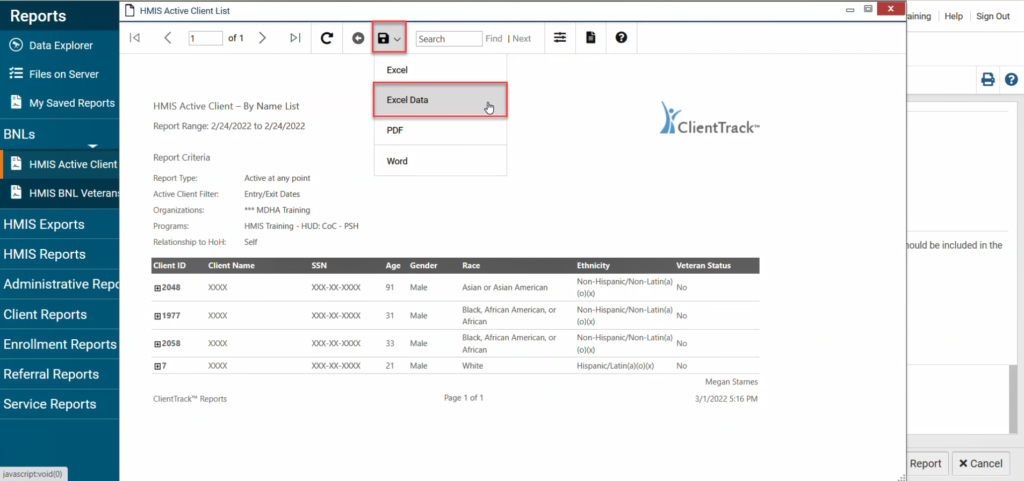
In addition to using this report to create a BNL for the PIT/HIC, housing programs can use this report to easily analyze Housing Move-In Dates for clients in their program, without having to queue and wait on an APR or CAPER.
To filter for Housing Move-In Date:
1. Save the report using the Excel Data option.
2. Open the Excel document and add filters to the header row (row 1).
3. Filter column Y, MoveInDate according to which clients you want to view.
Use this method for any of the columns in the report to only view clients with certain criteria.
Language and information taken from HMIS guides created by ICA: Active Client List Report Guide.
1. Log in to ClientTrack and navigate to your Reports workspace.

2. In the menu, click HMIS Exports, then choose CSV – APR FY[20XX] or CSV – CAPER FY [20XX].
Note: In the naming convention of the report above, [20XX] represents the most recently published HUD reporting standards i.e. 2026. HUD updates this report format regularly. Currently, the FY 2026 format is being used.


3. Complete the Date Range that you’d like to run the report for. Use the dropdown to select a range, or type a custom date range into the boxes provided.

4. Confirm that the organization selected is your organization.

5. Filter the report by program and select the program you are running the report for. For submitting the report to Sage, only 1 program should be selected.

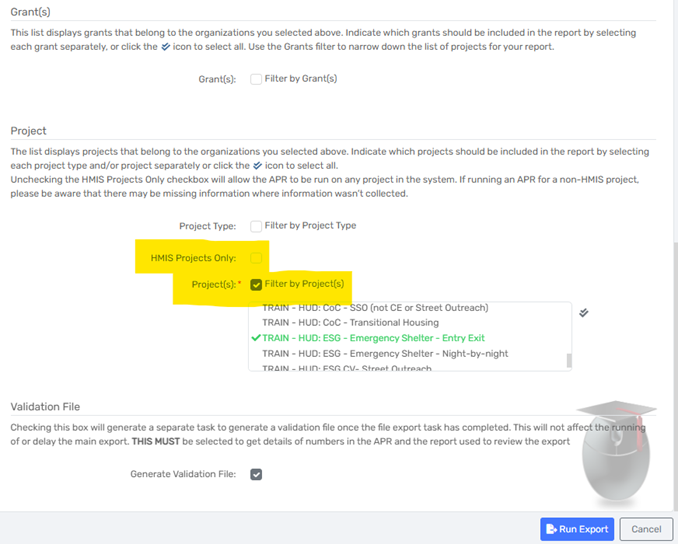
6. If you need client-level data, under Validation File, check the box next to “Generate Validation File”. This will queue a report in the Files on Server that contains client-level data.

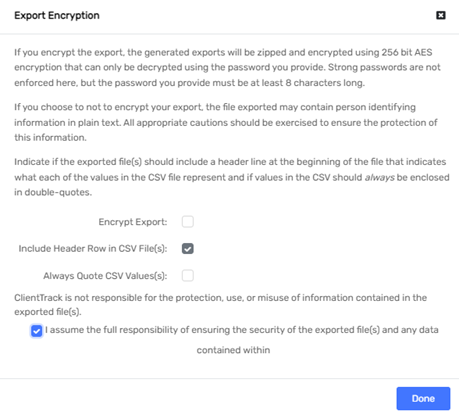
7. Click Run Export. Note that if you chose to create a validation file, ClientTrack will ask you to either password protect the document, or accept full responsibility for the safety of the file if you uncheck the encryption box. Choose one of these options, then click Done.


8. You will receive a notification that ClientTrack will being processing your report soon. Click OK.

9. You will be taken the Files on Server page. You can also access this page any time through the menu. Your report will display here when it is ready. While you are waiting on the report to run, you can view its status in the Task List by clicking “Click to view”.

First, you will see a pre-load file. Then you will see the export file once the pre-load file has run. If you chose to run a validation file, you will see that as well.

11. When the report has run, from the Files on Server page, use the button with the green arrow to download the file. The export file is what is imported to Sage. The validation file is what can be used to get client-level data for internal reporting purposes.

In your web browser, go to sagehmis.info. You can use this page to test your reports and get a formatted PDF version of the report. Or, you can log in to submit the report if that is part of your responsibilities. Sage will prompt you to choose either APR or CAPER depending on which report you need to upload.

These reports are run almost identically. In fact, in ClientTrack it can be hard to tell them apart at times. The main difference in the APR and CAPER is that the CAPER only displays clients with a Date of Engagement and Current Living Situation recorded.
This guide lists the questions included in the APR and could be helpful to determine if the APR will meet your specific reporting needs.
Download document:

Each of the sections below is a part of the basic APR. An APR is required for certain program types but can be useful for any program as it contains several helpful and commonly sought data points. Please use the list below to determine if the APR could be useful for your specific reporting needs.
Tip: You can use CTRL + F on your keyboard to search this page for a certain data element.
Q4. HMIS Project Information
Q5. Report Validations
Q6. Data Quality
Q7. Persons Served
Q8. Households Served
Q9. Contacts and Engagement
Q10. Gender
Q11. Age
Q12. Race & Ethnicity
Q13. Physical and Mental Health Conditions
Q14. Domestic Violence
Q15. Living Situation
Q16. Case Income – Ranges
Q17. Cash Income – Sources
Q18. Client Cash Income Category
Q19. Cash Income Changes Over Time
Q20. Non Cash Benefits
Q21. Health Insurance
Q22. Length of Participation
Q23. Exit Destination
Q24. Targeted Questions
Q25. Veterans
Q26. Chronic Homelessness
Q27. Youth
Q28. Bed & Unit Inventory and Utilization
Q29. Financial Information
Q30. Additional Comments
This report is a canned report with HMIS and allows you to easily report on how many clients are enrolled into a program.
The report displays the following data points:
1. Login to ClientTrack and navigate to your Reports Workspace. Click the Enrollment Reports tab in the menu on the left and select Clients in Programs.

2. Select the Date Range, Report Type from Run Report By section and the Program(s) according to your reporting needs. The other fields on this form are optional and could be useful.


3. Click on the Report button at the bottom right corner of the page to retrieve the report.

4. Review your report. Click on the positive sign to view client level details of the report. You can also export the report using the options at the top of the screen.

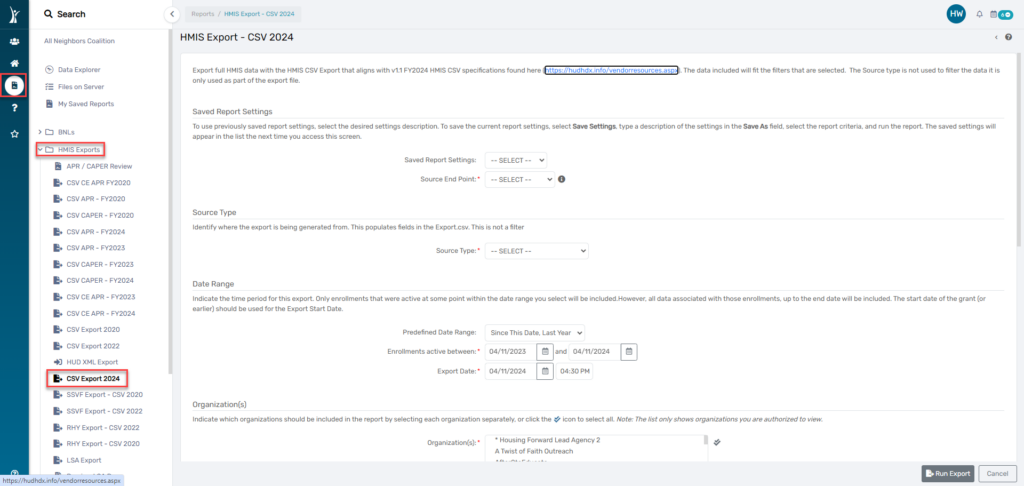
Beginning in October 2023, ClientTrack has released a new CSV Export 2024. Users needing to generate a CSV Export for any purposes, should go directly to the CSV Export 2024 report launch form.
Users will be need to utilize the filters outlined below in order to correctly generate a CSV Export. Additional filters may be applied, including selecting specific Program(s) and Grant(s).
Users can access the CSV Export 2024 by navigating to the Reports Workspace. Clicking on HMIS Exports and then CSV Export 2024:
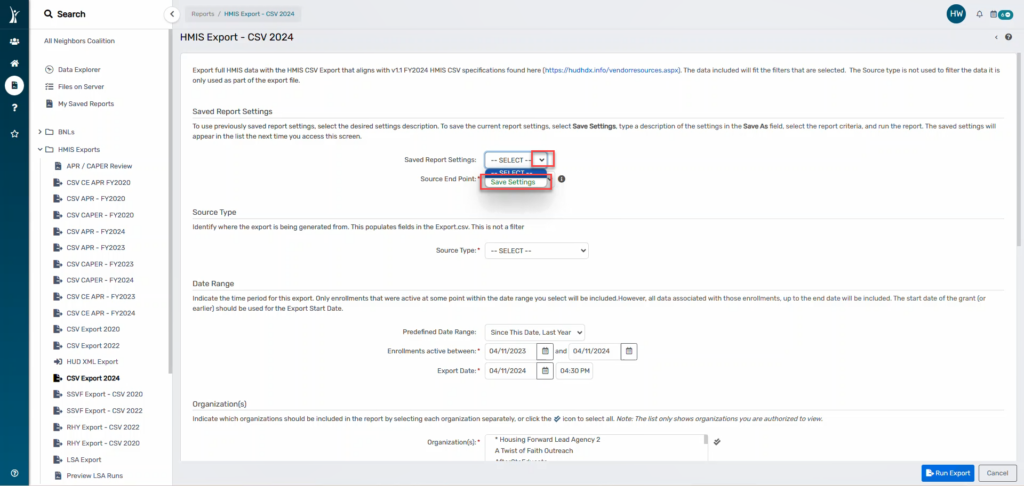
Saved Report Settings can be set up by a user as they apply filters, choose projects or grants, and select the date ranges. Users can reuse these saved settings in the future to generate another report without needing to reapply the same parameters manually.
To use previously saved report settings, select the desired settings description. To save the current report settings, select Save Settings.
Type a description of the settings in the Save As field.
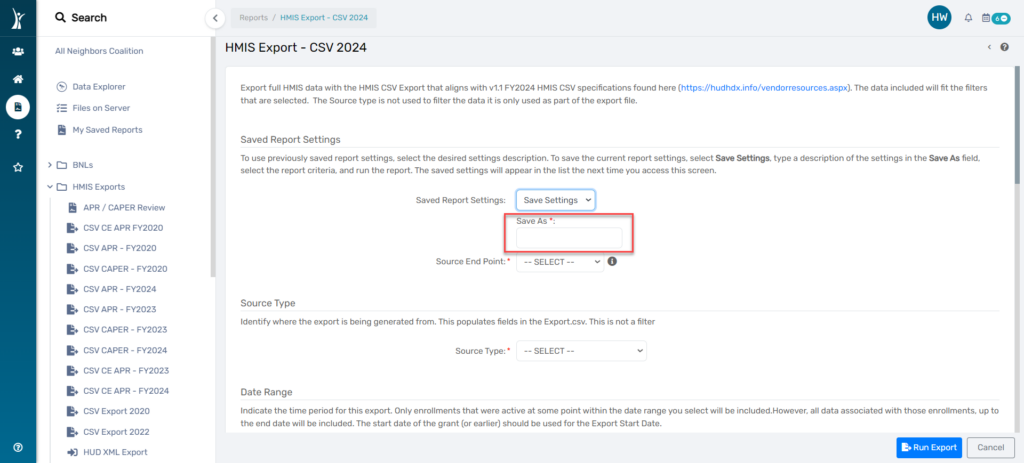
Select the report criteria, and run the report.
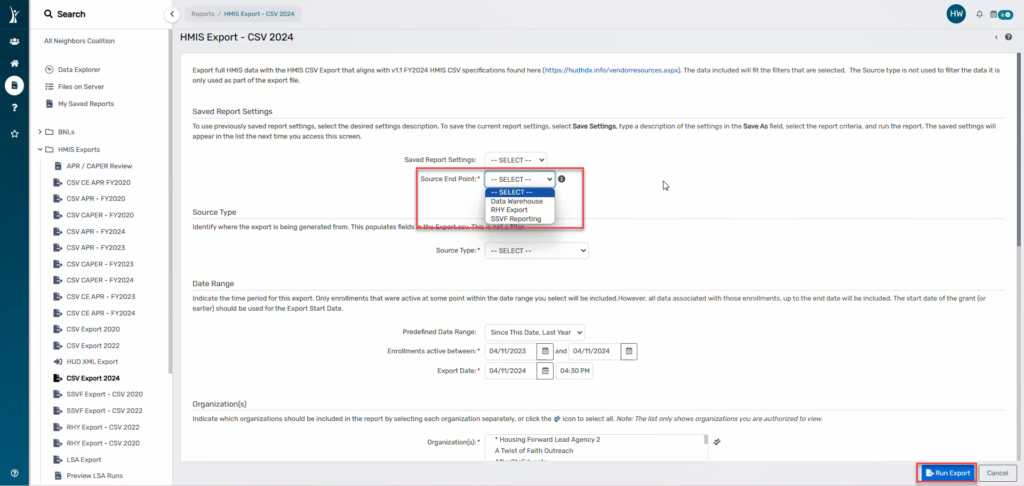
The saved settings will appear in the list the next time you access this screen.
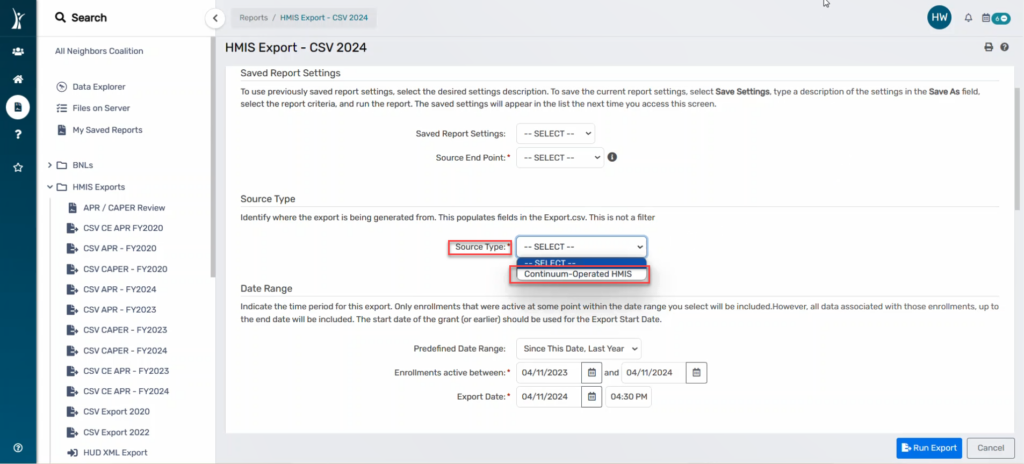
The Source Type is not a filter but is required before generating a CSV Export. According to the FY2024 CSV Specifications, this field identifies the type of source database that the data is exported from.
Select Continuum-Operated HMIS.
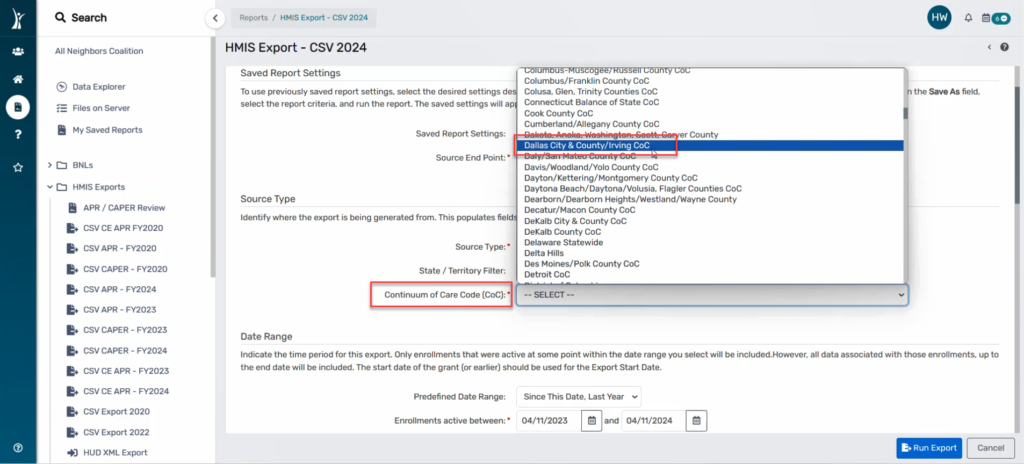
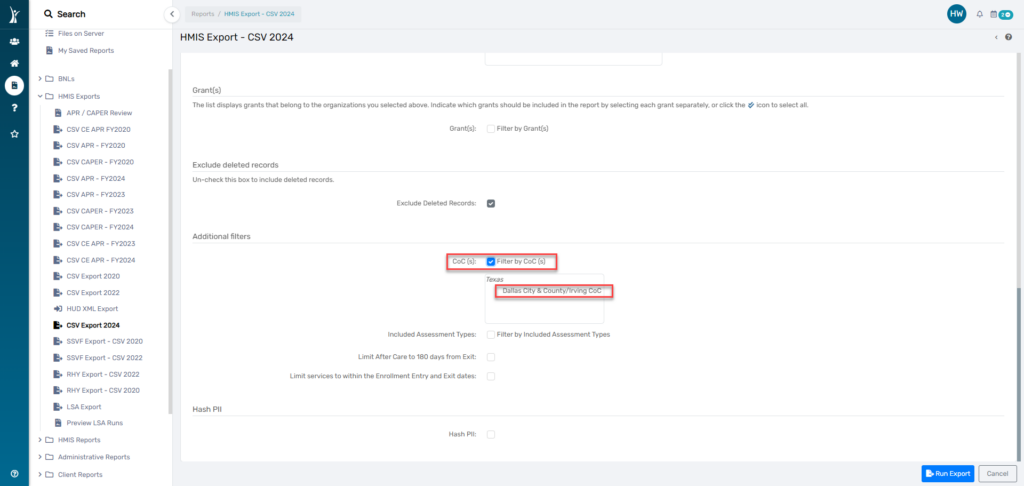
Select Dallas City & County/Irving CoC as the Continuum of Care Code (CoC):
The Date Range filter can be used to filter the enrollments that were active at some point during the date range selected.
There are several pre-defined date ranges to choose from in the “Predefined Date Range” field:
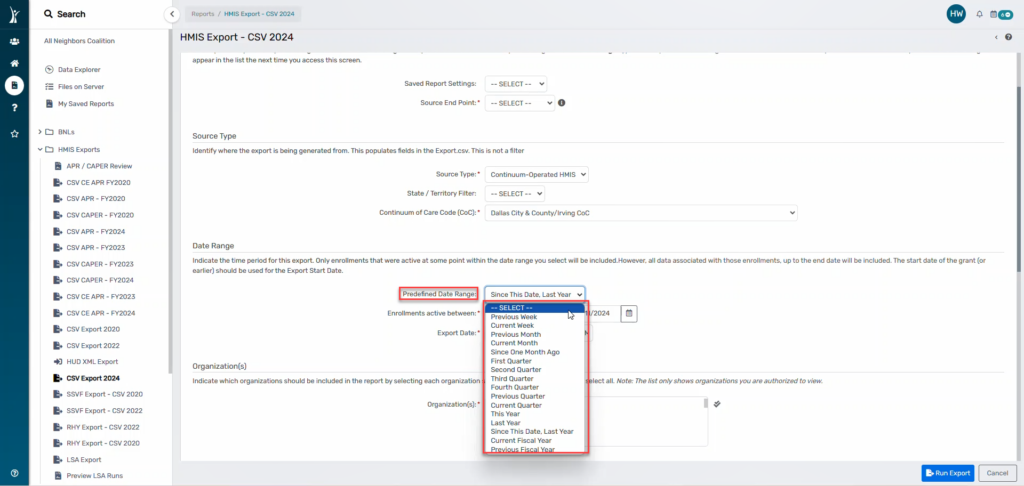
Users may manually update the date range for the export by entering start and end dates in the “Enrollments active between” field:
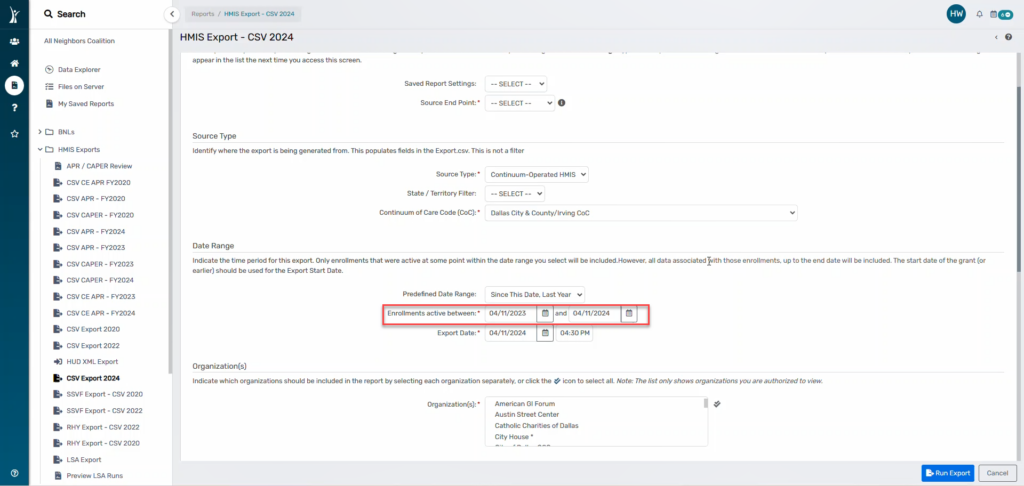
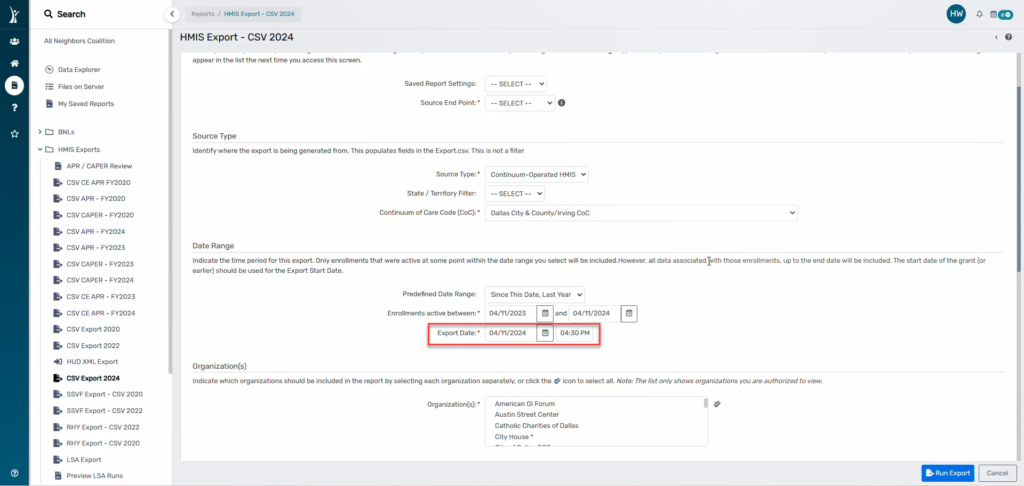
The start date of the grant should be entered for the “Export Date” :
The Organization filter is a required field before generating an export.
Choose your organization by selecting the name of your organization:
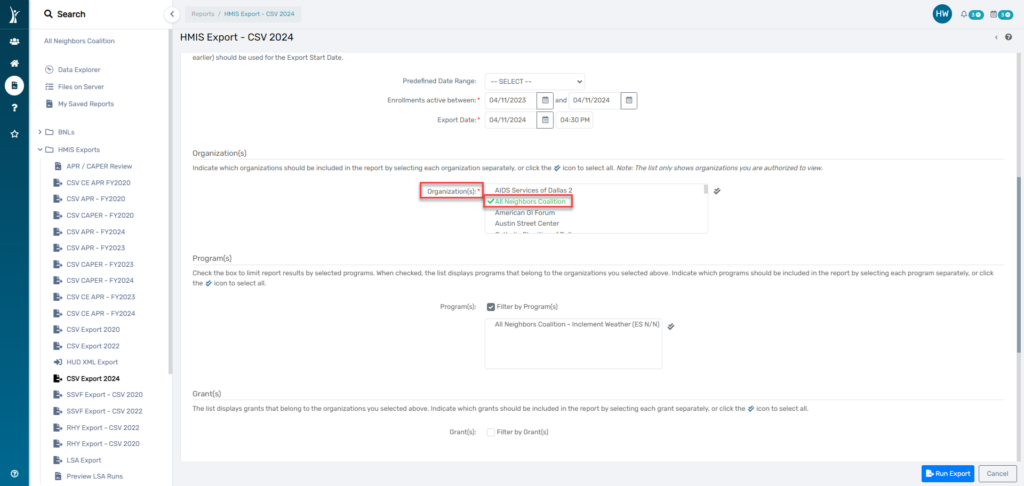
The Program(s) filter may be used to restrict the export records to only include applicable records within the program(s) selected. This field is not required and users may select any and all applicable projects.
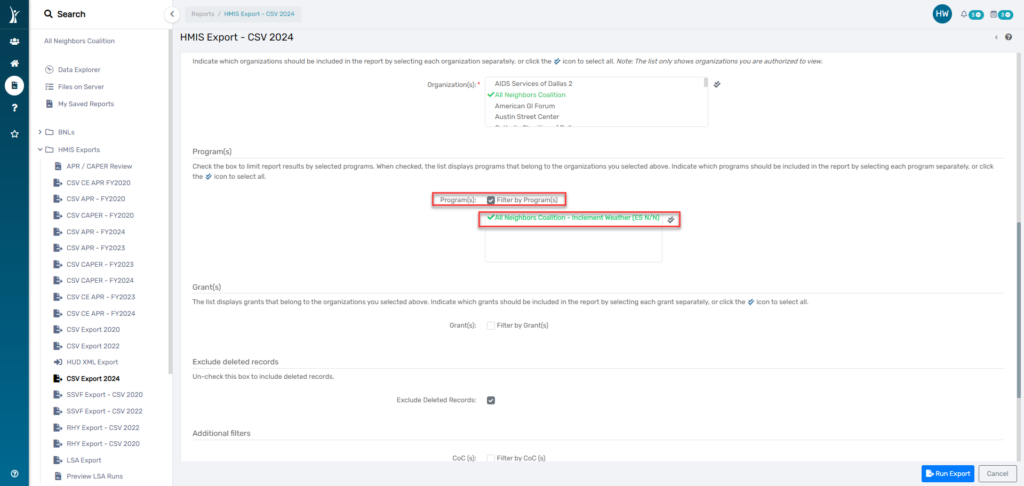
The Grant(s) filter may be used to restrict the export records to only include applicable records within the grant(s) selected. This field is not required and users may select any and all applicable grants.
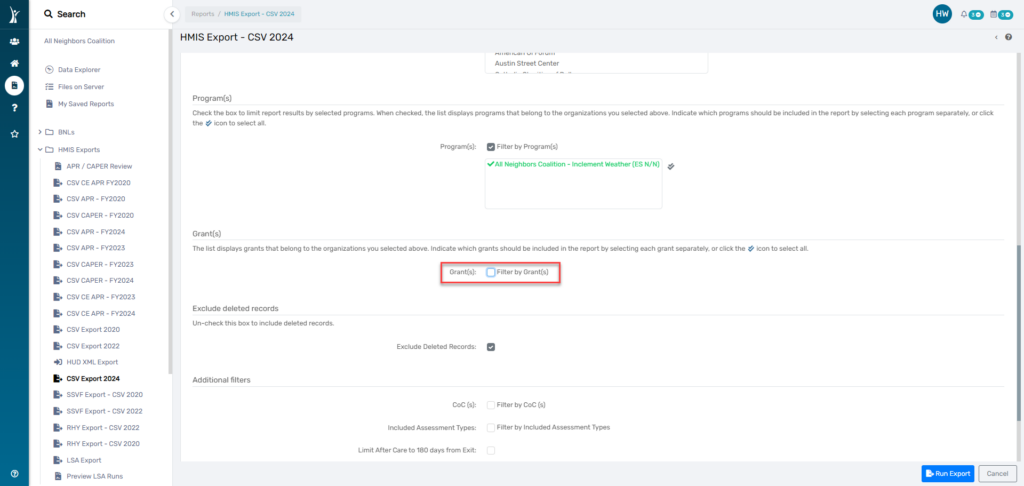
The list will only display grants that belong to the organizations you selected above.
This filter will exclude any deleted records from the export. Deleted records may include, but are not limited to deleted programs, deleted enrollments, and deleted client records. This filter is set to default as ‘Exclude Deleted Records’. If a user would like to include the deleted records, they may uncheck this filter and generate the export.
It is highly recommended to continue to exclude deleted records when generating a CSV Export.
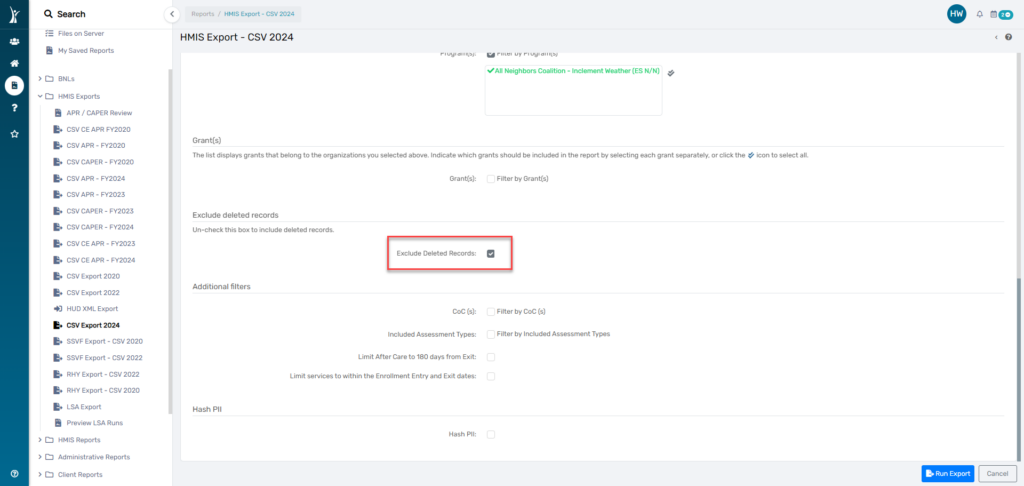
This filter is not required, but when selected, allows users to filter the records included in the CSV Export to only include records associated with the CoC selected. The CoC selected must match the Enrollment CoC in the clients Universal Data Assessment at entry and/or the Program CoC for project setup.
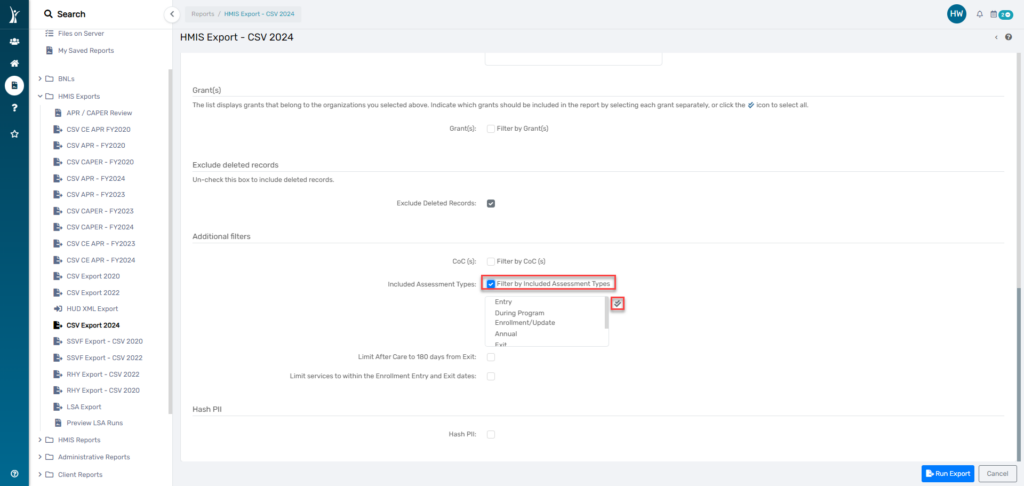
This filter is not required, but when selected, allows users to filter the records included in the CSV Export to only records associated with the specific Assessment Types selected. These Assessment Types include Entry, During Program, Enrollment/Update, Annual, Exit, Post Exit/Follow Up and Other.
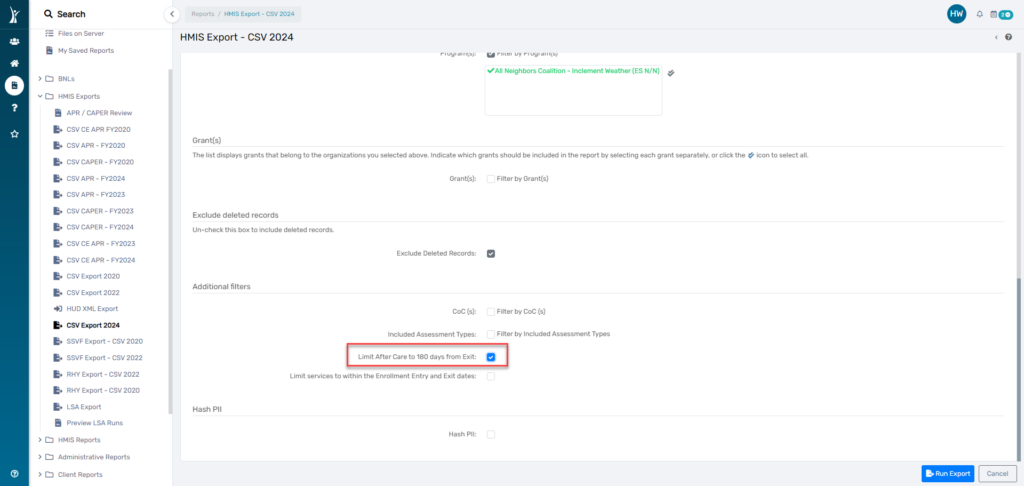
This filter is not required, but when selected, allows users to filter the records to exclude any After Care assessments collected outside of the 180 day timeframe defined by HUD.
This filter is not required, but users generating a CSV Export for a RHY Export or a YHDP Supplemental Report should select this filter.
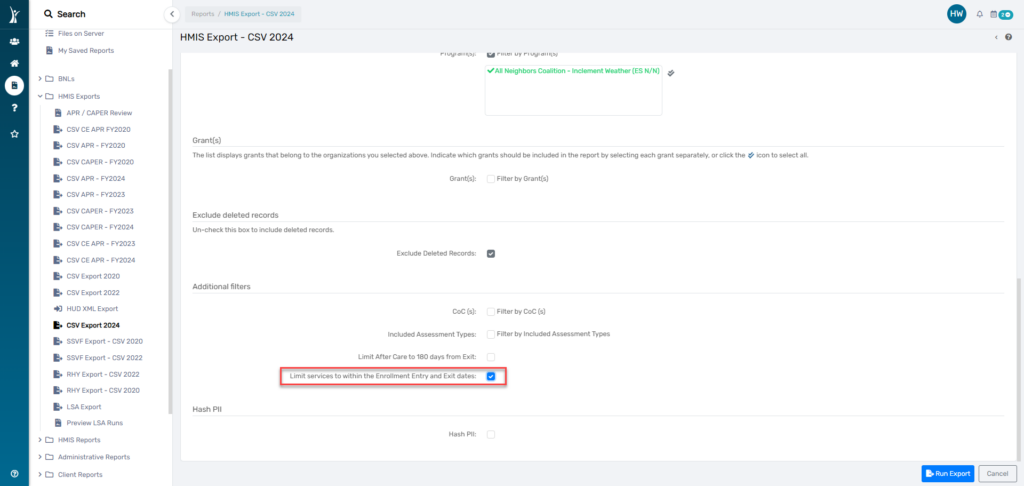
This filter allows users to filter the export to exclude any services that are provided to a client outside of the Enrollment Entry and Exit dates.
This filter is not required, but users generating a CSV Export for an official HUD purpose, including the SSVF Export, RHY Export, YHDP Supplemental Report, should select this filter.
This filter will apply the HUD defined Hash algorithm to the Personally Identified Information (PII) included in the CSV Export.
This filter is not required, but users generating a CSV Export for a RHY Export, a YHDP Supplemental Report will need to select this filter to generate a Hashed CSV Export.


2. Under the “HMIS Reports” dropdown, select “HMIS Data Entry Timing Report”

3. On the reporting screen: select Date Range, Type, Organization, and Program(s)


Note: The “Programs” field is multi-select!
4. Once the required information is captured, select “Report“

If the reports are running in the background, you’ll see the notifications below.


5. When the report is ready, you will see something like the one below. By clicking on the plus signs, you will be able to see client-level data.

6. To save the report, select the “Save” icon and choose “Excel“. This will save the report in the same formatting you are seeing it in ClientTrack!

Download document:
Users can access the HMIS Data Entry Timing Report by navigating to the Reports Workspace. Clicking on HMIS Reports and then HMIS Data Entry Timing Report:

Select a Date Range:

Select the appropriate Type for your agency’s needs:

Select the Program(s):

Other Filter Options:
When checked the grant filter displays grants that belong to the organization and program you selected above:

Select “Report” to run the report:


The HMIS Data Standards require that each client with an active enrollment of at least 1 year receives an Annual Assessment. The Annual Assessment is due within a 60-day window of the anniversary of the client’s project start date in the program (i.e. the day the Entry Assessment/Intake was completed). This 60-day window starts 30-days before the anniversary date and extends 30-days after the anniversary date.
Programs can determine if any Annual Assessments were missed using the steps detailed below. This process uses the current APR to view Annual Assessment data.
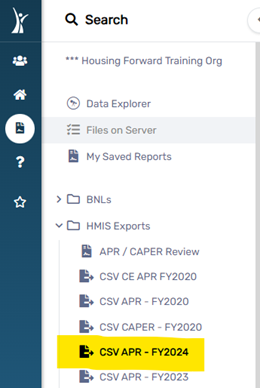
1. Log into ClientTrack and navigate to the Reports Workspace. Under HMIS Exports, select the most current CSV APR. At the time this article is being written, the most current APR is FY2024. Please confirm that you are selecting the correct report, which may be different than what is shown here.
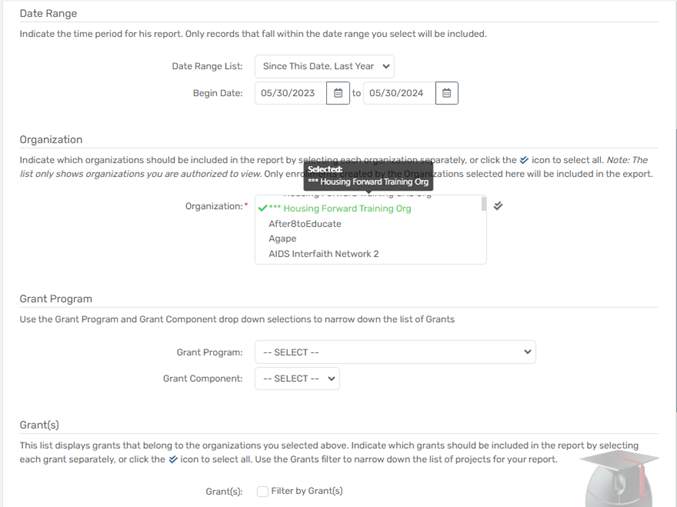
2. Complete the basic report parameters as follows.
3. Projects: Deselect “HMIS Projects Only”. Check the box to “Filter by Project(s)“, then select the Projects you wish to see. This is a multi-select and will allow you to run the report for several programs at once.
4. Click Run Export.
5. Confirm your security/encryption method. Our team recommends the following selections.
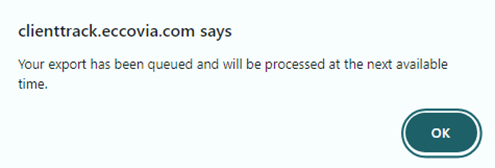
You should receive a pop-up confirming that the report is queued. Select “OK” to close this pop-up. Your report will display on the Files on Server page when it is finished processing.
1. From the Files on Server page of the Reports workspace, Download the “Validation” ZIP folder.
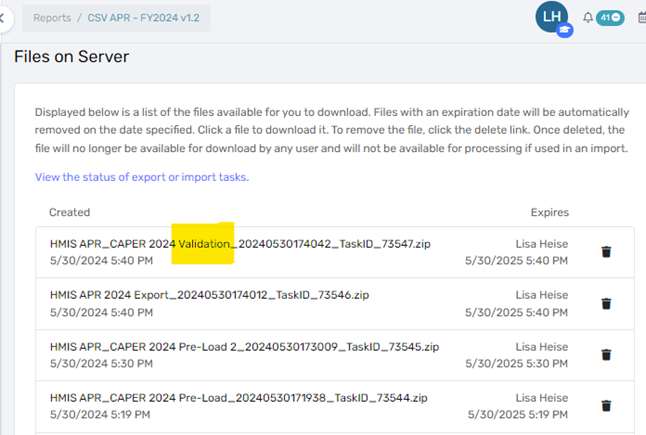
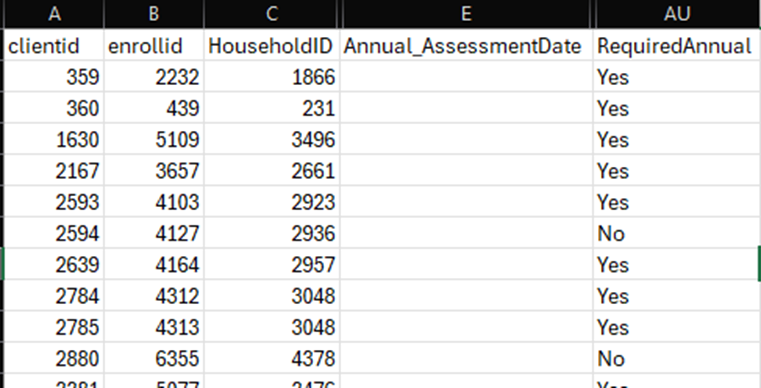
2. On your device, open the downloaded ZIP folder and select the “APR_20XX_Annual_Detail” file.
3. In the Annual Detail File, these columns will help determine Annual Assessment data
Column AU – Required Annual answers “Is an Annual Assessment needed for this client?”
Once you use the report to determine which clients have missing Annual Assessments, take these steps to record the missing assessments for each client.
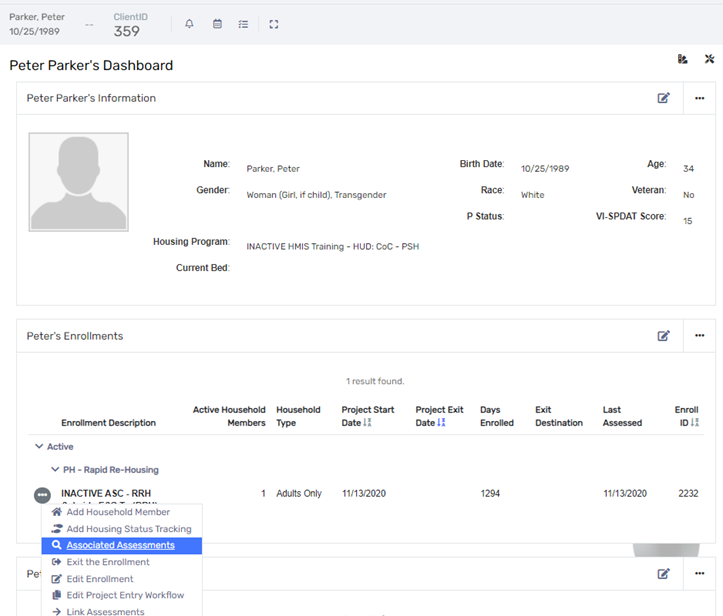
1. Log into ClientTrack and navigate to the Clients Dashboard. You can use the Client ID from the report to easily search for the correct client.
2. In the Enrollments section of the dashboard, find the relevant program enrollment. Click the Action menu (three dots) next to the relevant program enrollment, then select Associated Assessments.
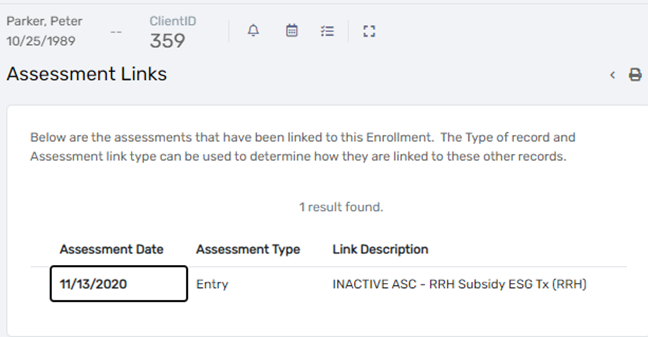
3. Find the Entry Assessment and note the Assessment Date. Based on the current date, determine how many missing Annual Assessments need to be recorded.
4. Record each missing Annual Assessment following the appropriate steps to backdate each assessment so that it falls within the 60-day window. If you need assistance completing an Annual Assessment, see our guide for Annual Assessments: https://housingforwardntx.org/docs/update-annual-assessments
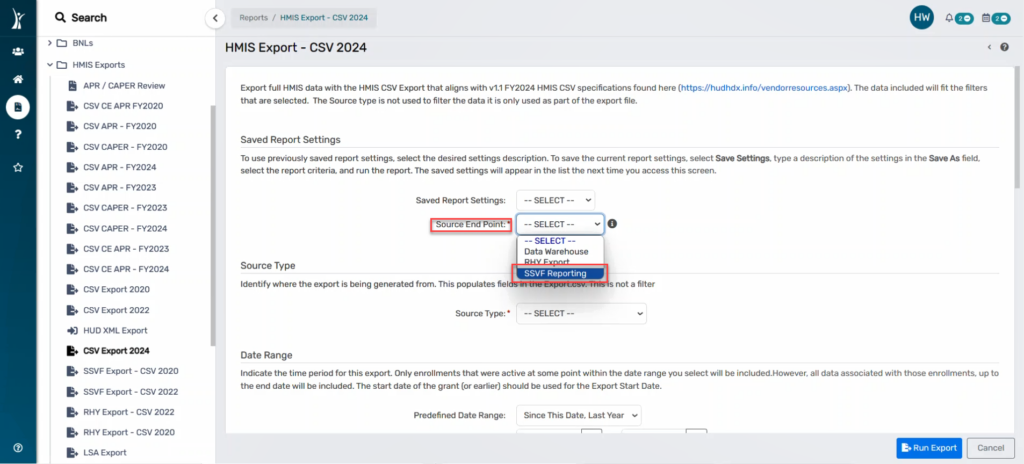
Beginning in October 2023, ClientTrack has integrated the RHY Export into the overarching CSV Export 2024. Users needing to generate a CSV Export for RHY and/or YHDP purposes should go directly to the CSV Export 2024 report launch form.
Users will be need to select the filters outlined below in order to correctly generate a RHY CSV Export. Additional filters may be applied, including selecting specific Program(s) and Grant(s).
Users can access the CSV Export 2024 by navigating to the Reports Workspace. Clicking on HMIS Exports and then CSV Export 2024. In the Source End Point field select RHY Export.

The Source Type is not a filter but is required before generating a CSV Export. According to the FY2024 CSV Specifications, this field identifies the type of source database that the data is exported from.
Select Continuum-Operated HMIS.
Select Dallas City & County/Irving CoC as the Continuum of Care Code (CoC):
The Date Range filter can be used to filter the enrollments that were active at some point during the date range selected.
There are several pre-defined date ranges to choose from in the “Predefined Date Range” field:
Users may manually update the date range for the export by entering start and end dates in the “Enrollments active between” field:
The start date of the grant should be entered for the “Export Date” :
The Organization filter is a required field before generating an export.
Choose your organization by selecting the name of your organization:
This filter will exclude any deleted records from the export. Deleted records may include, but are not limited to deleted programs, deleted enrollments, and deleted client records. This filter is set to default as ‘Exclude Deleted Records’. If a user would like to include the deleted records, they may uncheck this filter and generate the export.
It is highly recommended to continue to exclude deleted records when generating a CSV Export.
This filter is not required, but when selected, allows users to filter the records to exclude any After Care assessments collected outside of the 180 day timeframe defined by HUD.
This filter is required for users generating a RHY Export.
This filter allows users to filter the export to exclude any services that are provided to a client outside of the Enrollment Entry and Exit dates.
This filter is not required, but users generating a CSV Export for an official HUD purpose, including the SSVF Export, RHY Export, YHDP Supplemental Report, should select this filter.
This filter will apply the HUD defined Hash algorithm to the Personally Identified Information (PII) included in the CSV Export.
This filter is not required, but users generating a CSV Export for a RHY Export, a YHDP Supplemental Report will need to select this filter to generate a Hashed CSV Export.
Additional guidance for timelines and requirements for the RHY Export can be found in the RHY-HMIS Program Manual.
This cheat sheet reviews the save settings for most ClientTrack Canned (pre-built) reports. Almost all reports in the Reports Workspace (excluding the Data Explorer) will have these save file options after being run.
1. After running the report, click the Save button on the report in ClientTrack.
2. Choose your desired format from the file format options. Most reports will have the option for:
3. Once you select your file format, the file will download onto your device. Your device settings will determine where the file is saved on your device (most often this is a Downloads folder), and whether or not the file opens automatically after being downloaded. Contact your internal IT department if you have any difficulty locating your downloaded file.
Format Recommendations
Tips
Occasionally, users have technical difficult when viewing Excel Data downloads, as the .xml file format open differently than a typical .xls (Excel) file. HMIS Team members have found the following steps helpful in resolving this error. However, if you follow these steps and continue have issues opening your .xml file, please contact your internal IT department for assistance.
1. Open MS Excel and click File – Open
2. Browse to the location that has the .xml file saved, and click Open to open the file.
3. A pop up with 3 options should display. Select As an XML table radio button.
4. This opens and displays the .xml file as an Excel table.
Beginning in October 2023, ClientTrack has integrated the SSVF Export into the overarching CSV Export 2024. Users needing to generate a CSV Export for SSVF purposes should go directly to the CSV Export 2024 report launch form.
Users will need to utilize the filters outlined below in order to correctly generate an SSVF CSV Export. Additional filters may be applied, including selecting specific Program(s) and Grant(s).
Users can access the SSVF Export 2024 by navigating to the Reports Workspace. Clicking on HMIS Exports and then CSV Export 2024:
In the Source End Point field select SSVF Export.
The Source Type is not a filter but is required before generating a CSV Export. According to the FY2024 CSV Specifications, this field identifies the type of source database that the data is exported from.
Select Continuum-Operated HMIS.
Select Dallas City & County/Irving CoC as the Continuum of Care Code (CoC):
The Date Range filter can be used to filter the enrollments that were active at some point during the date range selected.
There are several pre-defined date ranges to choose from in the “Predefined Date Range” field:
Users may manually update the date range for the export by entering start and end dates in the “Enrollments active between” field:
The start date of the grant should be entered for the “Export Date” :
The Organization filter is a required field before generating an export.
Choose your organization by selecting the name of your organization:
The list will only display grants that belong to the organizations you selected above.
This filter will exclude any deleted records from the export. Deleted records may include, but are not limited to deleted programs, deleted enrollments, and deleted client records. This filter is set to default as ‘Exclude Deleted Records’. If a user would like to include the deleted records, they may uncheck this filter and generate the export.
It is highly recommended to continue to exclude deleted records when generating a CSV Export.
This filter is not required, but when selected, allows users to filter the records to exclude any After Care assessments collected outside of the 180 day timeframe defined by HUD.
This filter allows users to filter the export to exclude any services that are provided to a client outside of the Enrollment Entry and Exit dates.
This filter is required, for users pulling a SSVF Export.
This filter will apply the HUD defined Hash algorithm to the Personally Identified Information (PII) included in the CSV Export.
Additional guidance for timelines and requirements for the SSVF Export can be found in the SSVF FY24 Data Guide.
This report is a custom report that is built in Data Explorer which allows you to easily report on how often users at your agency are logging into ClientTrack.
The report will display the following data points:
• Active Status
• User ID
• User Name
• Email
• Organization Last Logged on to
• User Created Date
• Last Login Date
• Workgroup Last Logged in to
1. Log in to ClientTrack and navigate to your Reports Workspace.
2. In the menu, select Data Explorer.

3. Uncheck “Only show my questions”.

4. Search for “User Tracker” and select that query.

5. Under “Which records do you want to include?” change the organization to your agency.

6. Click “Show Me” then use the export button in the top right corner of the report to export your report.

Download document:
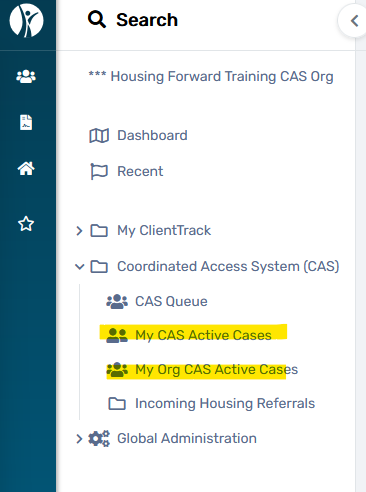
Two forms have been created for use as a CAS Case Management Tool. Both are located in the Home Workspace under Coordinated Access System (CAS) and provide information for case managers to manage their CAS case load through the CAS process.
This page automatically displays the CAS case load for the user that is logged in. ClientTrack automatically assigns the user completing the CAS & Diversion intake assessment as the “active case manager” on a client’s CAS enrollment. Users can change the assigned active case manager using these instructions.
On the My CAS Active Cases page, users can filter and sort the results using the fields at the top of the screen. The following information will display for each case:
This page allows the user to filter active CAS cases to view all active cases assigned to users at their Access Point organization (for all organizations they can access in ClientTrack).
This page functions in the same manner as the My CAS Active Cases page, and displays the following information:
Program Managers and team leaders can use this page to review CAS active cases assigned to members of their teams, to assist in caseload management and coordination.