Thanks for your patience while we get this content on the webpage. Until then, download the document below to view it on your device!
Download document:

Case-Manager-Assignment-Cheat-Sheet.pdf
Every HMIS user in ClientTrack is assigned “Case Manager” access, regardless of their role or job title at their agency. The assigned case manager inside ClientTrack is the HMIS user assigned to that client’s enrollment in a given program. A client can have multiple case managers assigned to their enrollment(s).
The case manager is automatically assigned to the HMIS user completing the intake (entry/enrollment) assessment for a client.
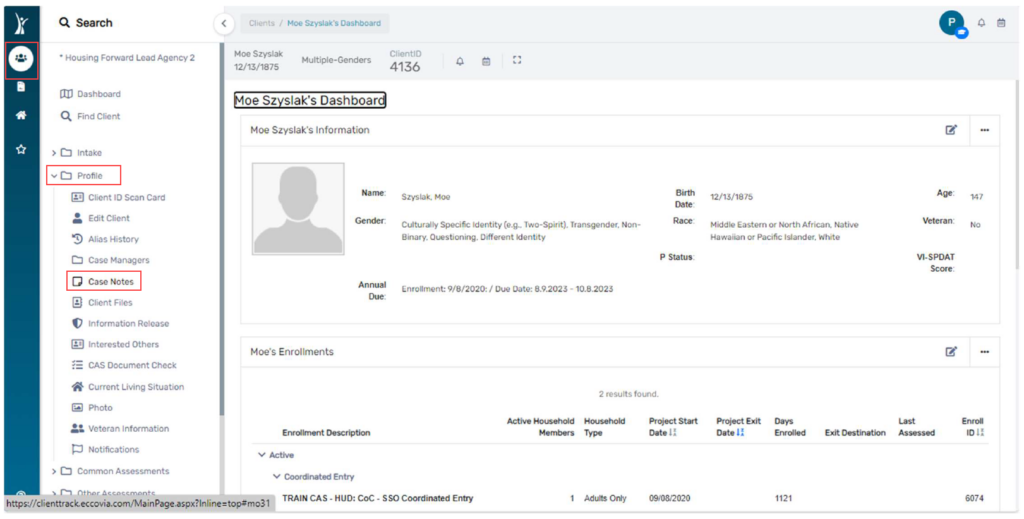
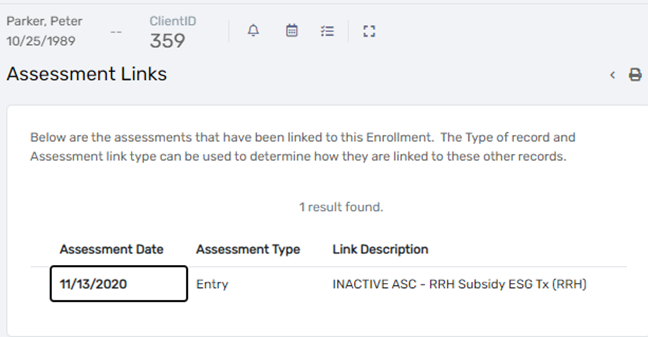
Locate the neighbor using Find Client, once on the client’s dashboard select Profile and then Case Managers.
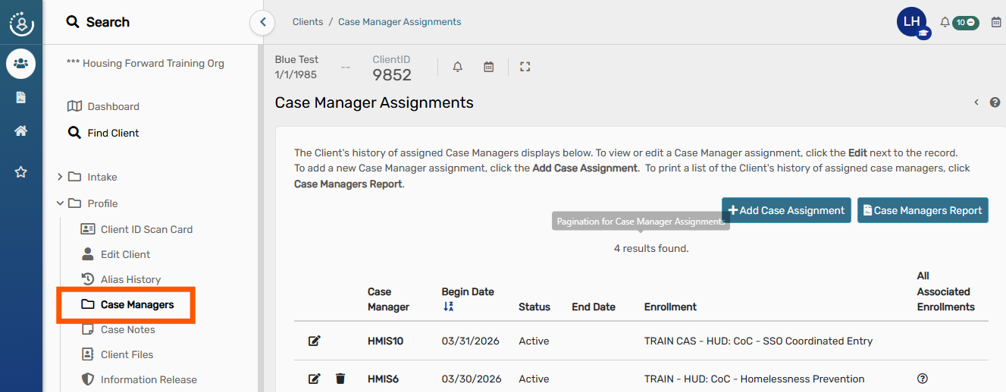
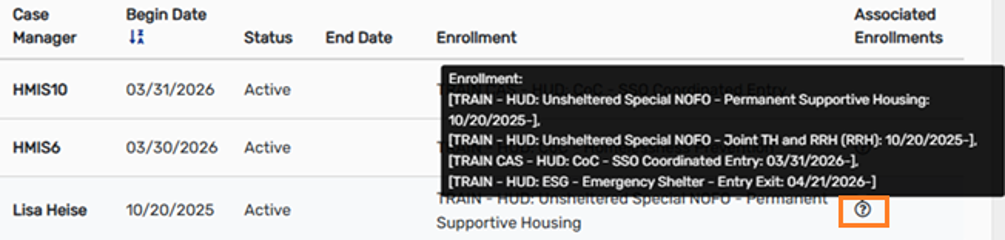
Case manager assignments are grouped.
By hovering over the question mark, one can see all the active assignments.
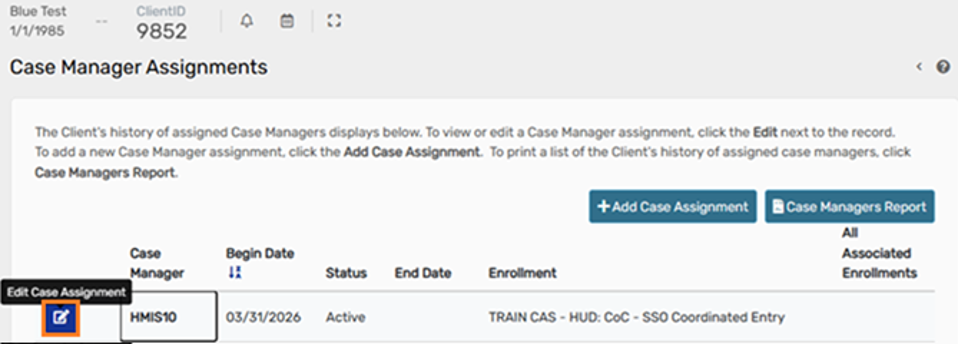
On the Case Manager Assignments page, select “Edit Case Assignment” next to the previous case manager for the enrollment.
Add an End Date for the assignment, and set the Status to “Inactive”
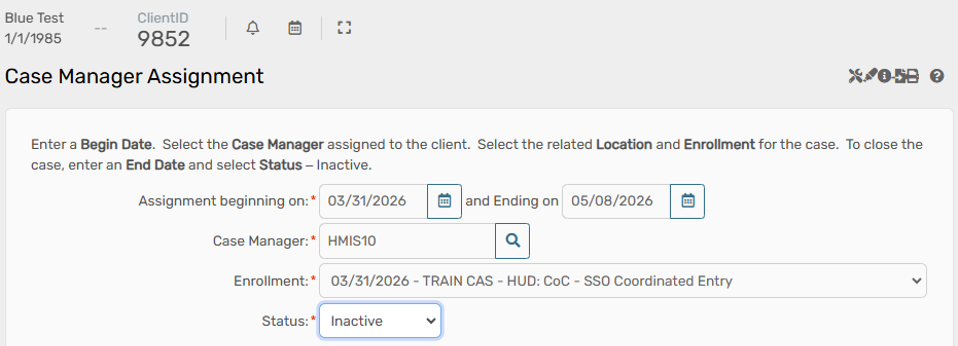
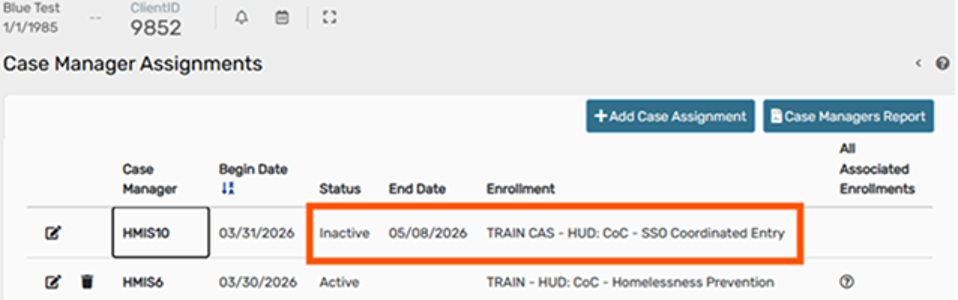
Now the assignment shows that the case manager is inactive on the date selected.
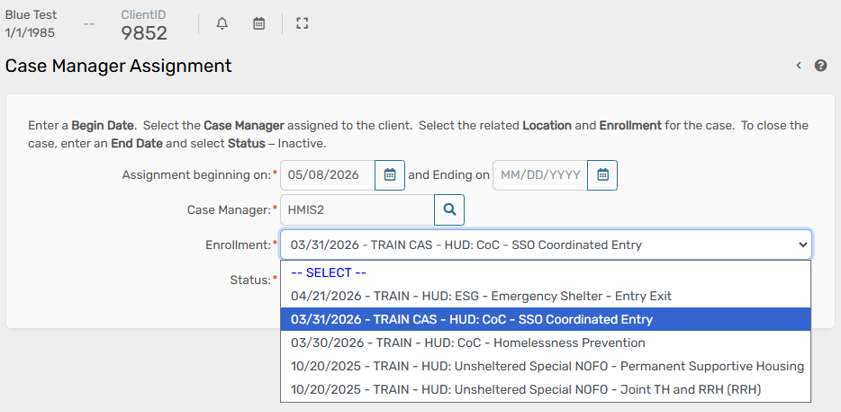
To add the new case manager, select “Add Case Assignment”.

Select the Start Date, Case Manager’s Name, the appropriate Enrollment and set the Status to Active for the assignment.
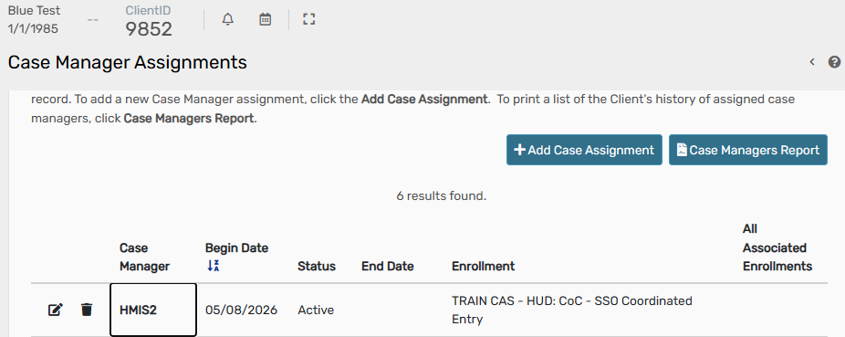
Once you select Save you will see the updated Case Manager Assignment.
On the neighbor’s dashboard under the Enrollments section, locate the enrollment for your project, edit the project entry workflow via the three dots.
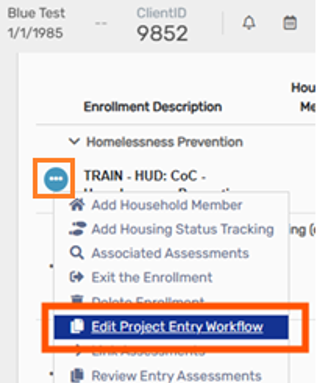
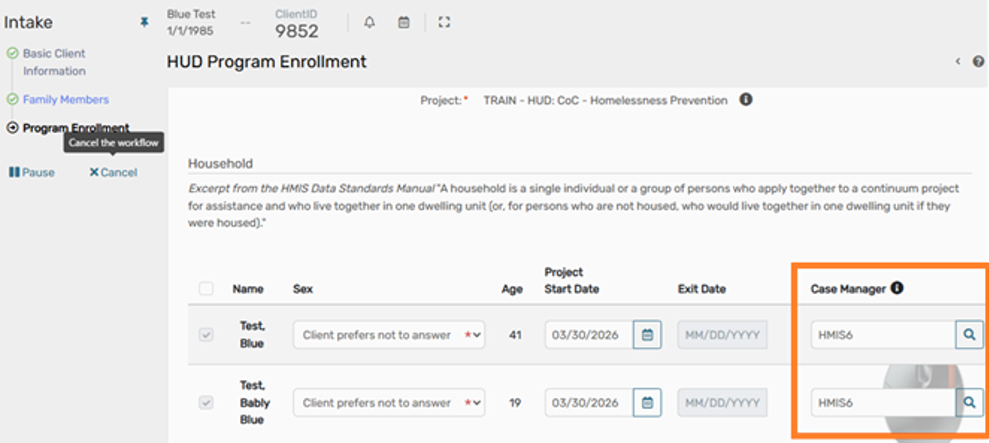
Continue through the workflow to the HUD Program Enrollment page and select the search button for the Case Manager assignment(s) you wish to change.
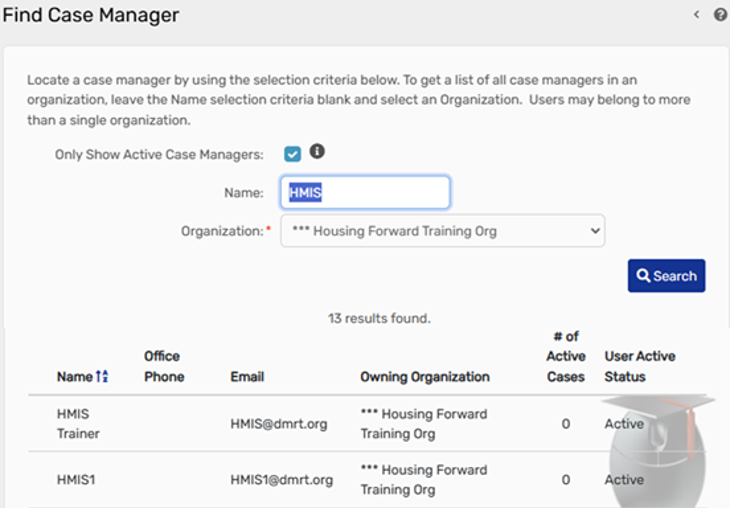
Search for the Case Manager by inputting their name.
Select the Case Manager you wish to assign to the enrollment.
Once the new Case Manager is selected, you will see the update on the HUD Program Enrollment page.
Select “Save” and continue through the workflow.

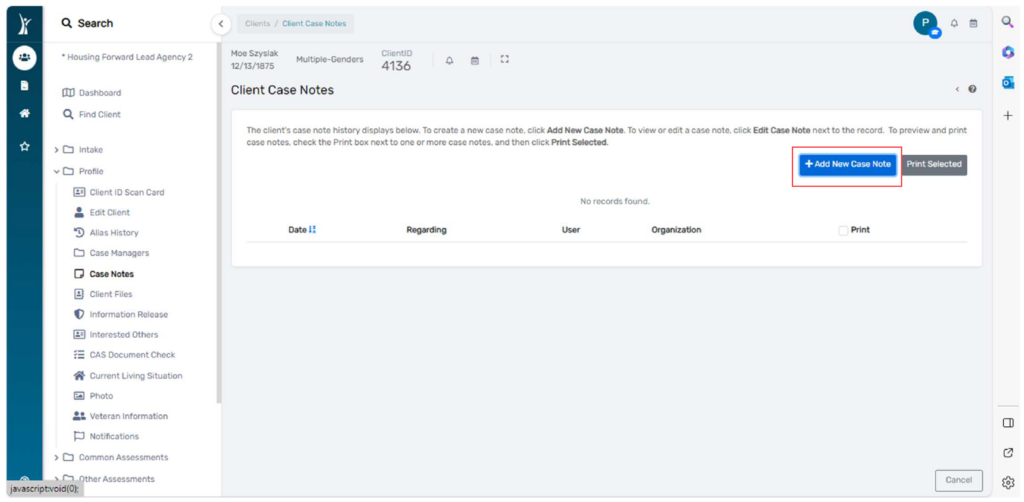
1. Begin on your Client Workspace and find the client you would like to record the Case Note for in the system.
2. From the Clients workspace, Select Profile from the menu on the left and then Case Notes from the submenu:
3. On the Case Notes page, click the Add New Case Note button.
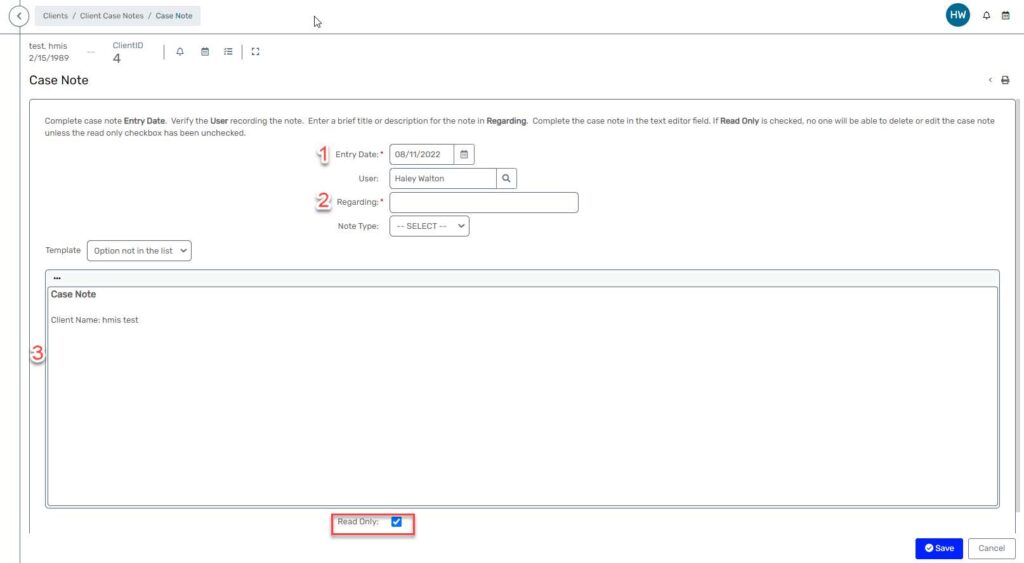
4. Enter a date (1) and a title (2) for the case note. Record your case note (3). Be sure to check the Read Only box (4) to make the case note printable and unable to be edited by others. If a case note should be removed, be sure to uncheck the “Read Only” box.
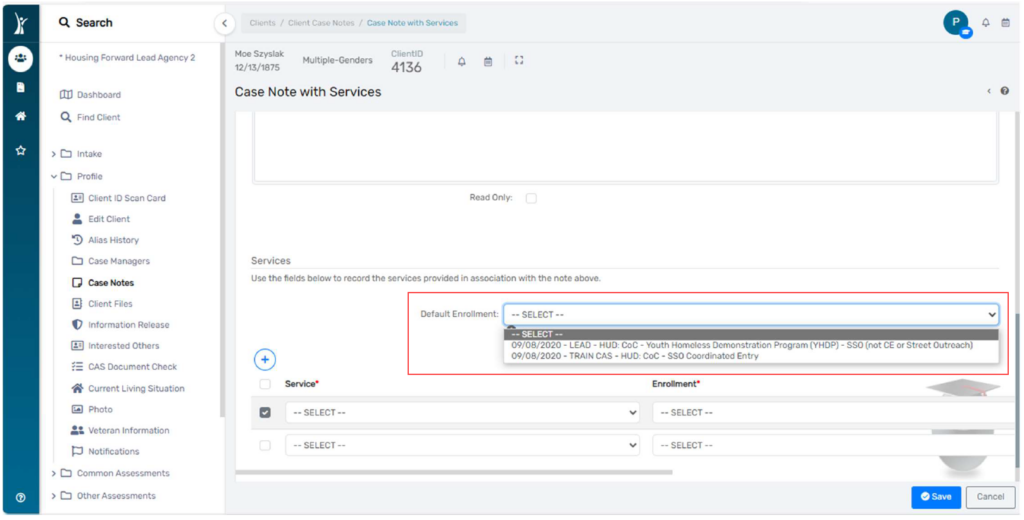
5. Enter service information and the enrollment to which you’d like this case note to
attach. If you want to default the enrollment fields to a specific enrollment, select that enrollment in the Default Enrollment field before adding service information:
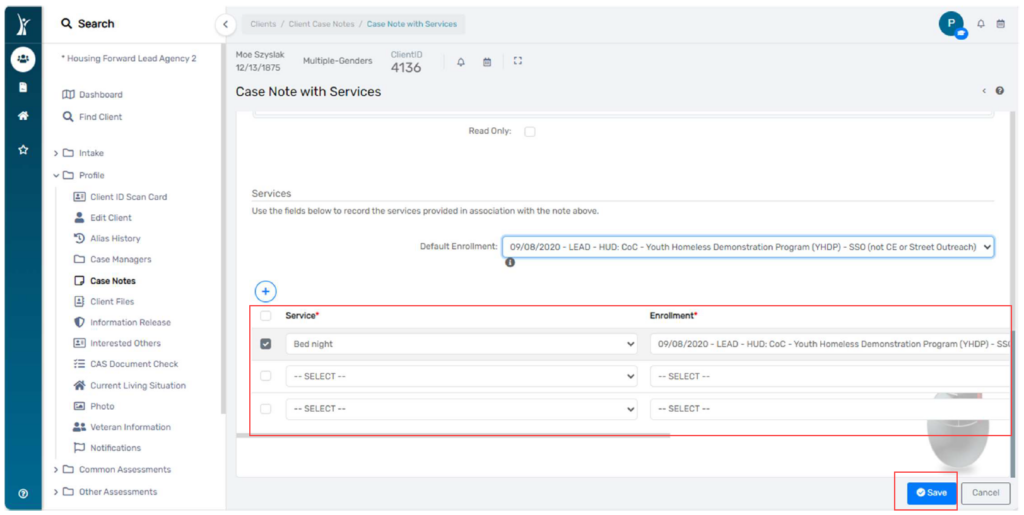
6. Select your services from the drop-down fields below. Click Save when you are done:
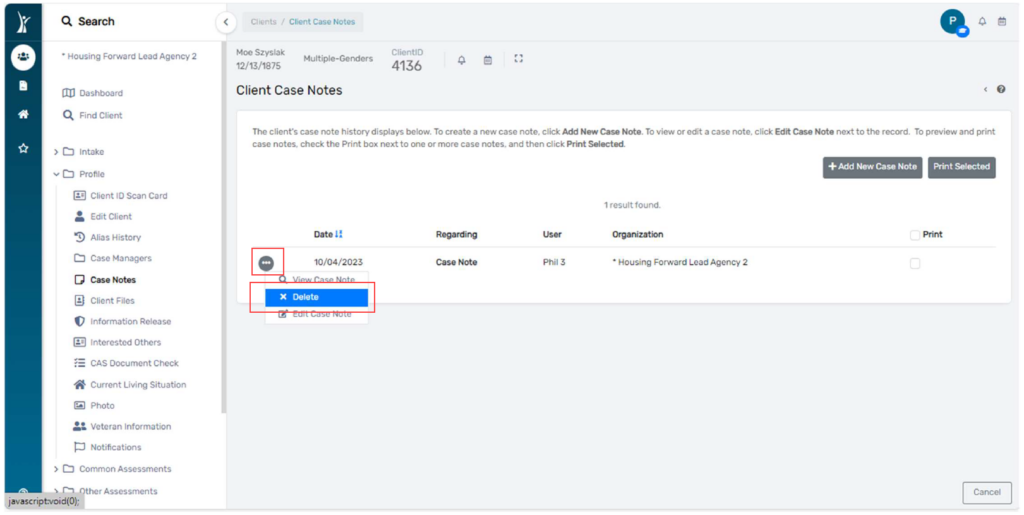
2. In the pop-up window, select from the drop-down “Delete” and click Save.
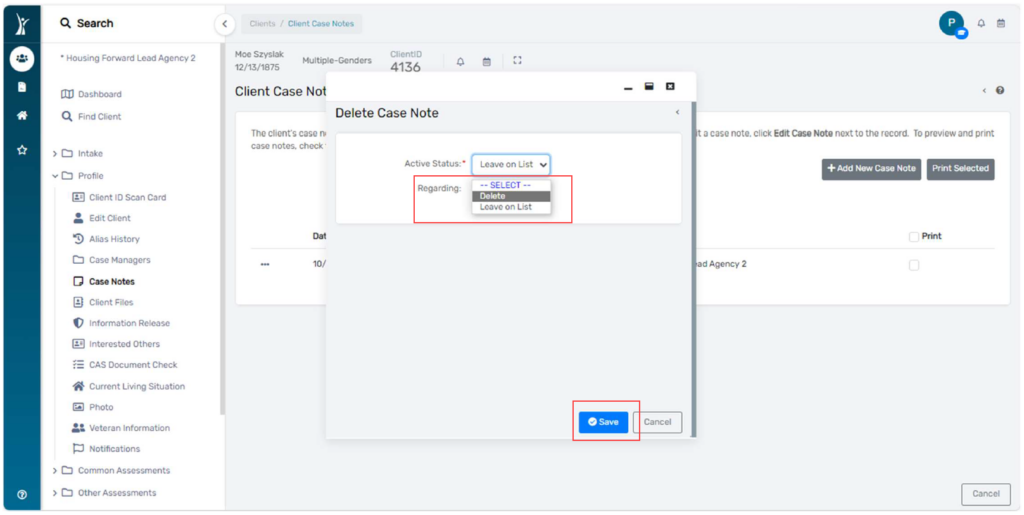
3. Click the “x” at the top right to close this pop-up window:

The Client Files feature functions as a system-wide digital file cabinet for items related to an individual client. Documents saved on the Client Files feature are shared in the same way as enrollment records, meaning other organizations will be able to access files you place on the client’s record using Client Files.
It can be extremely helpful to our clients to upload identification documents to Client Files. It is hard to keep track of these documents and they are required for several types of services and interventions. Using ClientTrack to help clients manage their documents is an easy way for us to take advantage of the system to provide additional support to our neighbors!
NOTE: NEVER upload CAS documentation to Client Files, especially verification of disability or any document containing HIPAA sensitive information, such as a diagnosis. Use Document Check for these types of documents and file.
1. Log in to ClientTrack and navigate to your Clients Workspace.

2. Find your client by searching using their name or client ID.
![]()
3. On the Favorites Menu, under Profile, select Client Files.

4. The Client Files page displays all files currently uploaded for this client. Use the Add File button to upload a new file. If you prefer, you can use the Grid view to view the documents in a list format and sort them using the filters on the screen.

5. Click Choose File to select a file from your computer to upload into HMIS. The Document Name will default to the same of the file you select, but you may change it by typing in a new Document Name. When you are ready, click Save.

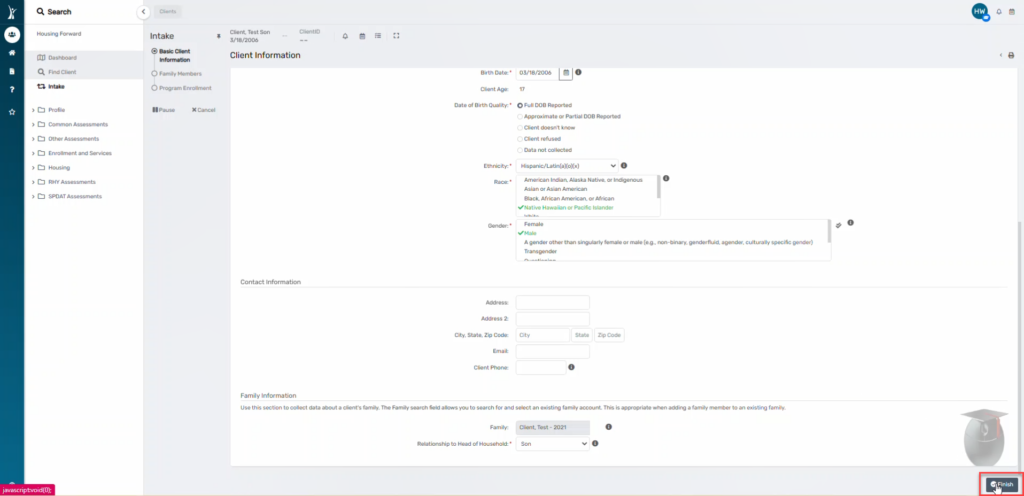
You can use these steps to edit a client’s basic information that appears at the top of their Client Dashboard and their identifying information such as date of birth or SSN.
Use these steps to add or correct information such as:
Do NOT use this page to correct Relationship to Head of Household or Veteran Status. Although these fields are editable from this page, this data is directly tied to program enrollments and should be edited from a workflow to avoid errors and ensure all of the required data for Head of Households and Family Members is collected.
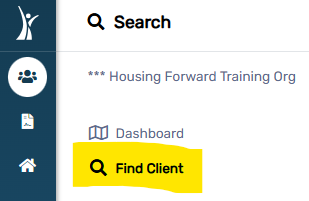
1. Navigate to your Clients Workspace.

2. Find your client using the Search or Find Client.
3. From your client’s Dashboard, click the edit button in the Client Information section.

OR
In the workspace menu, click Profile then Edit Client.

4. Make the necessary edits to the client’s information, then click Finish to save the page.

Interested Others: Others who might have an interest in the client’s situation.?
A client would add this information to their account to keep someone in the loop on their status.

3. Select “Add New Interested Other”

4. Add Type/Description of Interested Other

Relationship of Interested Other to Client and if they are aware of the client’s situation is not required


6. Add Contact Information for the Interested Other

7. Click “Save“

To Edit the information, select the Edit button on the far left of the name:

This document will show the steps in creating a client user in HMIS (Client Track).
1. Search for the Client
2. Search by name
Enter ONLY the first 2-3 letters of the client’s first name and the first three letters of the client’s last name. This will search the system to see if the client has an existing HMIS record.
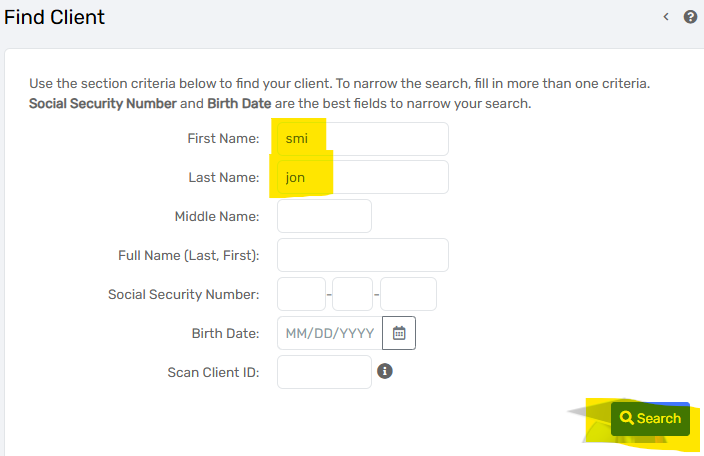
If no clients are found with that combination, the system will display “No records found.”

3. If a client isn’t found by searching for name, search by birthday or SSN.
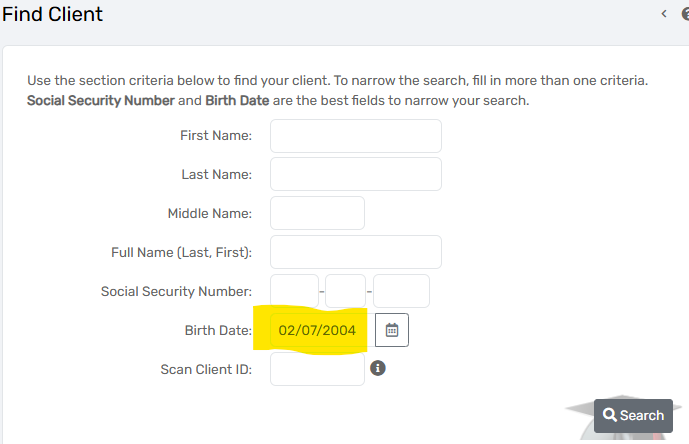
The client was found with their DOB, with a very similar name:
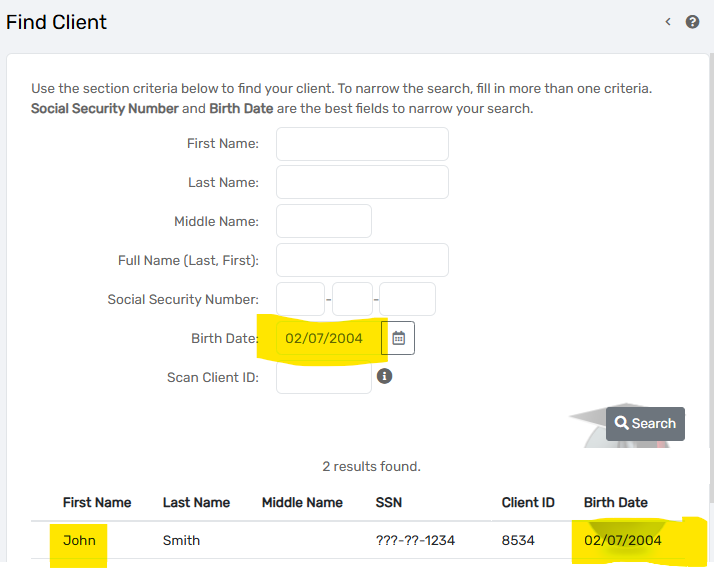
If you find duplicates, please submit a Spiceworks ticket by sending an email to help@housingforward.on.spiceworks.com with both client IDs.
If the client information is not the same, please determine which one is correct and edit the client information to match before submitting the merge of clients.


2. Notice that you have two options. You can either upload a photo by clicking “Choose File” or take a photo of the client by clicking on the camera icon.

1. Locate the file on your computer and upload it after clicking “Choose File”.
2. Click “Save”.

1. Allow ClientTrack to access your device’s camera if you have not already done so.
 2. Click the gray camera icon under the photo viewer to take a photo of your client.
3. You will have the options to “Use this image” or “Retake”. When you have a photo that you would like to use, click “Use this image”.
4. Click “Save“.
Once a client’s photo is saved, selecting “Client Photo” and then clicking the client’s photo gain will allow you to download it. Remove a photo using the “Remove Photo” button or upload a new photo using the steps listed in this cheat sheet.
Download document:
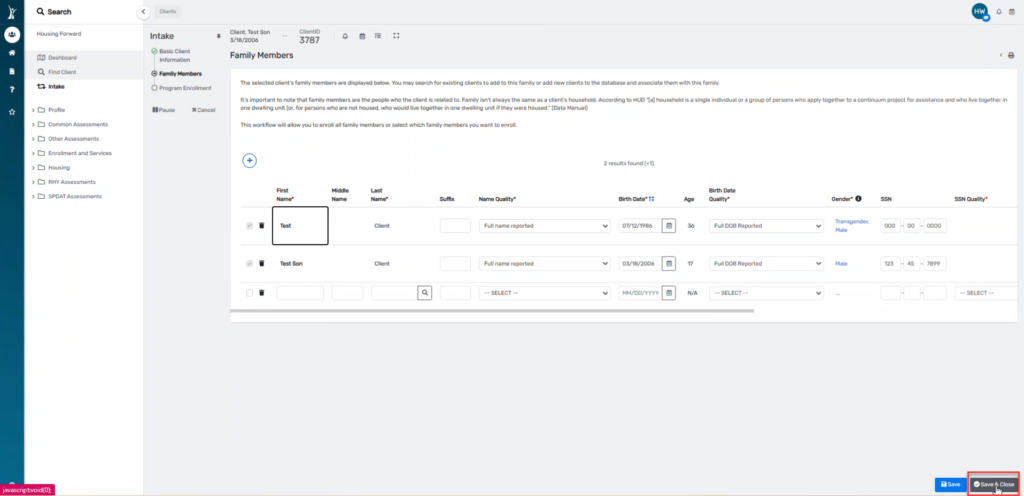
As a best practice, family members should be added to a clients’ household when the Head of Household’s (HoH) initial HMIS record is created. This occurs simultaneously with the HoH’s first intake assessment.
However, there are scenarios where a family member may need to be added to household after the initial record creation of the HoH:
Note that if the family member will be participating in your program and receiving any services, they should be added to the project enrollment with their own project start date.
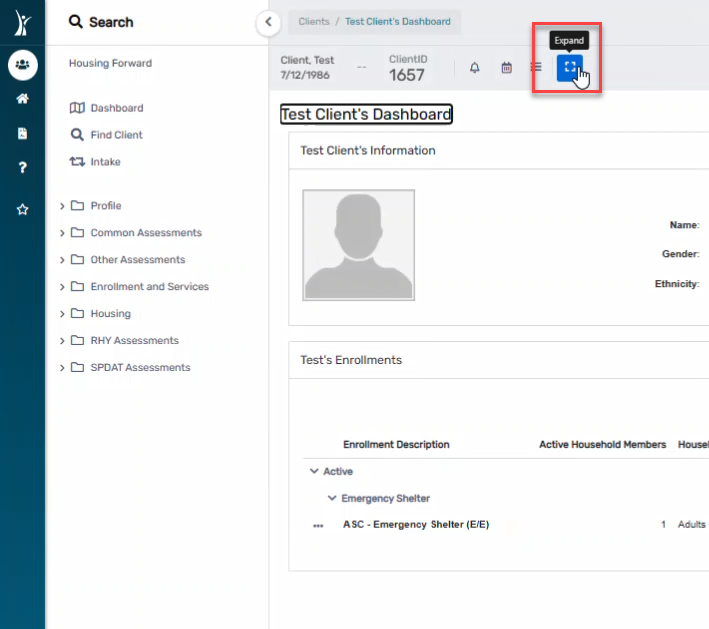
1. Log into ClientTrack and navigate to your Clients Workspace. Find your Head of Household (HoH) in the system.
2. From the HoH’s Dashboard, next to the ClientID there four icons – click on the “expand” icon (the 4th icon).

3. Click Quick Add Family Member.

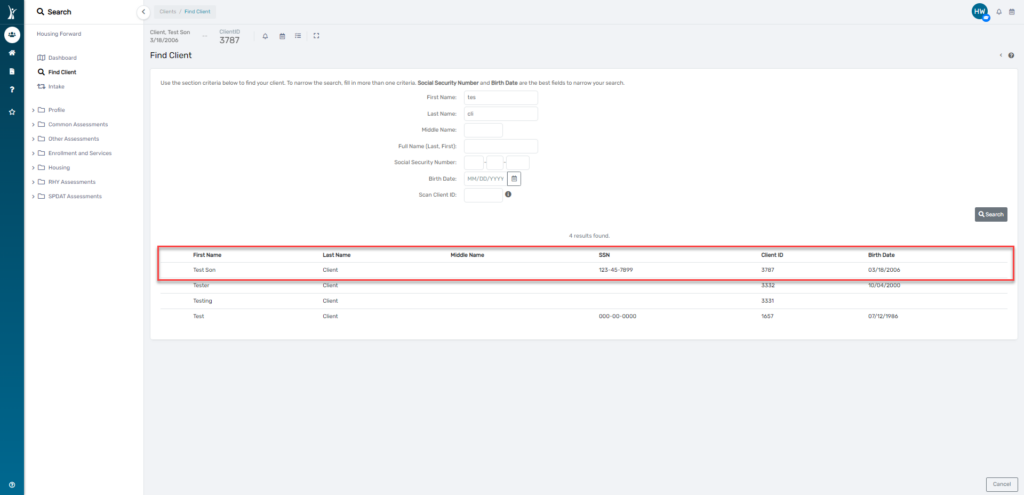
4. Search for the family member to ensure you are not creating a duplicate client, using the first 3 letters of the client’s first and last name.
5. Enter the client’s basic information, then click Finish. Be sure to complete all required fields per the HMIS Data Standards.

6. Continue to the next section of this cheat sheet to add the family member to the HoH’s existing enrollment if the new family member will be enrolling in the program or receiving services.
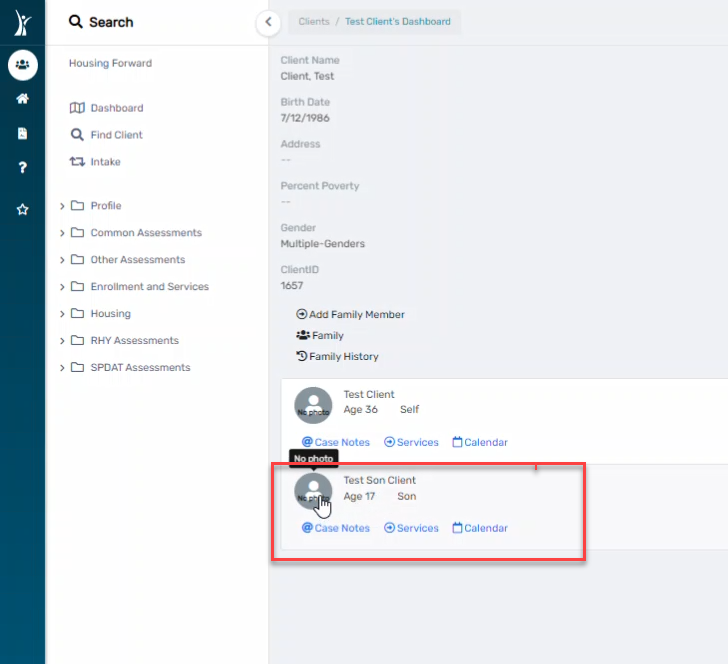
1. Navigate to the Head of Household’s (HoH) Dashboard by clicking the Household icon and selecting the Head of Household, or searching for the Head of Household using Find Client.
2. Click the action menu for the HoH’s enrollment in your program. Then click Edit Project Entry Workflow.

3. Continue through the Basic Client Information and Family Members pages, confirming all information is correct. On the HUD Program Enrollment Page, check the box next to every family member who should be enrolled in this program. You will see your new family member here and should check the box next to their name. Confirm their Project Start Date or backdate it accordingly. Then click Save.

4. Continue through the entire assessment workflow. Confirm all data entered for existing family members, using Save & Close or No Changes until you get to the new family member’s pages of the workflow. Complete all required data elements and assessment pages for the new family member.

5. Click Finish to close your workflow.

6. Confirm the family member’s enrollment in the program by navigating to their Dashboard and looking at their enrollments.

If you have incorrectly recorded a client’s Head of Household (Hoh) status, you can correct the error using an Edit to the Project Entry Workflow, or entry assessment. You will need to change the status for both the client who should be the head of household and the client who was accidentally marked as head of household in error.
The images below show where in the workflow to make these specific edits. If you are unsure how to begin an edit to the entry assessment, please see our Edit Entry Workflow cheat sheet.
It is important that this edit is done from the entry workflow, because the data standards sometimes require different questions for the head of household than they do for adult family members who are not head of household.
Finally, remember that, with very few exceptions for RHY programs, minor family members cannot be the head of household. The system will not allow you to change the head of household to a minor family member.
1. Begin the edit to the entry workflow.
2. On the Basic Client Information page, scroll down and change the Relationship to Head of Household to the correct option (not Self) for the family member who was accidentally marked as HoH. Click Finish to continue.

3. On the Family Members page, find the client who should be marked Head of Household. Scroll to the right and change Relationship to Head of Household to Self. Confirm that the client who was marked as the HoH still has the new status you edited in step 2. Click Save & Close to continue.

4. On the HUD Program Enrollment page, you will also need to change the clients’ Relationship to Head of Household to match what you recorded in steps 2 and 3. Click Save to continue.

5. You should see that the workflow progress bar has updated to list your new Head of Household first. This is one way to confirm that your changes have been saved. Continue through the rest of workflow, answering all new questions for the new head of household.
6. Complete the entire workflow and click Finish to close the workflow.
7. Next to the ClientID there four icons – click on the “expand” icon (the 4th icon) and confirm the Relationship to Head of Household is correct for all clients in the household.

To record an Entry Assessment for a client, be sure you are on the Clients Workspace.
a. Searching for the Head of HouseHold and selecting a family member.

b. Searching directly for client.
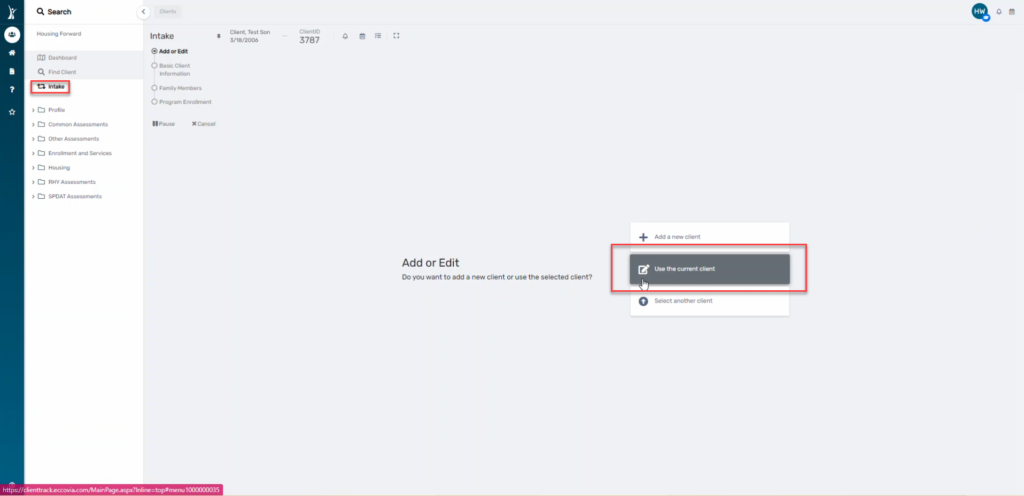
2. On the client’s dashboard, click Intake. This will start a workflow. Click “Use the Current Client”
3. Continue through the pre-populated (from creation of client) client information, confirming as you go and changing if needed.
NOTE: All family members will appear on this screen because they are currently connected. Simply save and close.
4. Select the Project for which the client will be enrolled in from the dropdown box. Check the box next to the family member you are enrolling.
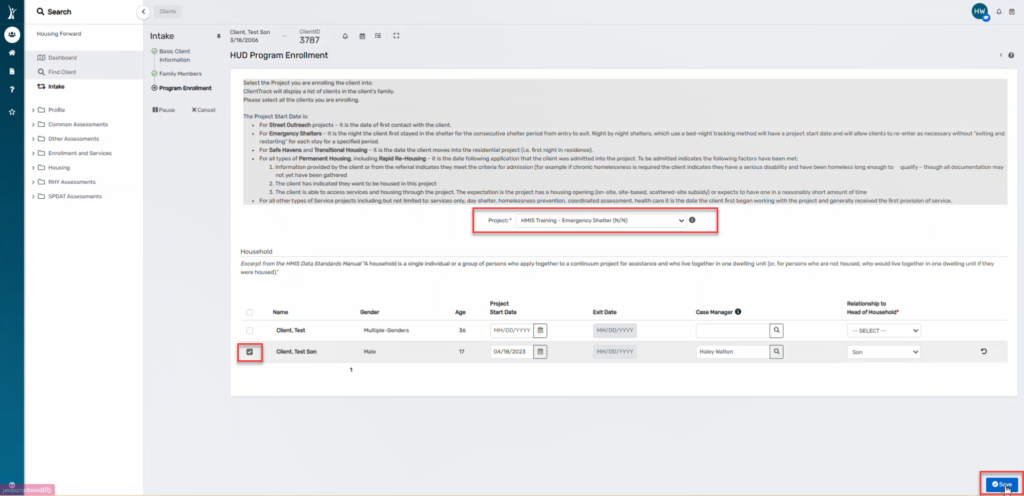
5. Record all information for the client.
6. Click Save.
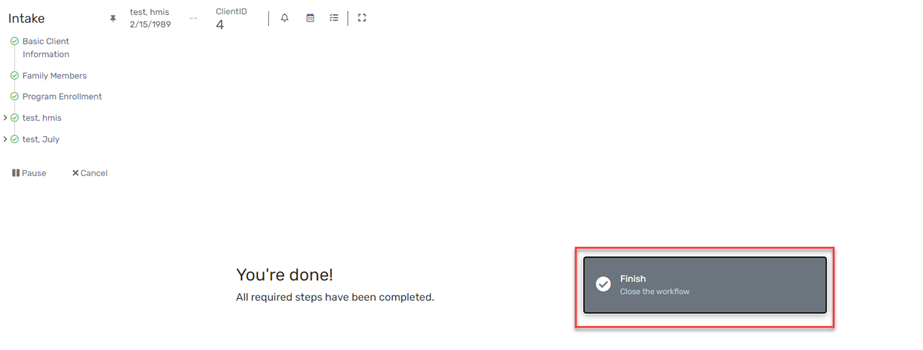
7. You will come to the end of the workflow. Click Finish.
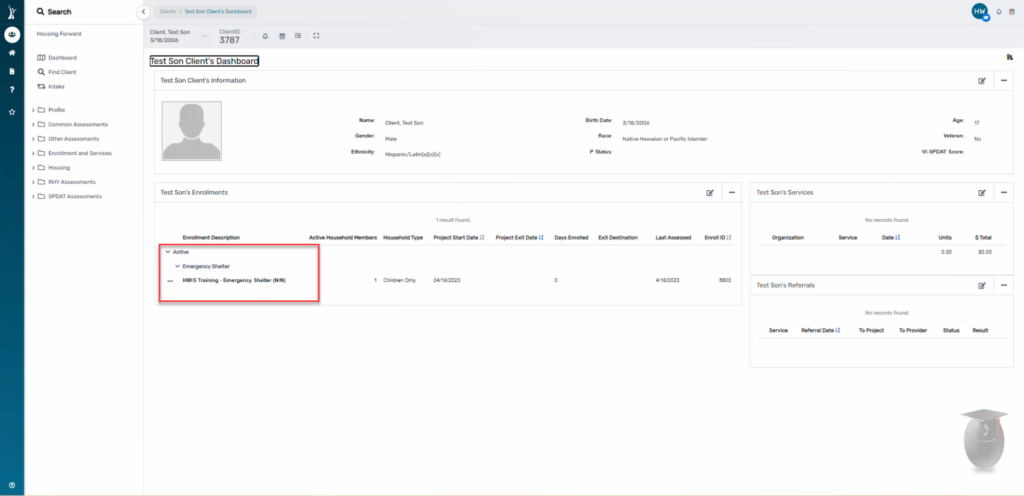
Confirm that you see the enrollment on the client’s dashboard.
Thanks for your patience while we work on getting this content into the webpage. Until then, download the document below to view it on your device!
Download document:
When logging in, be sure to use the correct URL and a Preferred or Acceptable browser from the list below.
URL: https://www.clienttrack.net/housingforward
Preferred Browsers
Acceptable Browsers (users may experience infrequent connectivity issues)
Incompatible Browsers (do NOT use)

It is extremely important for every user to set up their recovery information by creating a Security Question and Answer. This allows users to reset their own password in case their password is forgotten. If the recovery information is not set up, users must submit a Spiceworks ticket to the HMIS Team to have their password reset. Response times to tickets are not guaranteed to be immediately or within the time that a user might need to access the system in urgent or emergent situations.
To set up your recovery information, you can follow the pop-up to review your recovery information the first time you log in. If you dismissed this pop-up, follow the steps below.
1. Click on your initials in the top right corner of the screen after logging in.

2. Click on Security Settings under your picture.

3. Enter your password.

4. Click on “Update your account recovery information”

5. Create a Question which only you will know the answer to. Then type in the Answer to that question.
NOTE: Answers are case sensitive. If your question was “Who was your favorite teacher?” You answer will need to be entered exactly the same way each time. “Ms Jones” or “MsJones” or “msjones” would NOT be considered the same answer by the system.

6. Click Update to save the recovery information and return to your previous dashboard.
Always remember to log out of the system when it is not in use!
Download document:
Paused workflows are incomplete assessments. You are likely to create a paused workflow if you begin an assessment (entry, update, annual, or exit) and then navigate away from the assessment, pause or cancel the assessment, click the Back arrow, or log out without completing the assessment. These actions are highly discouraged because paused workflows can result in incomplete data and inaccurate reports.
The HMIS Team recommends that you regularly check your Paused Workflows to ensure data quality by deleting the workflow and reviewing the client’s record.
1. Log in to ClientTrack and navigate to your Home Workspace.
2. Open the menu on the left if needed, navigate to the “Profile” menu, and then click “Paused Workflows”.

3. If you have any Paused Workflows, RESUME them with the Play icon
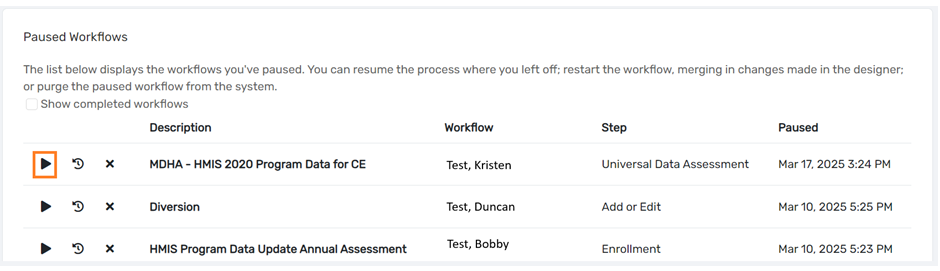
NOTE: The Restart icon allows you to restart the workflow, the X icon allows you to delete the workflow, but these options are not recommended.
4. Return to the Client workspace and review the client’s record to be sure that all assessments recorded there are accurate and up to date.
Download document:
When a neighbor/client turns 18, these are the following data elements that must be added/updated.
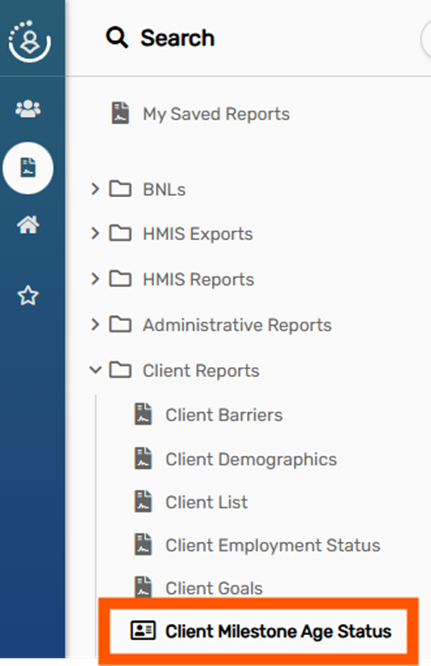
How will I know if a neighbor becomes 18, and updates are required?
Please run the “Client Milestone Age Status” report.
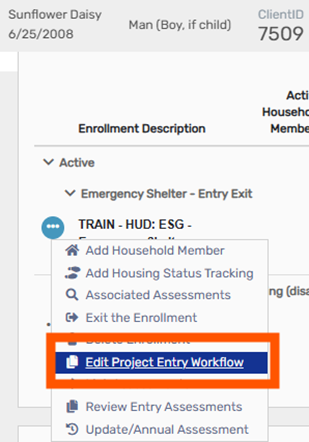
To update Veteran Status and PLS, please go to the 18-year-old’s Dashboard and select “Edit Project Entry Workflow” for the enrollment(s) affected.
Select their Veteran Status via the Basic Client Information page.
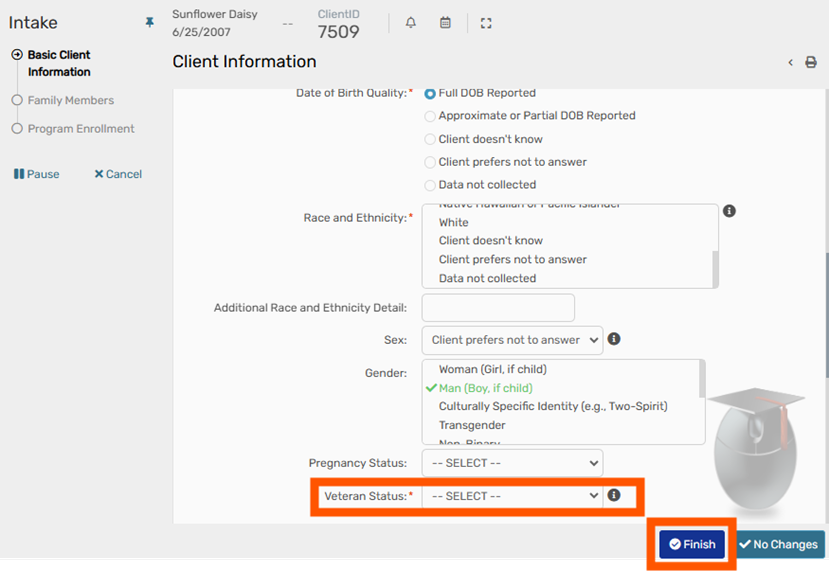
Continue through the workflow and update the newly turned 18-year-old’s Prior Living Situation. The PLS choices may appear different to you, as the questions are tied to Project Type.
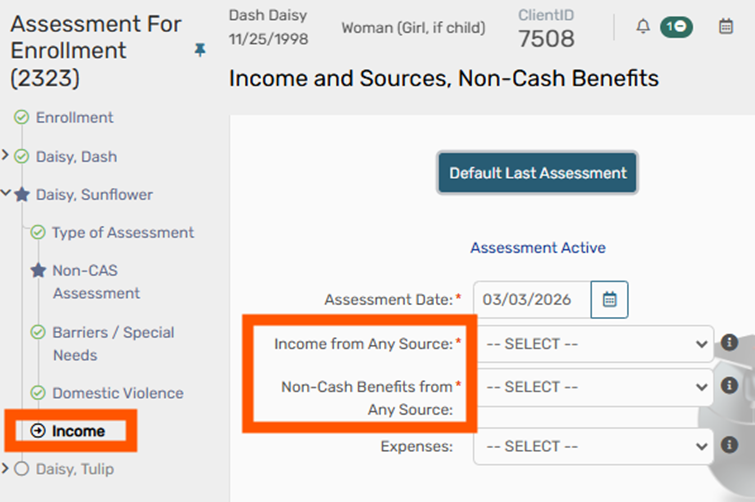
Income and Non-Cash Benefits will not appear when editing the Workflow, so an Update Assessment is required to add those fields. Please return to the Dashboard and select Update Assessment via the three dots.
Now that the client is over 18 Income and Sources, and Non-Cash Benefits will be editable.
1. Log in to ClientTrack and navigate to your Clients Workspace. Find your client in the system.
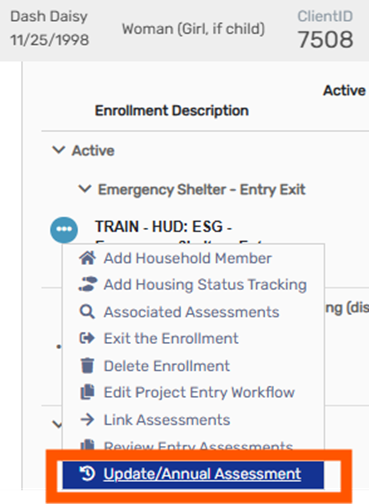
2. Click the action arrow and select “Update/Annual Assessment” on the enrollment you wish to add an Update Assessment to.

NOTE: If your client has already been exited, you will choose the “Missed Update/Annual Assessment” option instead.

3. The HUD Program Enrollment screen allows you to verify enrollment information. Typically you will click No Changes here however, there are some options to record data here depending on your program type. You may see:

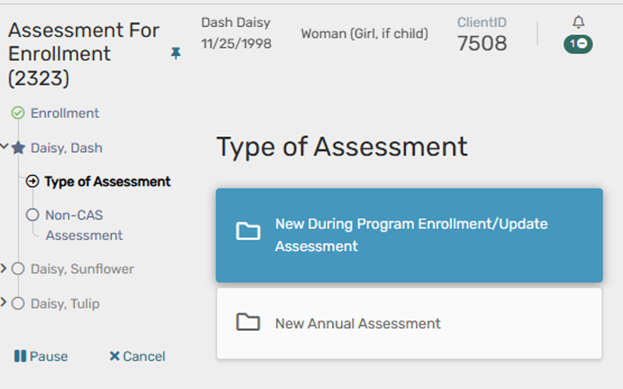
4. Next, select whether you are recording an Update (During Program Enrollment) Assessment, or an Annual Assessment.
NOTE: Annual assessments may only be completed within a 60-day window – within 30 days prior to and 30 days after the anniversary of the project start date.

NOTE: If an update or annual assessment has already been recorded, first you will see the option to create a new assessment or “edit existing”. If you need to create a new assessment, choosing that option will then prompt you to choose Update or Annual.
5. Complete the assessment with all the client’s updated information. Use the default button on each page first, when available, to have the system pre-populate the most recently recorded information for the client. Then you can edit the information based on what is accurate and true for the client on the day of assessment. If there are no changes to a certain data element, use the default button and save to continue.

6. Complete the workflow for any family members. Choose the same option here that you chose for your head of household.

7. Always work to the end of the workflow and click Finish to close the workflow.

Edits should be made to the workflow when data was recorded incorrectly and needs to be edited to be accurate.
1. Log in to ClientTrack and navigate to your Clients Workspace. Find your client in the system.
2. On the Client Dashboard, click the action menu next to the enrollment in question and choose Edit Project Entry Workflow.

3. You are now in the Entry Workflow. You only need to make changes on pages with incorrect information. You can click No Changes or Save & Close on any page where you do not need to make changes.
NOTE: This is where you can correct the Project Start Date. However, if you edit this date, you will need to edit the Assessment Date on each subsequent page of the workflow, and the Master Assessment. See the Master Assessment section below for more details.

4. Edit any pages in the workflow that needs to be edited.
If you changed the project start date, check the dates on each of the pages in the rest of the workflow to be sure they match the project start date.
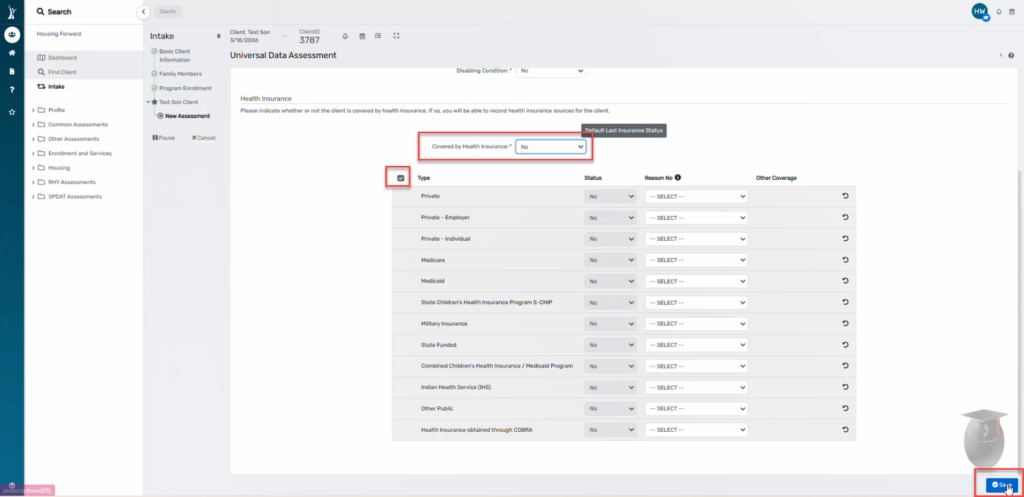
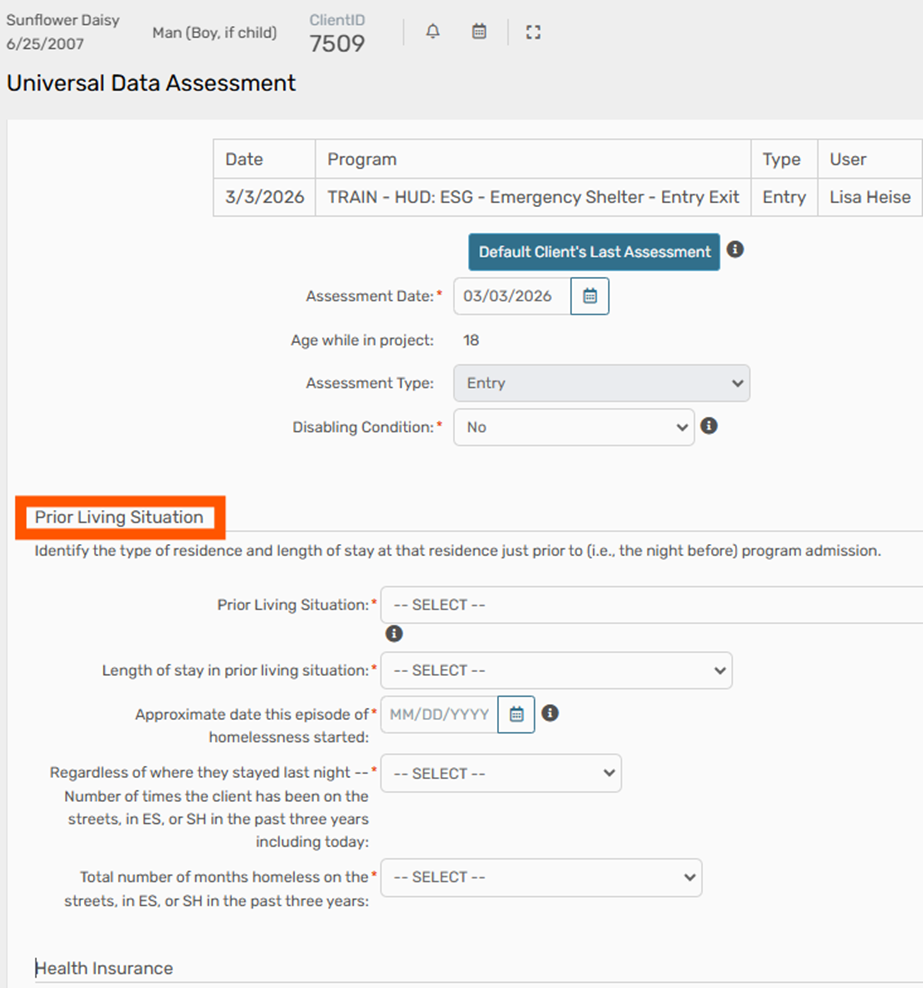
Examples of pages you may see in the workflow are shown below, but are dependent on project type. The date of each assessment page is highlighted below for easy reference, but all information on these pages can be edited as needed.
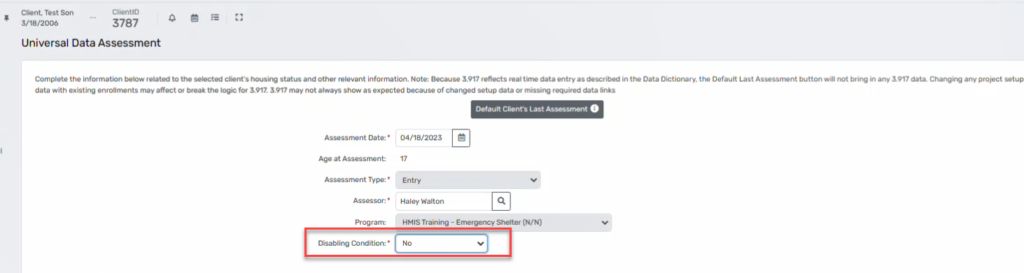
Universal Data Assessment

Barriers/Special Needs

Domestic Violence Assessment

Income
If you edit the Income assessment date, you will also need to edit the Master Assessment date to ensure no reporting errors. See the Master Assessment section below for more details. You will receive an error alert if you need to complete this edit.

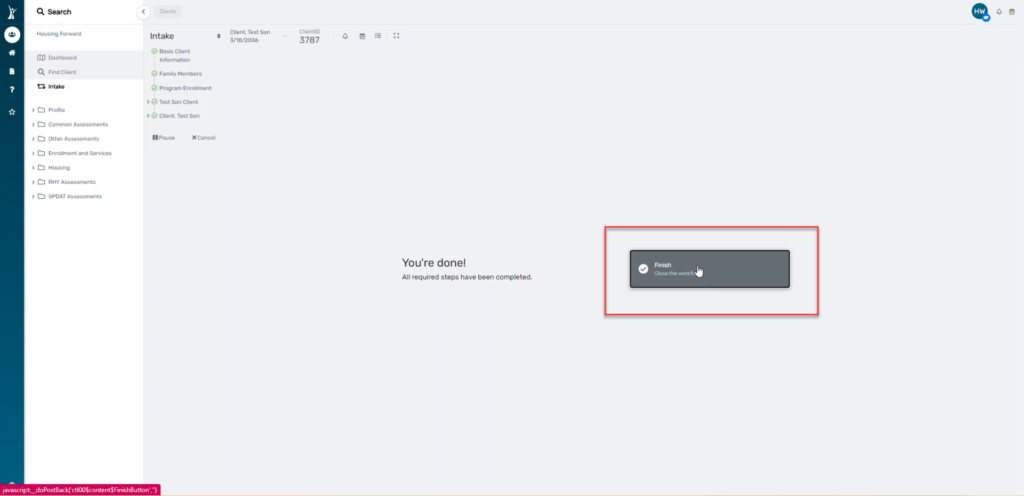
5. When you have edited all pages and clicked through the entire workflow, click Finish to close the workflow.
This edit will be required if you are editing the Project Start Date or the Income Assessment Date.
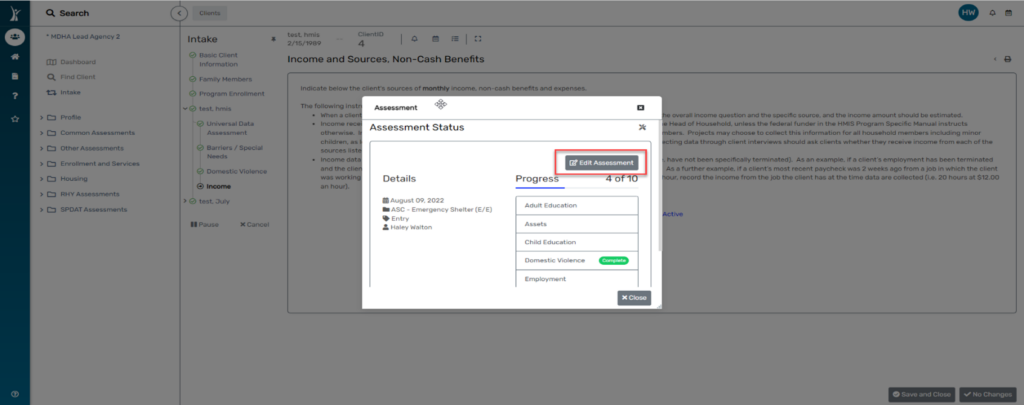
1. On any page of the workflow, click Assessment Active link (shown on Income page above in Step 5).
2. Click Edit Assessment.
3. Edit the Assessment Date to match the Project Start Date.
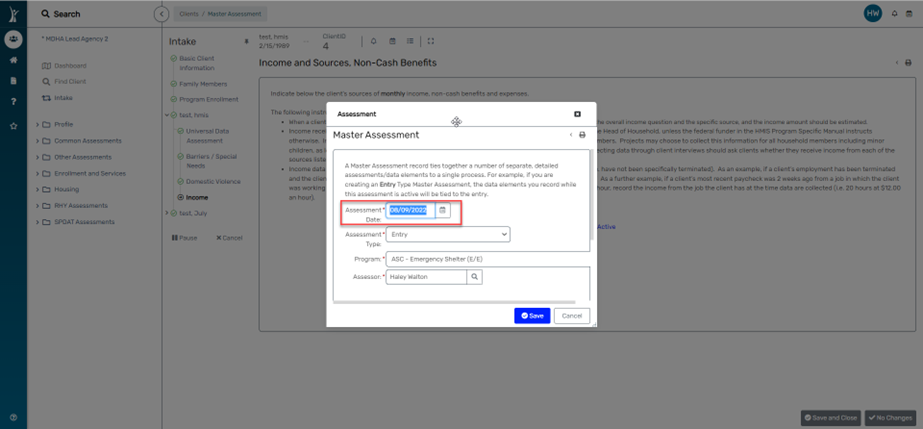
4. Click Save, then Close the Master Assessment popup box to go back to the workflow.

1. Log into ClientTrack and navigate to the Clients Workspace.
2. Find your client in the system.
3. From the client’s Dashboard, scroll down to the enrollments section and click the action arrow next their enrollment in your program. Click the “Edit Exit Workflow” option.

4. Work through each page of the assessment, making any edits where necessary. On any page you make an edit, click Save to continue. If you make no edits to a page, click No Changes to continue.

5. If there are other family members in this household, repeat step 4 for all family members.
6. Work through the entire assessment workflow and click the button that says “Finish” to close your workflow.

It is important to understand the difference between an update assessment and the need for an edit to an existing assessment. Update assessments should be completed any time the client’s information has changed, i.e. the client did not have insurance and now they do, or the client now has more regular income. An edit should be performed any time the original assessment was recorded incorrectly, i.e. the user entered the wrong type or amount of income.
Edits to update and annual assessments are completed in the same manner.
1. Log into ClientTrack and navigate to the Clients Workspace.
2. Find your client in the system.
3. From the client’s Dashboard, scroll down to the enrollments section and click the action arrow next their enrollment in your program. Click the “Update/Annual Assessments” option. This will say “Missed Update/Annual Assessment” if the client has been exited from the program.

4. On the HUD Program Enrollment page, you can make edits to any project-specific data elements like Housing Move-in Date or Date of Engagement. If you edit these data elements, click Save to continue. If you are not making any edits to these data elements, click No Changes.
Data that was recorded in the entry assessment (like Project Start Date and client demographic information) should be edited from the assessment where it was initially recorded.
5. On the next page, if an Update or Annual Assessment has already been recorded, the system will prompt you to select New Assessment or Edit Existing. To edit a previously recorded assessment, choose Edit Existing.

6. The system will display all existing Update/Annual assessment for the select client. Click on the assessment you want to edit to continue.

7. Work through each page of the assessment, making any edits where necessary. On any page you make an edit, click Save to continue. If you make no edits to a page, click No Changes to continue.
8. If there are other family members in this household, you will receive the same prompt starting at step 5 above. For each family member, you should choose the same type of assessment as you chose for the head of household. So, if for the head of household you chose “Edit Existing” and then chose to edit an update assessment recorded on 12/19/2021, you should make the same choices when prompted for each of their family members.
9. Continue steps 5-8 for each additional family member in the household.
10. Work through the entire assessment workflow and click the button that says “Finish” to close your workflow.

1. To record an Entry Assessment for a client, be sure you are on the Clients Workspace.

2. Click the Intake button in the top left corner. This will start a workflow.

3. Click Add a new client.

4. Enter ONLY the first three letters of the client’s first name and the first three letters of the client’s last name. This will search the system to see if the client has an existing HMIS record. Click Next in the bottom right corner.

5. The system will search to see if the client has an existing record. Be sure to select the existing record if the client returns in the search results. Doing so will add the enrollment to the existing record. If the client does not have an existing record, click Next to create a new record.

6. Continue to fill out the Basic Client Information screen and click Finish when done.
7. Starting with the first blank row, record ONLY the first three letters of the client’s first name and the first three letters of the client’s last name. Use the tab key or the magnifying glass. A Find Client screen will open.

8. Click the Search button to see if the client has an existing record. If so, be sure to click on that record to add that client to the enrollment workflow. If the client does not have an existing record, simply close the box.
9. Record the client’s full information.
10. Repeat this step for each family member.
11. Be sure each family member’s name has a check mark for the name.
12. Click Save & Close.
13. Select the Project for which the client will be enrolled in from the dropdown box.

14. Place a check mark next to all family members. Doing so will add each person to the
enrollment and default the Project Start Date to today’s date.

15. Confirm the Project Start Date. Make corrections if necessary. Outreach project types should record the Date of Engagement if necessary.
16. Click Save.
17. Record all information for the client. The Assessment date should be equal to the project start date.

18. Click Save.
19. Record all information for the client. The Identified Date should be equal to the project start date.

20. Save & Close
21. Record all required information for the client. The Assessment date should be equal to the project start date.

22. Save & Close
23. Record all required assessment for each family member. You will come to the end of the workflow. Click Finish.

Download document:
1. On the Client Workspace, use Find Client to find the client you want to exit.
2. On the client’s Dashboard, identify the active enrollment that you need to exit.

3. Click the action arrow, then click Exit the Enrollment.

4. Confirm the Exit Date on the first screen. You can backdate this assessment here, if needed. Check the box next to “End Case Assignment” to remove this client from the user’s case load inside HMIS (the caseload displays on the My Case Assignments section of the user’s Home Dashboard).

Note about Exit Destinations: If your client has disappeared and you are not able to complete an exit interview you can choose “No exit interview completed” for exit destination.
5. Record any services provided at exit. Click Save to continue to the next page of the workflow.
6. For each remaining page of the workflow, complete the questions with answers that are true and accurate for your client on their exit date.
Note: If you chose “No exit interview completed” for exit destination, use the “Default Last Assessment” button on each page to complete the assessment.
7. Continue the workflow for all family members. When you come to the end of the workflow, click Finish to close the workflow.

Download document:
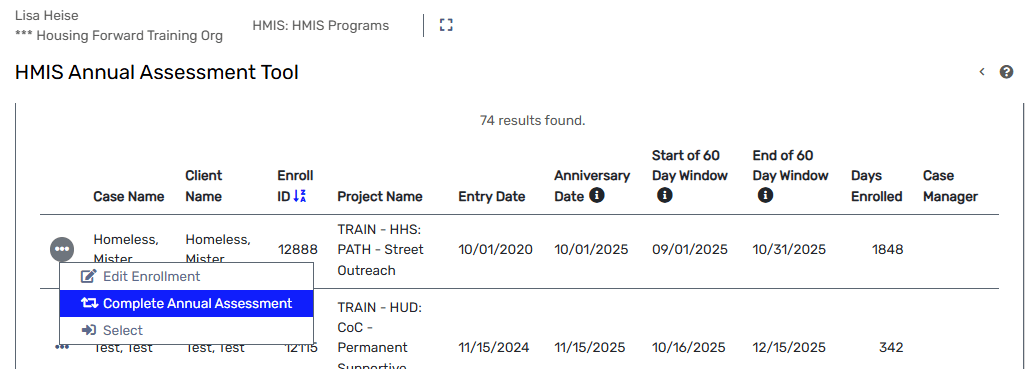
This document will show how to utilize the HMIS Annual Assessment Tool.
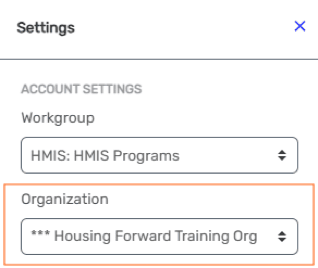
1. Log into ClientTrack and navigate to your Settings Icon (your initials).

2. Set Organization to Your Agency, if necessary.
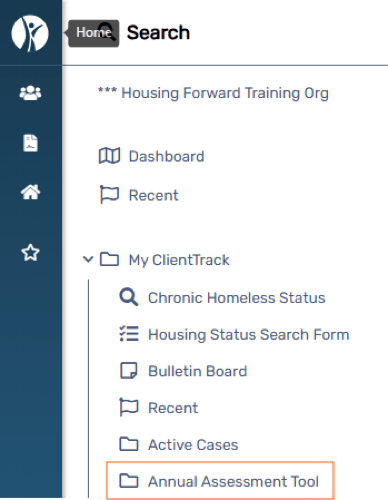
3. Navigate to your Home workspace and select Annual Assessment Tool
Home -> My ClientTrack -> Annual Assessment Tool
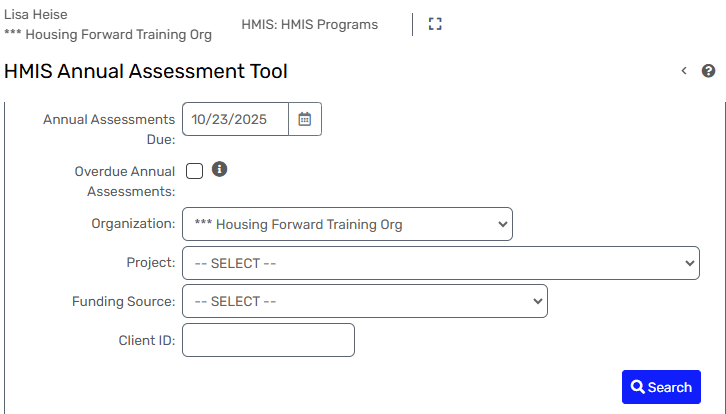
4. This tool is intended to assist in finding Annual Assessments that needs to be completed.
The Annual Assessments Due date will include filter to show all open enrollments where an annual assessment has not been completed, and the date selected is within the sixty-day window of allowed for annual assessments.
To use this tool, select the Due Date (defaults to the current date).
You may also filter by Organization, Project, Funding Source or Client ID.
5. You may view this report through HMIS.
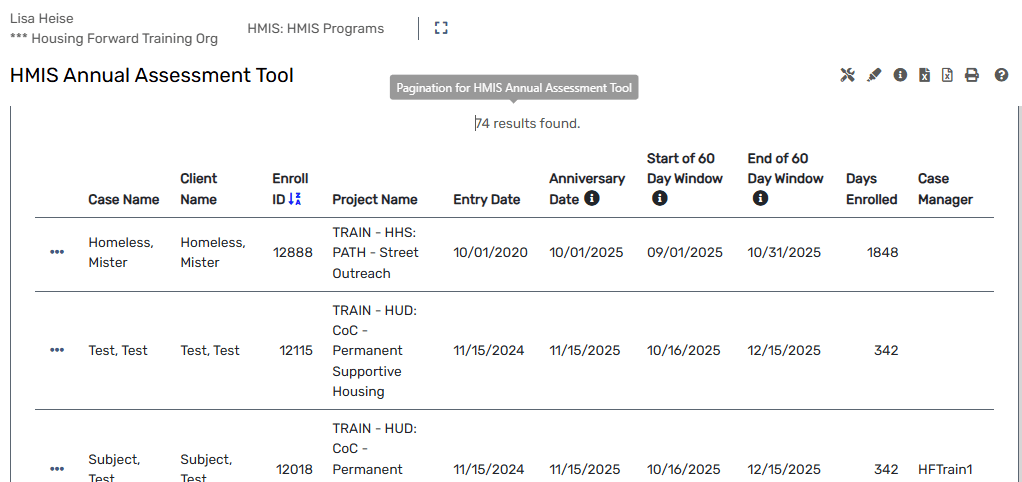
6. You may download it as pictured below.

7. By selecting the action dots, you will see options to Edit the Enrollment, Complete the Annual Assessment, or choose Select to view the neighbor’s Dashboard.
Always remember to log out of the system when it is not in use!
Download document:
If a client has been incorrectly exited from the program, use the Reenter Enrollment feature to enter the client back into the program. This option is only available to HMIS users for 90 days. If the client has been exited for more than 90 days, submit a request to the HMIS admin to delete the exit.
1. Begin on your Client Workspace and find the client whose record you need to edit.
2. On the Client Dashboard, find the enrollment that was incorrectly exited and click the action arrow and select “Re Enter the Enrollment”.

4. Check for a popup confirming that the enrollment has been reentered and click OK.

This guide serves a purpose of how to generate a By Name List (BNL) Report for Active Clients during certain periods of
their enrollment into a program. This report can be used to view your clients that are actively enrolled in a
program, when they began their enrollment and when they exited at any time during the program. With the
exported BNL report, you will also be able to discover if a client is missing any data elements that may affect other
reports. (ICA, Active Client List Report Guide)
NOTE: If submitting this report for the annual PIT/HIC please do not skip step 11.
1. Log in to ClientTrack and navigate to your Reports workspace.

2. In the menu on the left, click BNLs then select HMIS Active Client List.

3. For the Date Range, select 2/24/2022 for both dates.

4. For Report Type, select Active at Any Point from the drop down menu.

5. For Active Client Method, select Entry/Exit Dates from the drop down menu.

6. Confirm that your Organization has defaulted to select your agency.

7. Check the box for Filter by Programs and select one program to run the report for. This report should be run for individual programs one at a time.

8. Leave the CoC Filter and Sub-population fields empty.

9. For Head of Household, check the box for Include Heads of Households Only.

10. For users, leave the Filter by User box empty (do NOT check).

11. For PII, check the box to Hide PII. NOTE: This step is extremely important to protect your clients’ information.

12. Click Report to see the report in real time, or click Schedule Report to have the report run automatically at a later time.

In addition to using this report to create a BNL for the PIT/HIC, housing programs can use this report to easily analyze Housing Move-In Dates for clients in their program, without having to queue and wait on an APR or CAPER.
To filter for Housing Move-In Date:
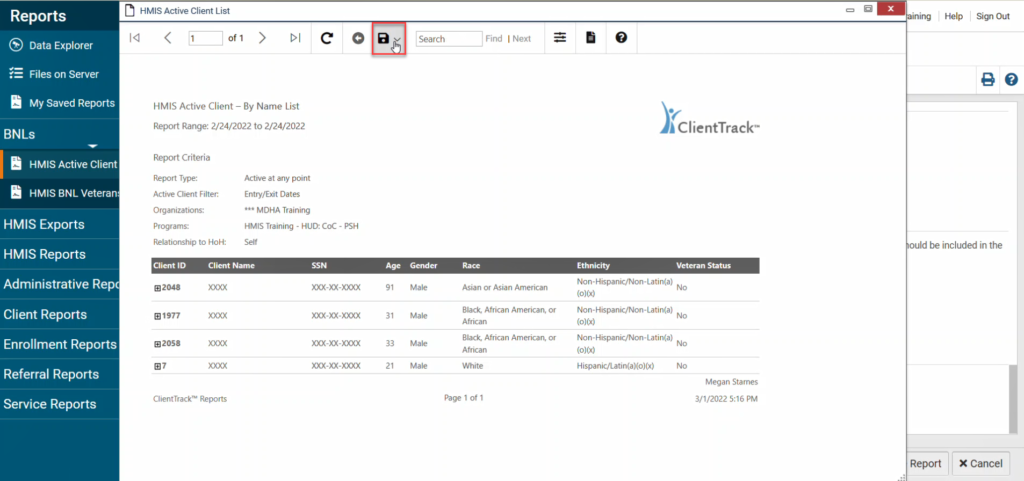
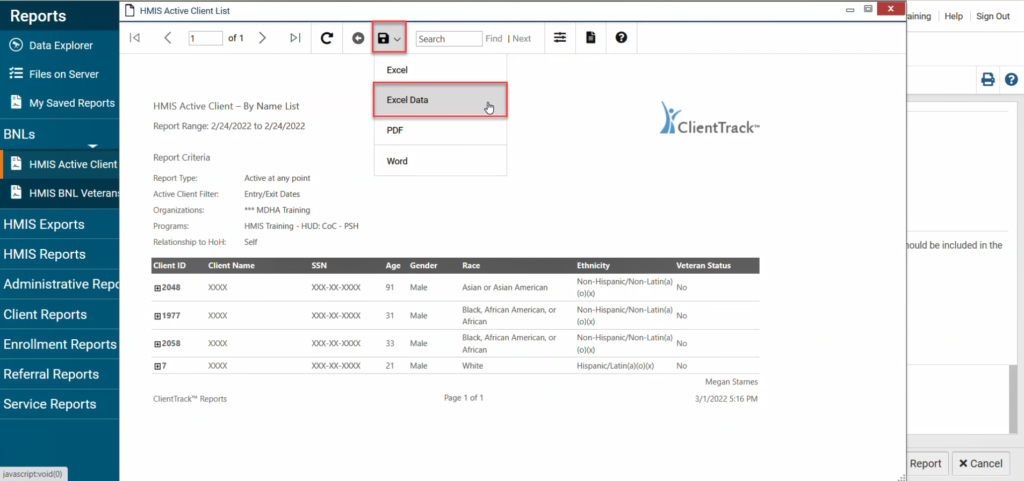
1. Save the report using the Excel Data option.
2. Open the Excel document and add filters to the header row (row 1).
3. Filter column Y, MoveInDate according to which clients you want to view.
Use this method for any of the columns in the report to only view clients with certain criteria.
Language and information taken from HMIS guides created by ICA: Active Client List Report Guide.

1. Log in to ClientTrack and navigate to your Reports workspace.

2. In the menu, click HMIS Exports, then choose CSV – APR FY[20XX] or CSV – CAPER FY [20XX].
Note: In the naming convention of the report above, [20XX] represents the most recently published HUD reporting standards i.e. 2026. HUD updates this report format regularly. Currently, the FY 2026 format is being used.


3. Complete the Date Range that you’d like to run the report for. Use the dropdown to select a range, or type a custom date range into the boxes provided.

4. Confirm that the organization selected is your organization.

5. Filter the report by program and select the program you are running the report for. For submitting the report to Sage, only 1 program should be selected.

6. If you need client-level data, under Validation File, check the box next to “Generate Validation File”. This will queue a report in the Files on Server that contains client-level data.

7. Click Run Export. Note that if you chose to create a validation file, ClientTrack will ask you to either password protect the document, or accept full responsibility for the safety of the file if you uncheck the encryption box. Choose one of these options, then click Done.


8. You will receive a notification that ClientTrack will being processing your report soon. Click OK.

9. You will be taken the Files on Server page. You can also access this page any time through the menu. Your report will display here when it is ready. While you are waiting on the report to run, you can view its status in the Task List by clicking “Click to view”.

First, you will see a pre-load file. Then you will see the export file once the pre-load file has run. If you chose to run a validation file, you will see that as well.

11. When the report has run, from the Files on Server page, use the button with the green arrow to download the file. The export file is what is imported to Sage. The validation file is what can be used to get client-level data for internal reporting purposes.

In your web browser, go to sagehmis.info. You can use this page to test your reports and get a formatted PDF version of the report. Or, you can log in to submit the report if that is part of your responsibilities. Sage will prompt you to choose either APR or CAPER depending on which report you need to upload.

These reports are run almost identically. In fact, in ClientTrack it can be hard to tell them apart at times. The main difference in the APR and CAPER is that the CAPER only displays clients with a Date of Engagement and Current Living Situation recorded.
This guide lists the questions included in the APR and could be helpful to determine if the APR will meet your specific reporting needs.
Download document:
Each of the sections below is a part of the basic APR. An APR is required for certain program types but can be useful for any program as it contains several helpful and commonly sought data points. Please use the list below to determine if the APR could be useful for your specific reporting needs.
Tip: You can use CTRL + F on your keyboard to search this page for a certain data element.
Q4. HMIS Project Information
Q5. Report Validations
Q6. Data Quality
Q7. Persons Served
Q8. Households Served
Q9. Contacts and Engagement
Q10. Gender
Q11. Age
Q12. Race & Ethnicity
Q13. Physical and Mental Health Conditions
Q14. Domestic Violence
Q15. Living Situation
Q16. Case Income – Ranges
Q17. Cash Income – Sources
Q18. Client Cash Income Category
Q19. Cash Income Changes Over Time
Q20. Non Cash Benefits
Q21. Health Insurance
Q22. Length of Participation
Q23. Exit Destination
Q24. Targeted Questions
Q25. Veterans
Q26. Chronic Homelessness
Q27. Youth
Q28. Bed & Unit Inventory and Utilization
Q29. Financial Information
Q30. Additional Comments
This report is a canned report with HMIS and allows you to easily report on how many clients are enrolled into a program.
The report displays the following data points:
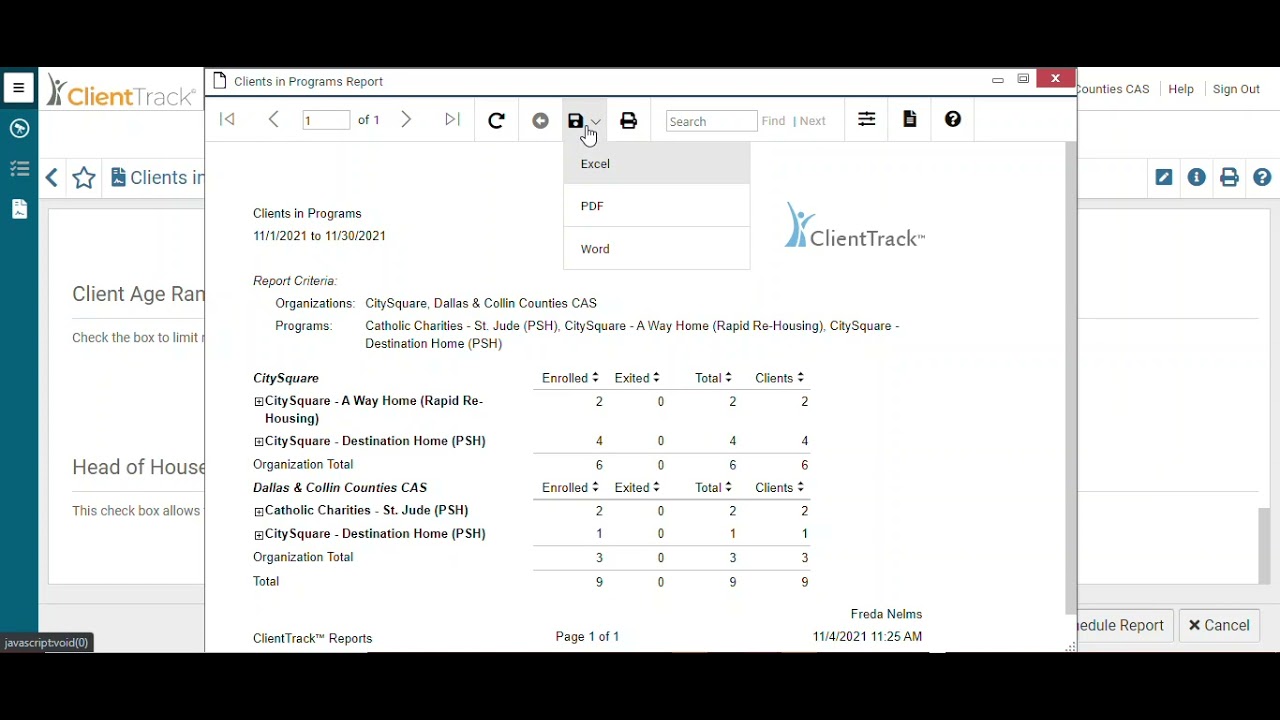
1. Login to ClientTrack and navigate to your Reports Workspace. Click the Enrollment Reports tab in the menu on the left and select Clients in Programs.

2. Select the Date Range, Report Type from Run Report By section and the Program(s) according to your reporting needs. The other fields on this form are optional and could be useful.


3. Click on the Report button at the bottom right corner of the page to retrieve the report.

4. Review your report. Click on the positive sign to view client level details of the report. You can also export the report using the options at the top of the screen.

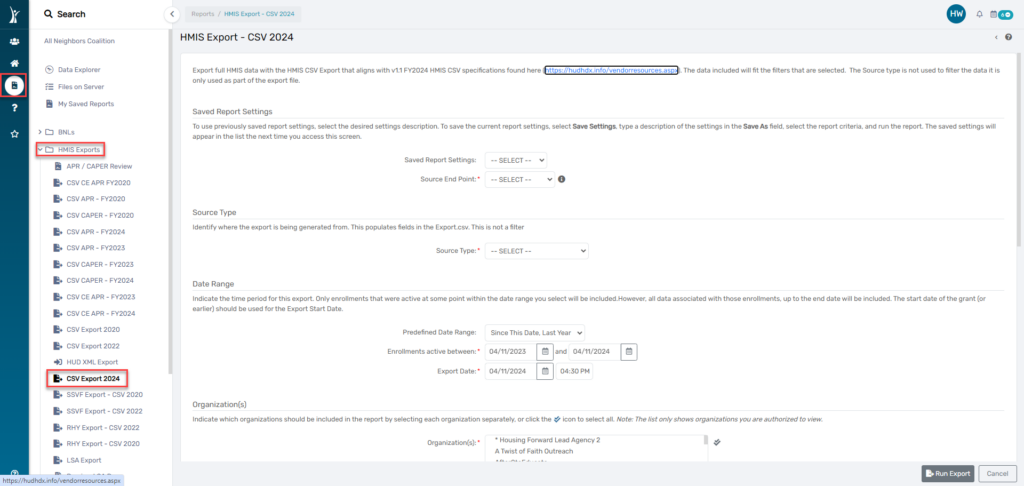
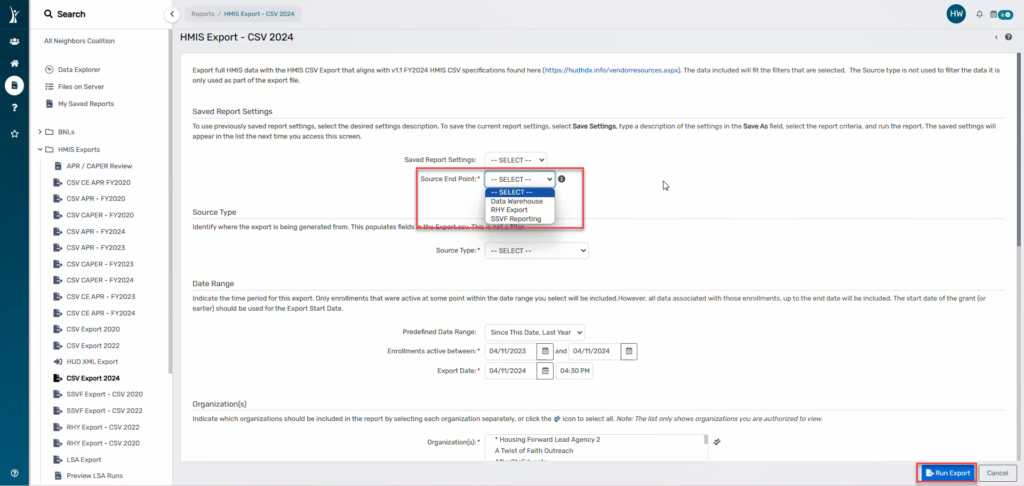
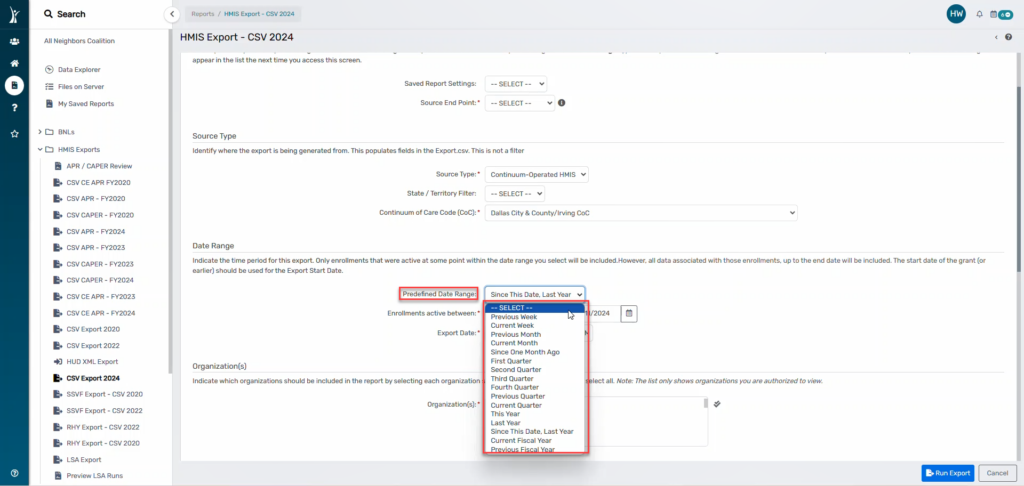
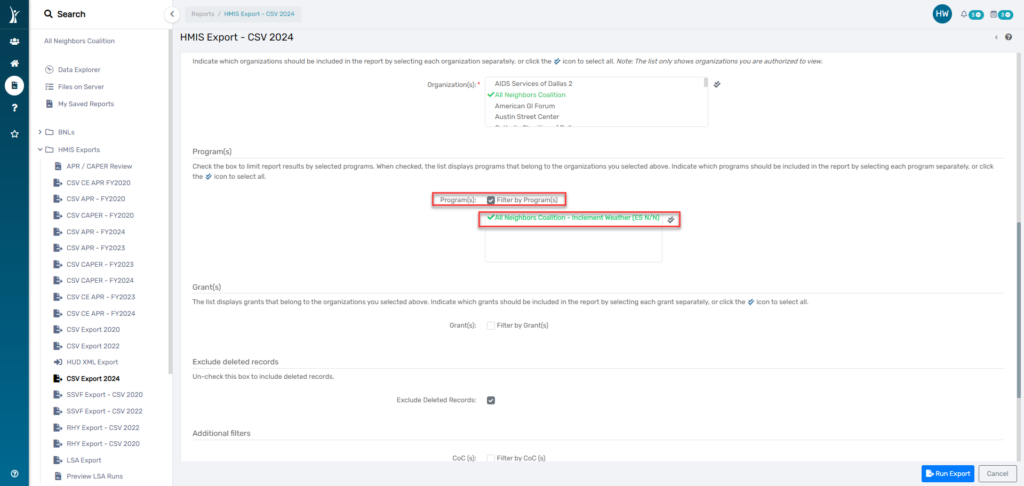
Beginning in October 2023, ClientTrack has released a new CSV Export 2024. Users needing to generate a CSV Export for any purposes, should go directly to the CSV Export 2024 report launch form.
Users will be need to utilize the filters outlined below in order to correctly generate a CSV Export. Additional filters may be applied, including selecting specific Program(s) and Grant(s).
Users can access the CSV Export 2024 by navigating to the Reports Workspace. Clicking on HMIS Exports and then CSV Export 2024:
Saved Report Settings can be set up by a user as they apply filters, choose projects or grants, and select the date ranges. Users can reuse these saved settings in the future to generate another report without needing to reapply the same parameters manually.
To use previously saved report settings, select the desired settings description. To save the current report settings, select Save Settings.
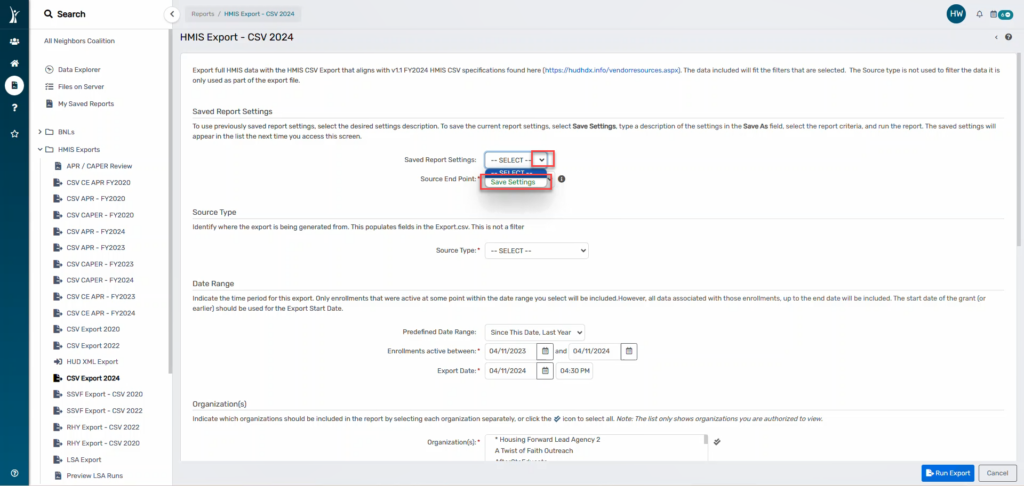
Type a description of the settings in the Save As field.
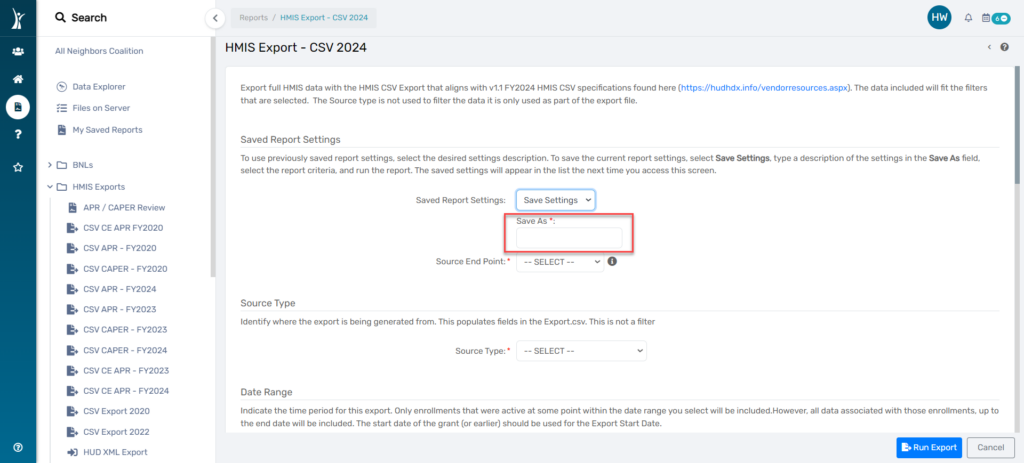
Select the report criteria, and run the report.
The saved settings will appear in the list the next time you access this screen.
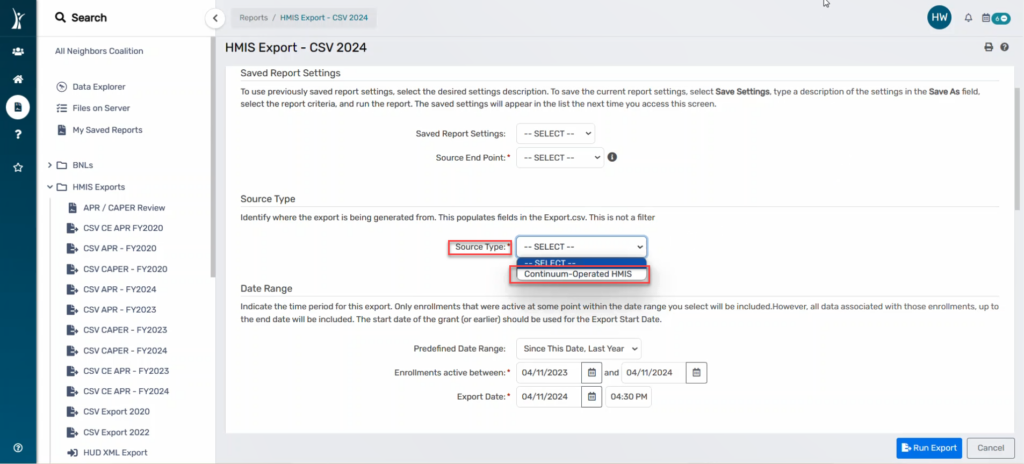
The Source Type is not a filter but is required before generating a CSV Export. According to the FY2024 CSV Specifications, this field identifies the type of source database that the data is exported from.
Select Continuum-Operated HMIS.
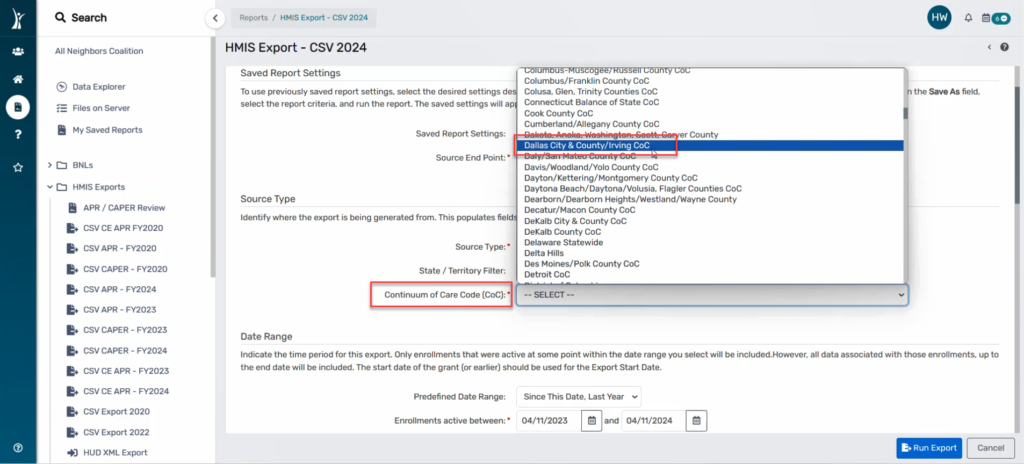
Select Dallas City & County/Irving CoC as the Continuum of Care Code (CoC):
The Date Range filter can be used to filter the enrollments that were active at some point during the date range selected.
There are several pre-defined date ranges to choose from in the “Predefined Date Range” field:
Users may manually update the date range for the export by entering start and end dates in the “Enrollments active between” field:
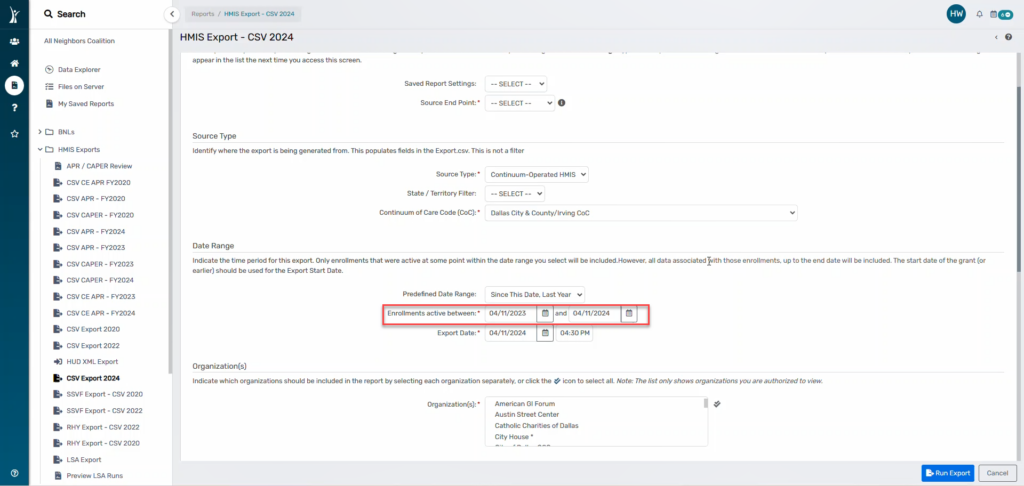
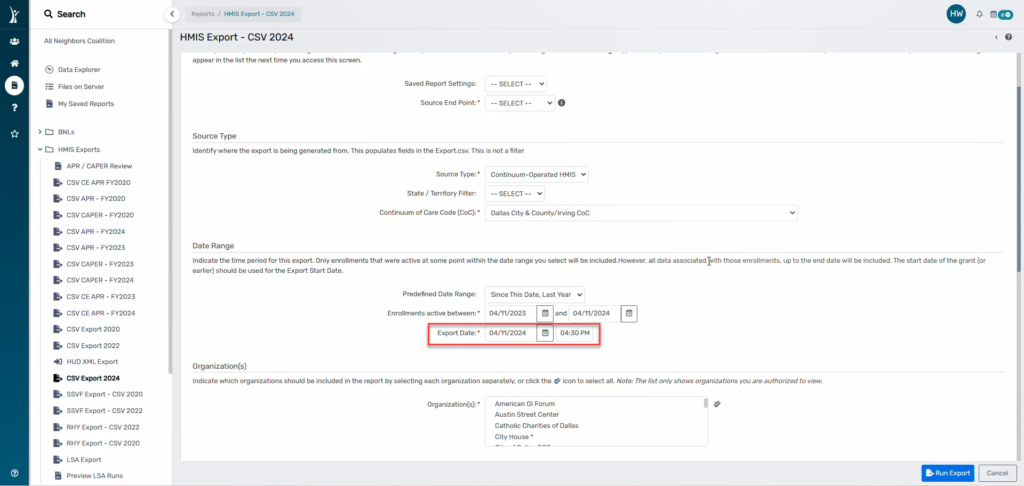
The start date of the grant should be entered for the “Export Date” :
The Organization filter is a required field before generating an export.
Choose your organization by selecting the name of your organization:
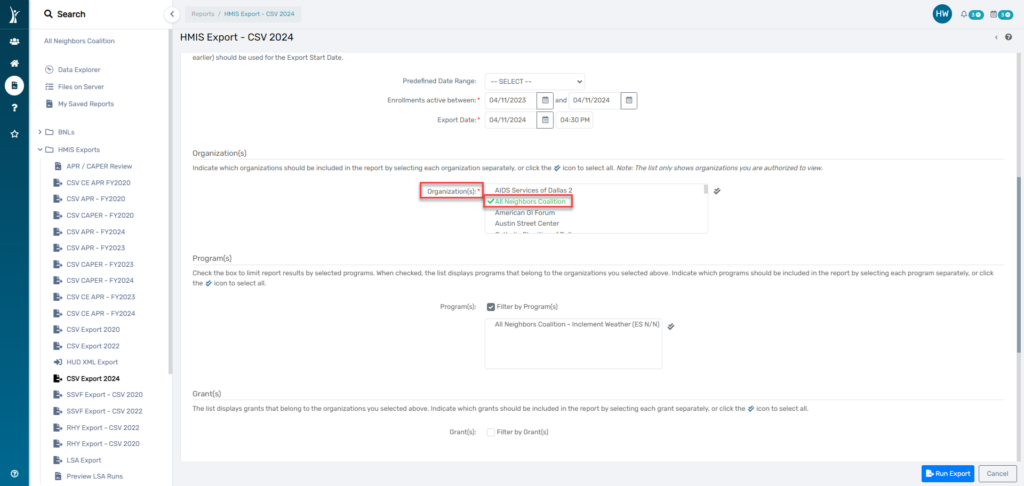
The Program(s) filter may be used to restrict the export records to only include applicable records within the program(s) selected. This field is not required and users may select any and all applicable projects.
The Grant(s) filter may be used to restrict the export records to only include applicable records within the grant(s) selected. This field is not required and users may select any and all applicable grants.
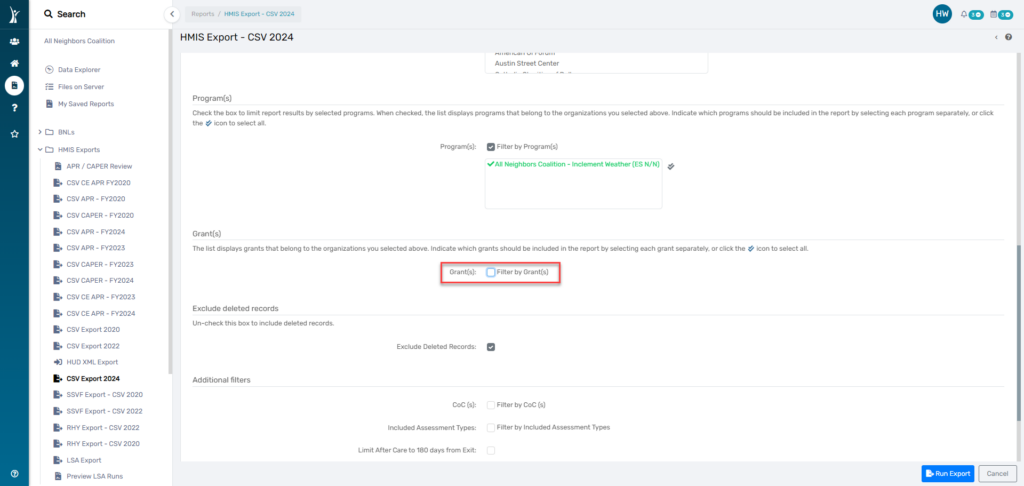
The list will only display grants that belong to the organizations you selected above.
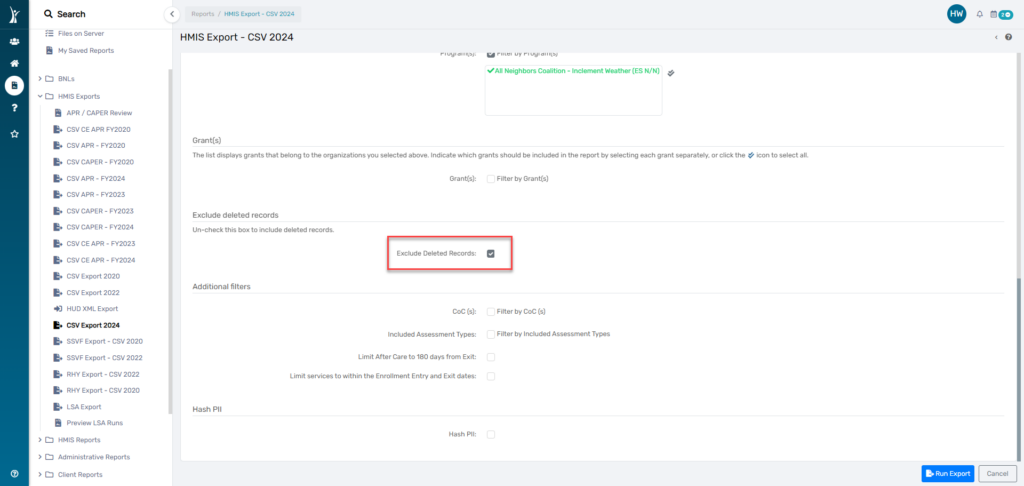
This filter will exclude any deleted records from the export. Deleted records may include, but are not limited to deleted programs, deleted enrollments, and deleted client records. This filter is set to default as ‘Exclude Deleted Records’. If a user would like to include the deleted records, they may uncheck this filter and generate the export.
It is highly recommended to continue to exclude deleted records when generating a CSV Export.
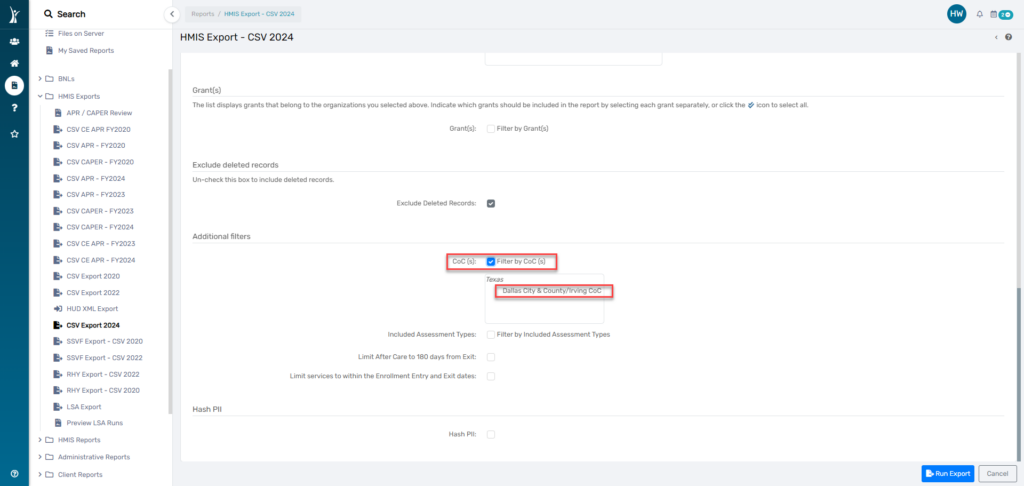
This filter is not required, but when selected, allows users to filter the records included in the CSV Export to only include records associated with the CoC selected. The CoC selected must match the Enrollment CoC in the clients Universal Data Assessment at entry and/or the Program CoC for project setup.
This filter is not required, but when selected, allows users to filter the records included in the CSV Export to only records associated with the specific Assessment Types selected. These Assessment Types include Entry, During Program, Enrollment/Update, Annual, Exit, Post Exit/Follow Up and Other.
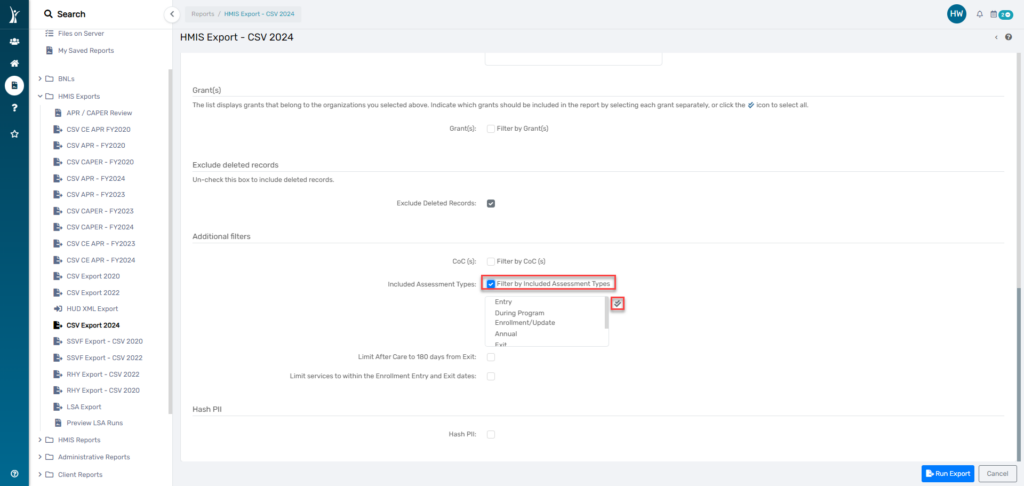
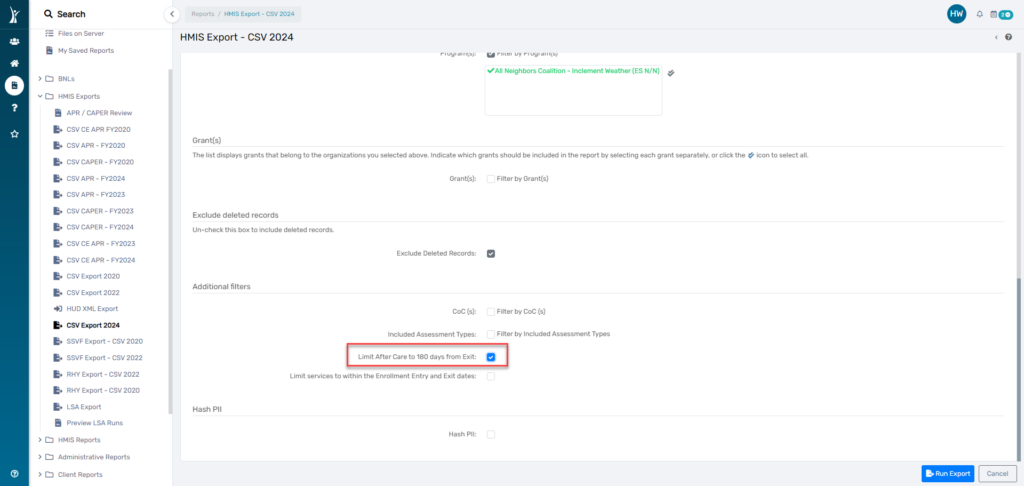
This filter is not required, but when selected, allows users to filter the records to exclude any After Care assessments collected outside of the 180 day timeframe defined by HUD.
This filter is not required, but users generating a CSV Export for a RHY Export or a YHDP Supplemental Report should select this filter.
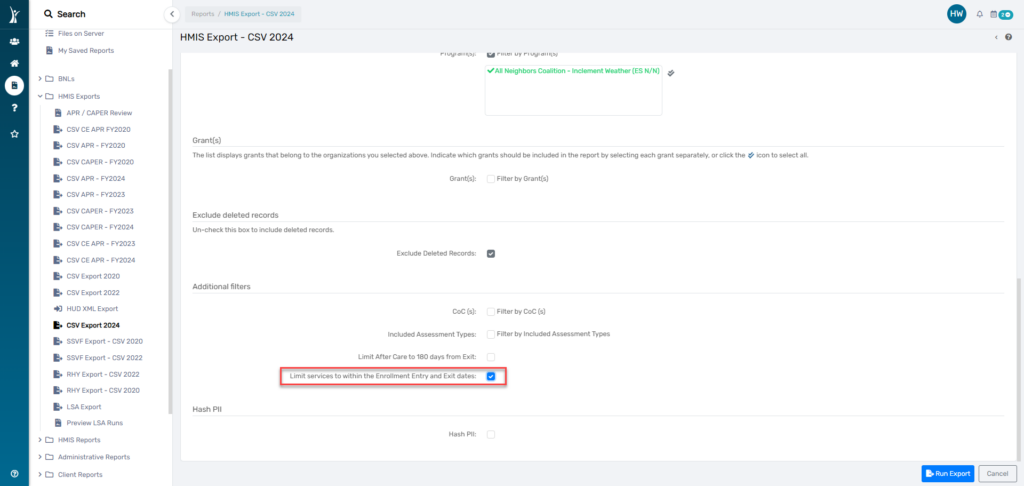
This filter allows users to filter the export to exclude any services that are provided to a client outside of the Enrollment Entry and Exit dates.
This filter is not required, but users generating a CSV Export for an official HUD purpose, including the SSVF Export, RHY Export, YHDP Supplemental Report, should select this filter.
This filter will apply the HUD defined Hash algorithm to the Personally Identified Information (PII) included in the CSV Export.
This filter is not required, but users generating a CSV Export for a RHY Export, a YHDP Supplemental Report will need to select this filter to generate a Hashed CSV Export.


2. Under the “HMIS Reports” dropdown, select “HMIS Data Entry Timing Report”

3. On the reporting screen: select Date Range, Type, Organization, and Program(s)


Note: The “Programs” field is multi-select!
4. Once the required information is captured, select “Report“

If the reports are running in the background, you’ll see the notifications below.


5. When the report is ready, you will see something like the one below. By clicking on the plus signs, you will be able to see client-level data.

6. To save the report, select the “Save” icon and choose “Excel“. This will save the report in the same formatting you are seeing it in ClientTrack!

Download document:
Users can access the HMIS Data Entry Timing Report by navigating to the Reports Workspace. Clicking on HMIS Reports and then HMIS Data Entry Timing Report:

Select a Date Range:

Select the appropriate Type for your agency’s needs:

Select the Program(s):

Other Filter Options:
When checked the grant filter displays grants that belong to the organization and program you selected above:

Select “Report” to run the report:


The HMIS Data Standards require that each client with an active enrollment of at least 1 year receives an Annual Assessment. The Annual Assessment is due within a 60-day window of the anniversary of the client’s project start date in the program (i.e. the day the Entry Assessment/Intake was completed). This 60-day window starts 30-days before the anniversary date and extends 30-days after the anniversary date.
Programs can determine if any Annual Assessments were missed using the steps detailed below. This process uses the current APR to view Annual Assessment data.
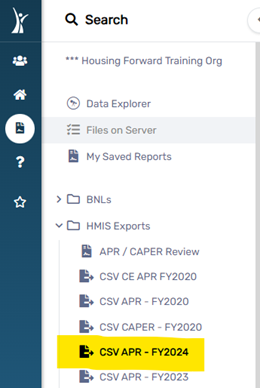
1. Log into ClientTrack and navigate to the Reports Workspace. Under HMIS Exports, select the most current CSV APR. At the time this article is being written, the most current APR is FY2024. Please confirm that you are selecting the correct report, which may be different than what is shown here.
2. Complete the basic report parameters as follows.
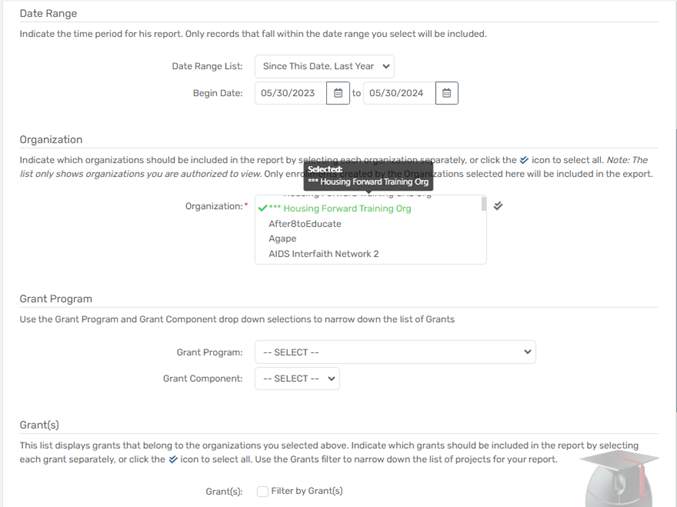
3. Projects: Deselect “HMIS Projects Only”. Check the box to “Filter by Project(s)“, then select the Projects you wish to see. This is a multi-select and will allow you to run the report for several programs at once.
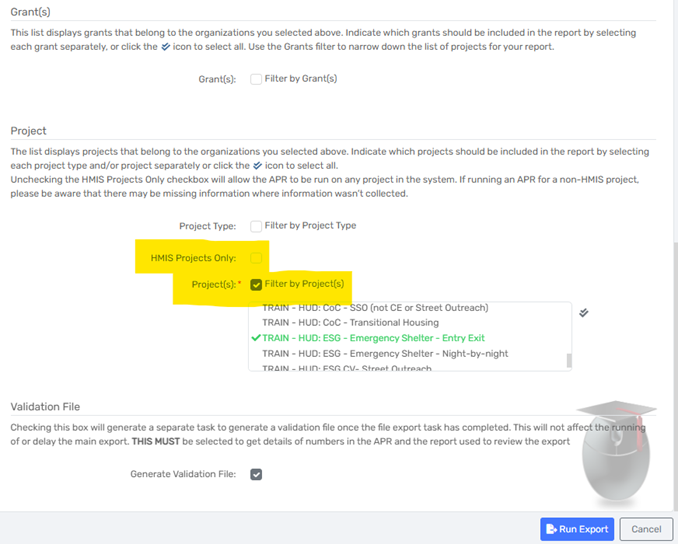
4. Click Run Export.
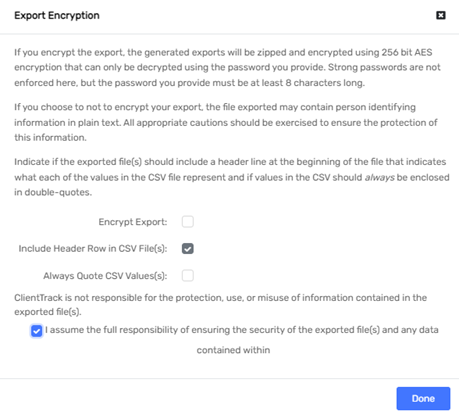
5. Confirm your security/encryption method. Our team recommends the following selections.
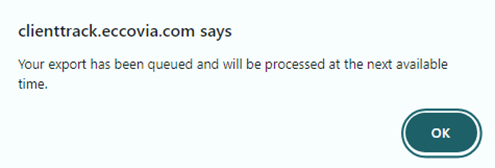
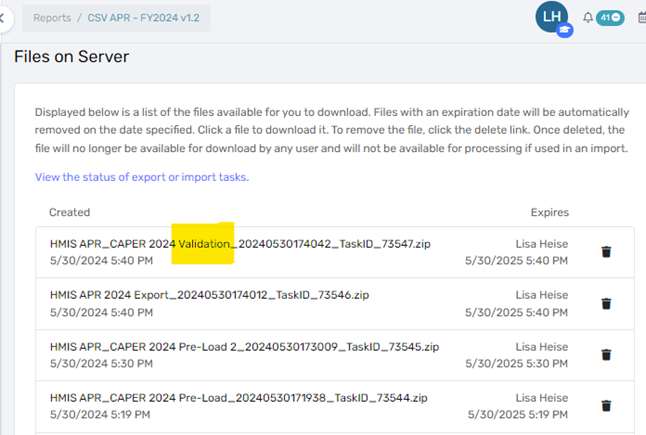
You should receive a pop-up confirming that the report is queued. Select “OK” to close this pop-up. Your report will display on the Files on Server page when it is finished processing.
1. From the Files on Server page of the Reports workspace, Download the “Validation” ZIP folder.
2. On your device, open the downloaded ZIP folder and select the “APR_20XX_Annual_Detail” file.
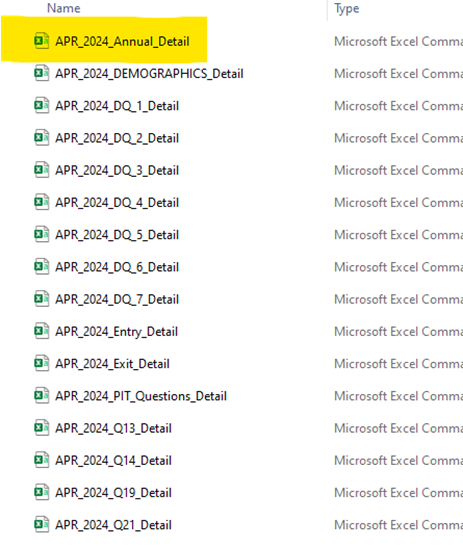
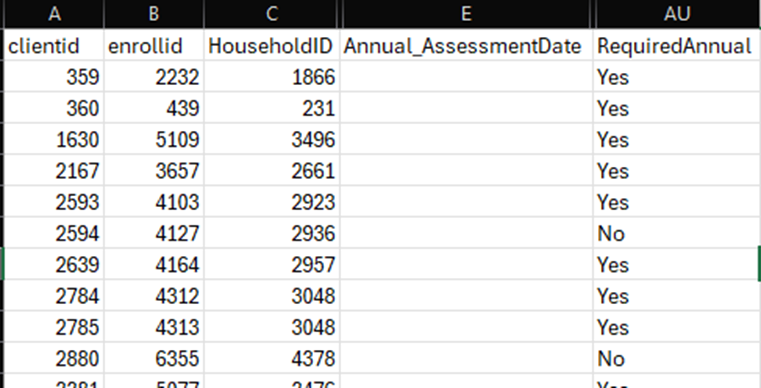
3. In the Annual Detail File, these columns will help determine Annual Assessment data
Column AU – Required Annual answers “Is an Annual Assessment needed for this client?”
Once you use the report to determine which clients have missing Annual Assessments, take these steps to record the missing assessments for each client.
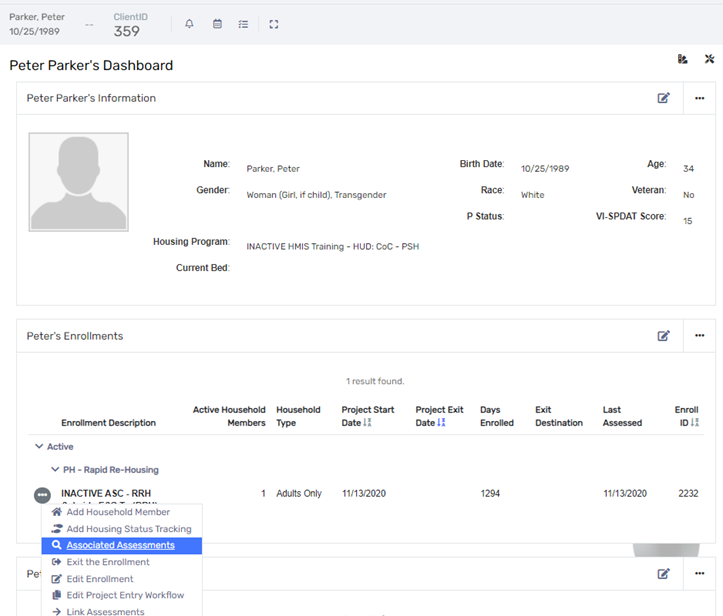
1. Log into ClientTrack and navigate to the Clients Dashboard. You can use the Client ID from the report to easily search for the correct client.
2. In the Enrollments section of the dashboard, find the relevant program enrollment. Click the Action menu (three dots) next to the relevant program enrollment, then select Associated Assessments.
3. Find the Entry Assessment and note the Assessment Date. Based on the current date, determine how many missing Annual Assessments need to be recorded.
4. Record each missing Annual Assessment following the appropriate steps to backdate each assessment so that it falls within the 60-day window. If you need assistance completing an Annual Assessment, see our guide for Annual Assessments: https://housingforwardntx.org/docs/update-annual-assessments
Beginning in October 2023, ClientTrack has integrated the RHY Export into the overarching CSV Export 2024. Users needing to generate a CSV Export for RHY and/or YHDP purposes should go directly to the CSV Export 2024 report launch form.
Users will be need to select the filters outlined below in order to correctly generate a RHY CSV Export. Additional filters may be applied, including selecting specific Program(s) and Grant(s).
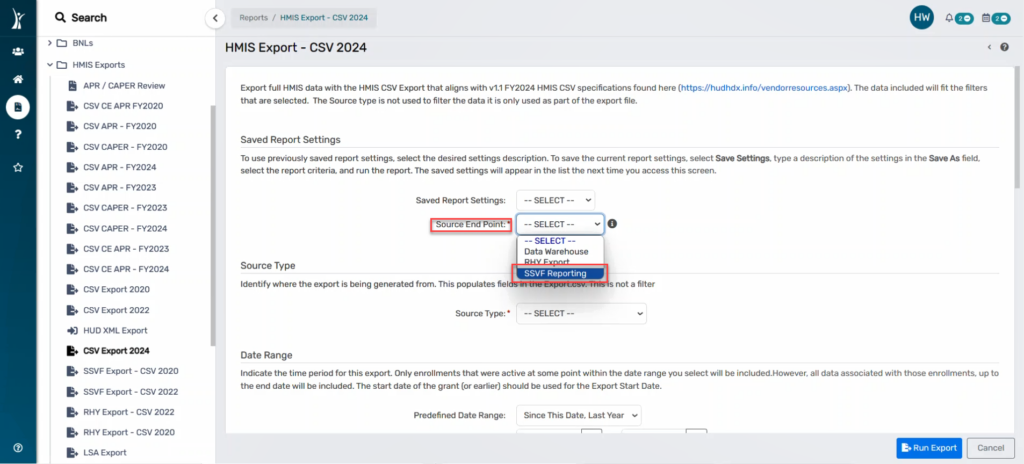
Users can access the CSV Export 2024 by navigating to the Reports Workspace. Clicking on HMIS Exports and then CSV Export 2024. In the Source End Point field select RHY Export.

The Source Type is not a filter but is required before generating a CSV Export. According to the FY2024 CSV Specifications, this field identifies the type of source database that the data is exported from.
Select Continuum-Operated HMIS.
Select Dallas City & County/Irving CoC as the Continuum of Care Code (CoC):
The Date Range filter can be used to filter the enrollments that were active at some point during the date range selected.
There are several pre-defined date ranges to choose from in the “Predefined Date Range” field:
Users may manually update the date range for the export by entering start and end dates in the “Enrollments active between” field:
The start date of the grant should be entered for the “Export Date” :
The Organization filter is a required field before generating an export.
Choose your organization by selecting the name of your organization:
This filter will exclude any deleted records from the export. Deleted records may include, but are not limited to deleted programs, deleted enrollments, and deleted client records. This filter is set to default as ‘Exclude Deleted Records’. If a user would like to include the deleted records, they may uncheck this filter and generate the export.
It is highly recommended to continue to exclude deleted records when generating a CSV Export.
This filter is not required, but when selected, allows users to filter the records to exclude any After Care assessments collected outside of the 180 day timeframe defined by HUD.
This filter is required for users generating a RHY Export.
This filter allows users to filter the export to exclude any services that are provided to a client outside of the Enrollment Entry and Exit dates.
This filter is not required, but users generating a CSV Export for an official HUD purpose, including the SSVF Export, RHY Export, YHDP Supplemental Report, should select this filter.
This filter will apply the HUD defined Hash algorithm to the Personally Identified Information (PII) included in the CSV Export.
This filter is not required, but users generating a CSV Export for a RHY Export, a YHDP Supplemental Report will need to select this filter to generate a Hashed CSV Export.
Additional guidance for timelines and requirements for the RHY Export can be found in the RHY-HMIS Program Manual.
This cheat sheet reviews the save settings for most ClientTrack Canned (pre-built) reports. Almost all reports in the Reports Workspace (excluding the Data Explorer) will have these save file options after being run.
1. After running the report, click the Save button on the report in ClientTrack.
2. Choose your desired format from the file format options. Most reports will have the option for:
3. Once you select your file format, the file will download onto your device. Your device settings will determine where the file is saved on your device (most often this is a Downloads folder), and whether or not the file opens automatically after being downloaded. Contact your internal IT department if you have any difficulty locating your downloaded file.
Format Recommendations
Tips
Occasionally, users have technical difficult when viewing Excel Data downloads, as the .xml file format open differently than a typical .xls (Excel) file. HMIS Team members have found the following steps helpful in resolving this error. However, if you follow these steps and continue have issues opening your .xml file, please contact your internal IT department for assistance.
1. Open MS Excel and click File – Open
2. Browse to the location that has the .xml file saved, and click Open to open the file.
3. A pop up with 3 options should display. Select As an XML table radio button.
4. This opens and displays the .xml file as an Excel table.
Beginning in October 2023, ClientTrack has integrated the SSVF Export into the overarching CSV Export 2024. Users needing to generate a CSV Export for SSVF purposes should go directly to the CSV Export 2024 report launch form.
Users will need to utilize the filters outlined below in order to correctly generate an SSVF CSV Export. Additional filters may be applied, including selecting specific Program(s) and Grant(s).
Users can access the SSVF Export 2024 by navigating to the Reports Workspace. Clicking on HMIS Exports and then CSV Export 2024:
In the Source End Point field select SSVF Export.
The Source Type is not a filter but is required before generating a CSV Export. According to the FY2024 CSV Specifications, this field identifies the type of source database that the data is exported from.
Select Continuum-Operated HMIS.
Select Dallas City & County/Irving CoC as the Continuum of Care Code (CoC):
The Date Range filter can be used to filter the enrollments that were active at some point during the date range selected.
There are several pre-defined date ranges to choose from in the “Predefined Date Range” field:
Users may manually update the date range for the export by entering start and end dates in the “Enrollments active between” field:
The start date of the grant should be entered for the “Export Date” :
The Organization filter is a required field before generating an export.
Choose your organization by selecting the name of your organization:
The list will only display grants that belong to the organizations you selected above.
This filter will exclude any deleted records from the export. Deleted records may include, but are not limited to deleted programs, deleted enrollments, and deleted client records. This filter is set to default as ‘Exclude Deleted Records’. If a user would like to include the deleted records, they may uncheck this filter and generate the export.
It is highly recommended to continue to exclude deleted records when generating a CSV Export.
This filter is not required, but when selected, allows users to filter the records to exclude any After Care assessments collected outside of the 180 day timeframe defined by HUD.
This filter allows users to filter the export to exclude any services that are provided to a client outside of the Enrollment Entry and Exit dates.
This filter is required, for users pulling a SSVF Export.
This filter will apply the HUD defined Hash algorithm to the Personally Identified Information (PII) included in the CSV Export.
Additional guidance for timelines and requirements for the SSVF Export can be found in the SSVF FY24 Data Guide.
This report is a custom report that is built in Data Explorer which allows you to easily report on how often users at your agency are logging into ClientTrack.
The report will display the following data points:
• Active Status
• User ID
• User Name
• Email
• Organization Last Logged on to
• User Created Date
• Last Login Date
• Workgroup Last Logged in to
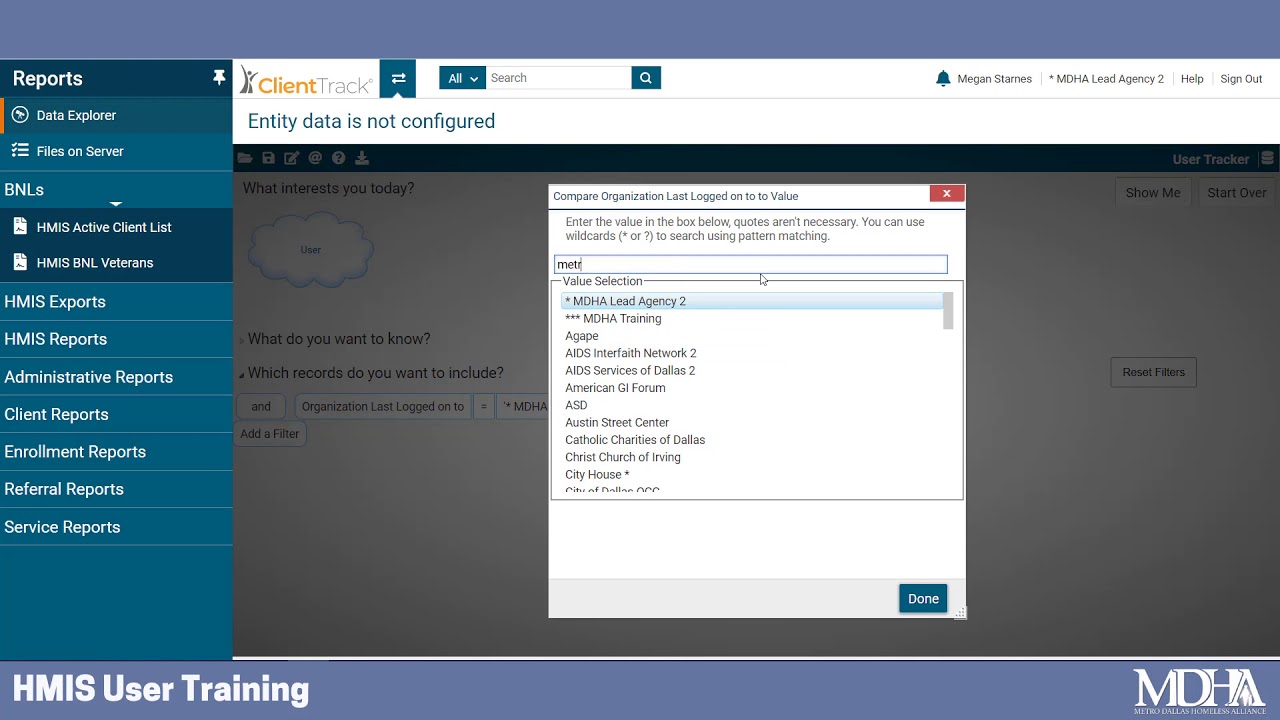
1. Log in to ClientTrack and navigate to your Reports Workspace.
2. In the menu, select Data Explorer.

3. Uncheck “Only show my questions”.

4. Search for “User Tracker” and select that query.

5. Under “Which records do you want to include?” change the organization to your agency.

6. Click “Show Me” then use the export button in the top right corner of the report to export your report.

Download document:
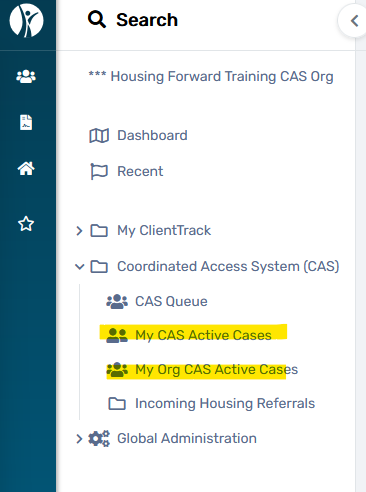
Two forms have been created for use as a CAS Case Management Tool. Both are located in the Home Workspace under Coordinated Access System (CAS) and provide information for case managers to manage their CAS case load through the CAS process.
This page automatically displays the CAS case load for the user that is logged in. ClientTrack automatically assigns the user completing the CAS & Diversion intake assessment as the “active case manager” on a client’s CAS enrollment. Users can change the assigned active case manager using these instructions.
On the My CAS Active Cases page, users can filter and sort the results using the fields at the top of the screen. The following information will display for each case:
This page allows the user to filter active CAS cases to view all active cases assigned to users at their Access Point organization (for all organizations they can access in ClientTrack).
This page functions in the same manner as the My CAS Active Cases page, and displays the following information:
Program Managers and team leaders can use this page to review CAS active cases assigned to members of their teams, to assist in caseload management and coordination.
Introduction
This document will show how to add a service to multiple clients using a scanner.
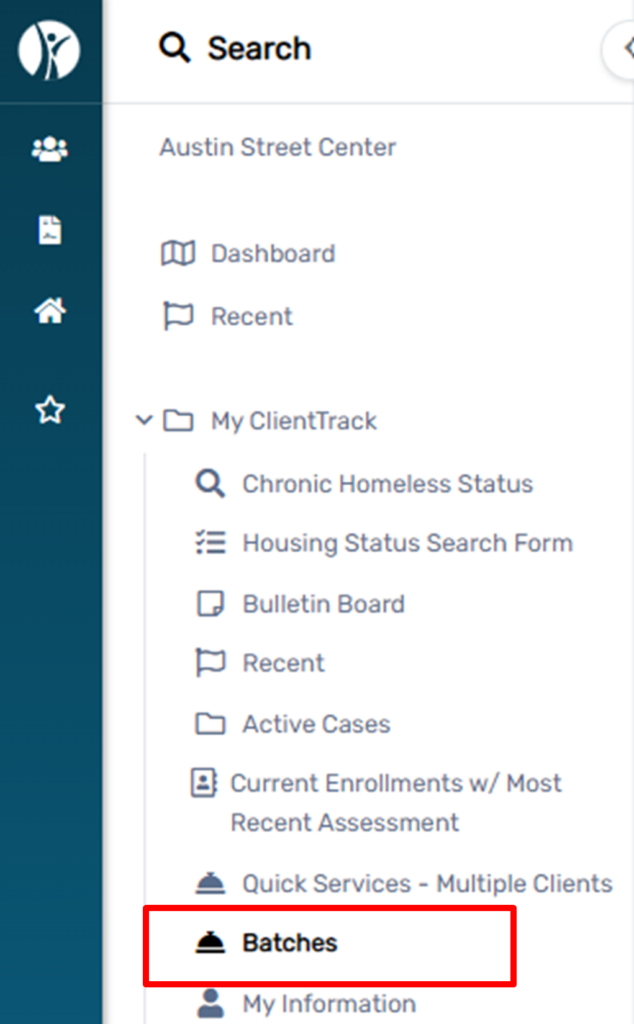
2. On the Home Workspace, select My Client Track, then Batches.
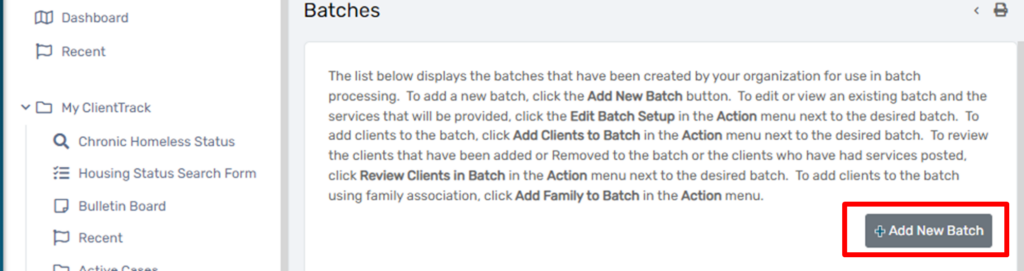
3. On the right side of the screen, select Add New Batch.
4. On the Batch set up, provide the following, bold entries are required, and select save:
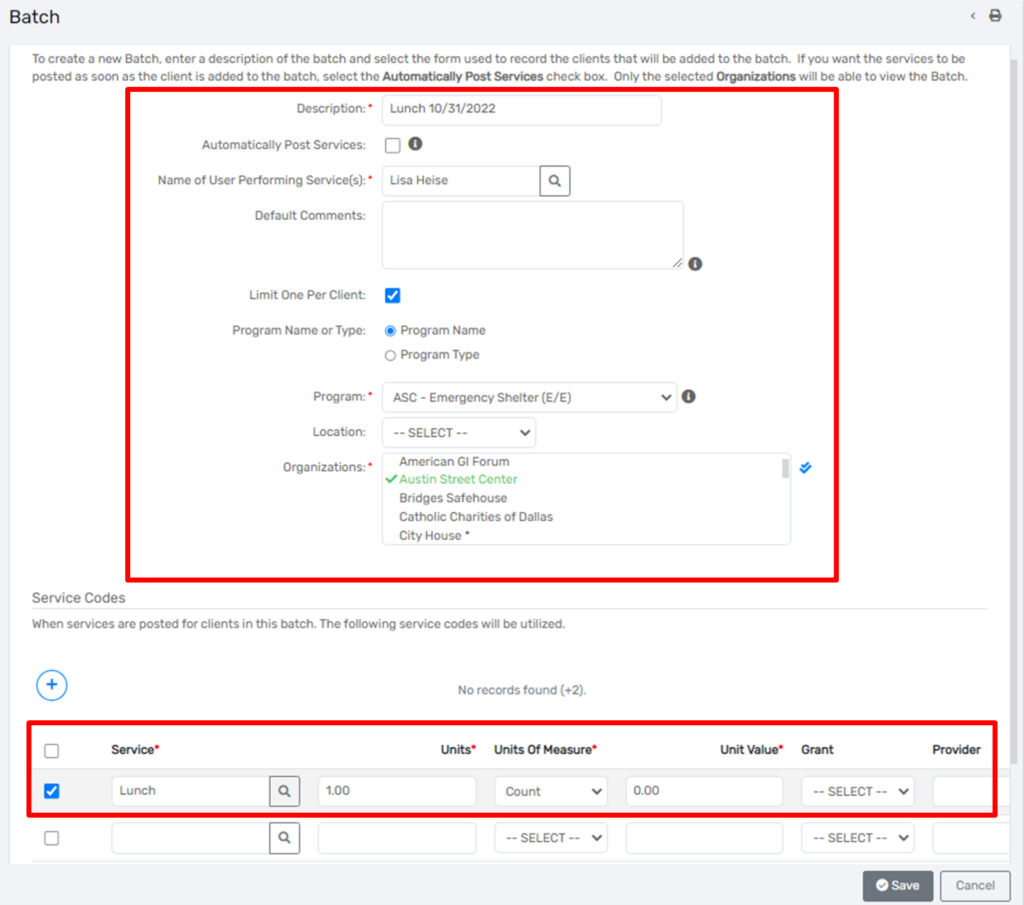
5. Choose the Batch and select Add Clients to Batch.
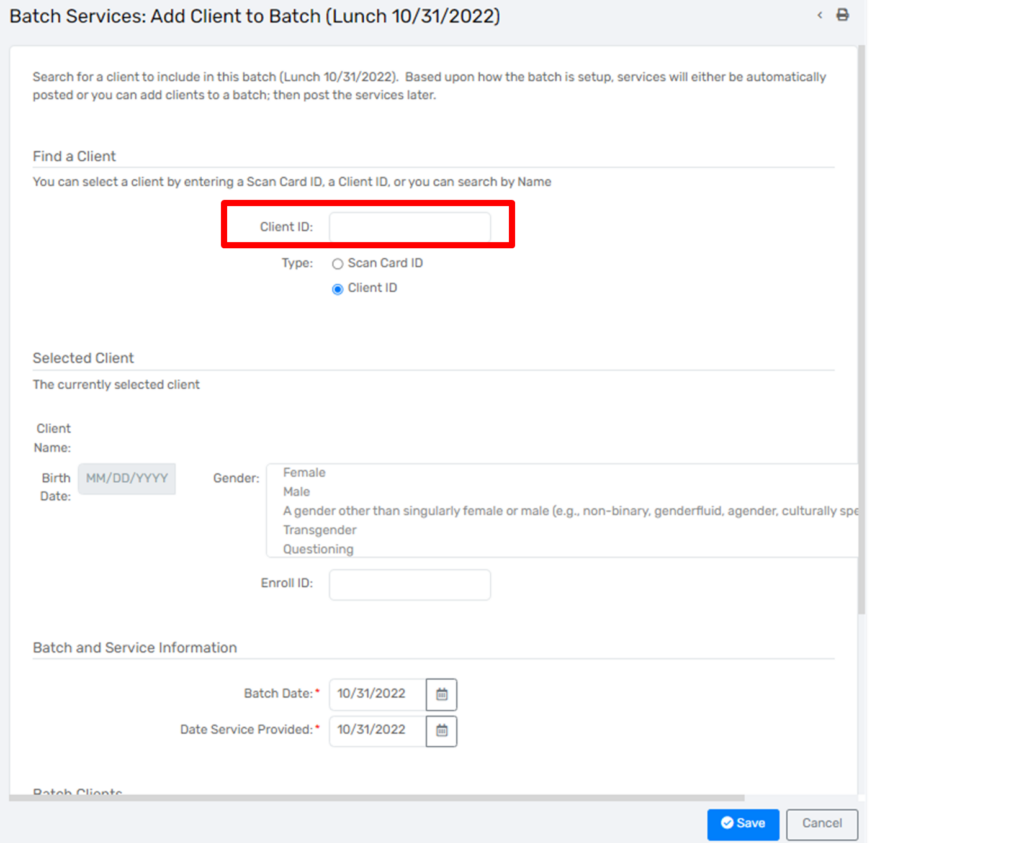
6. This screen will appear in which one would add the client information. Position your cursor in the Client ID field and scan the client’s card, then hit enter.
7. Scroll down to the Batch Clients section to see all the services that have been scanned.
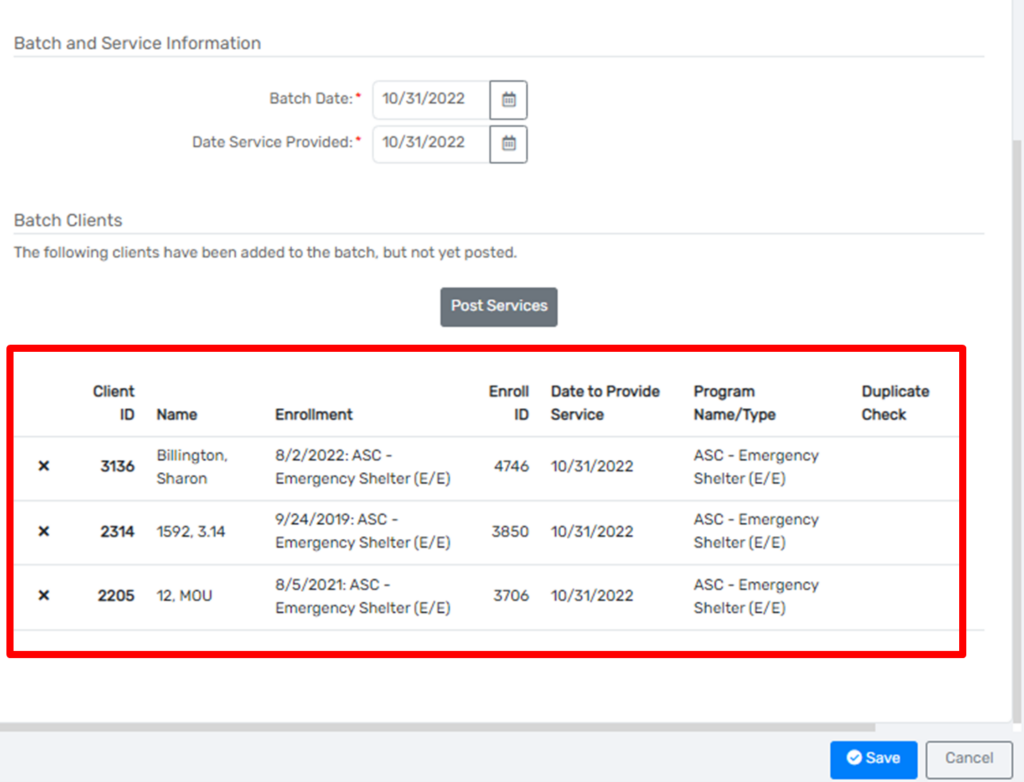
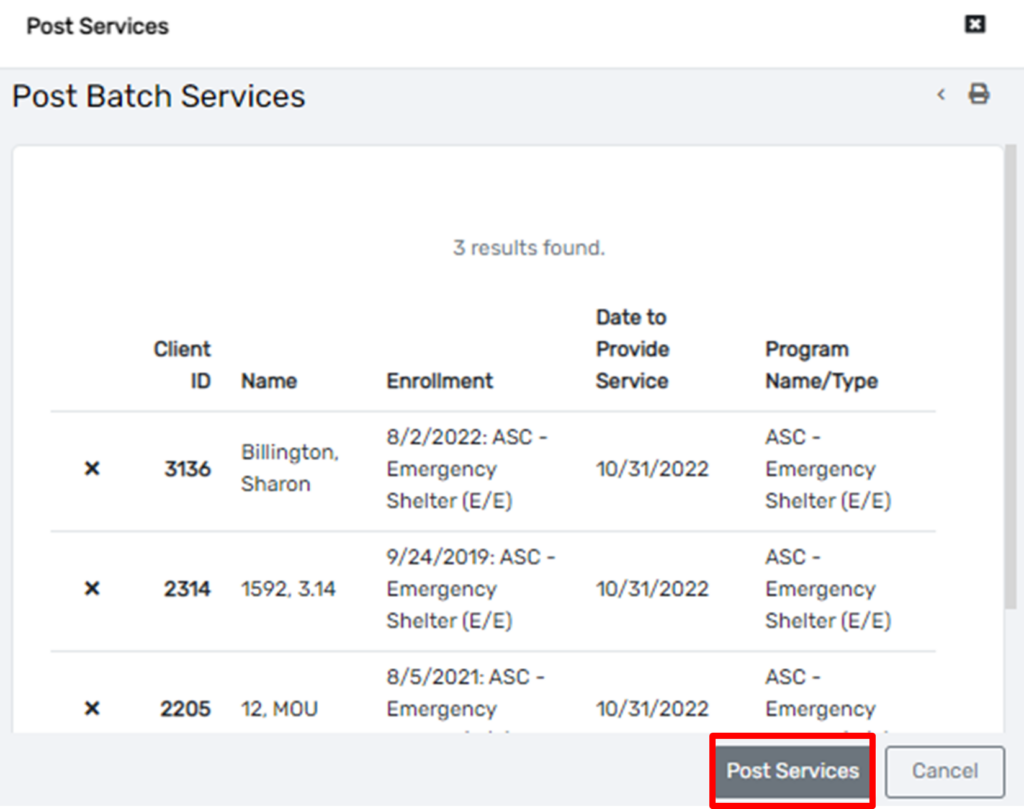
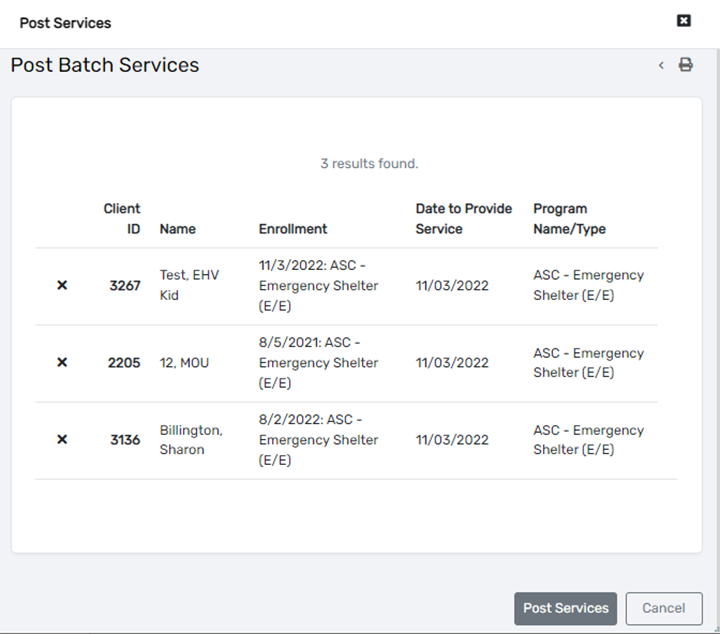
8. Once all the services have been added and reviewed, select Post Services.
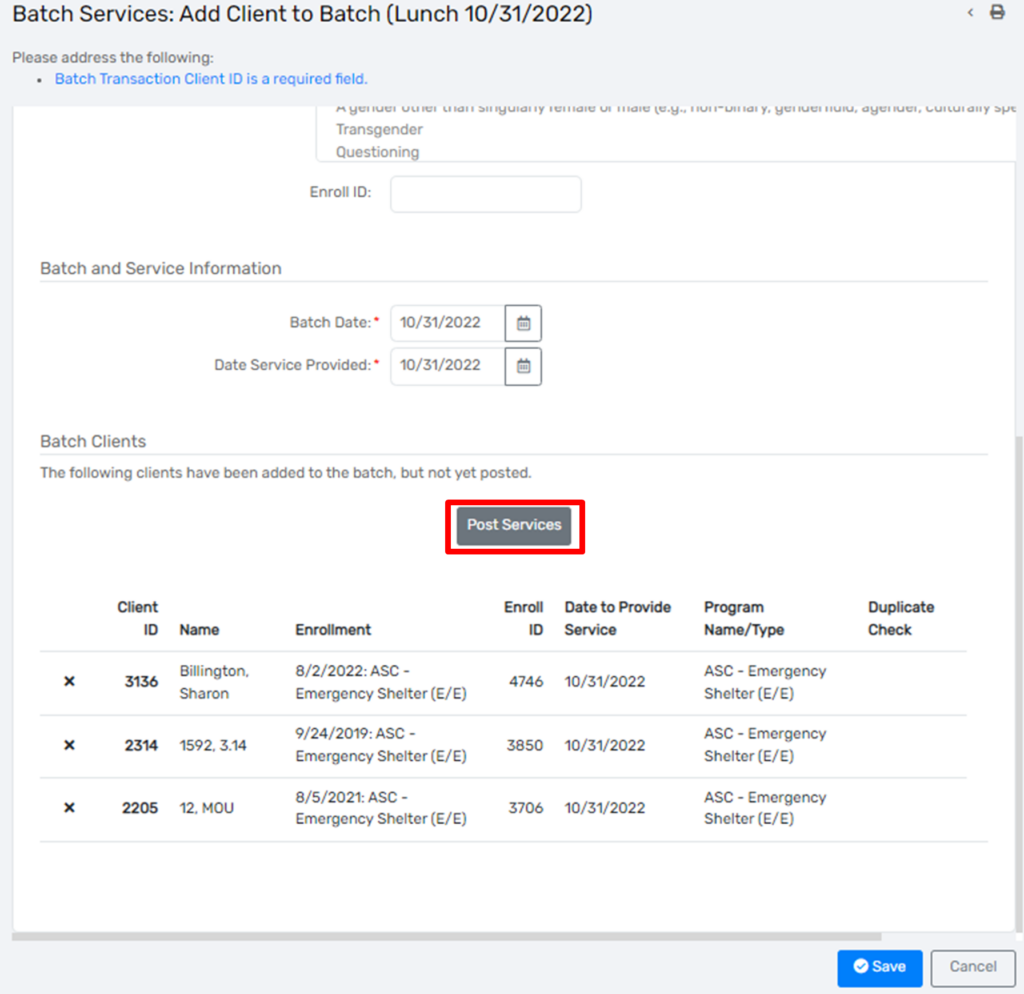
9. On the new window that appears, select Post Services.
When reviewing the batch, you may come across the following situations:
No Open Enrollment (the client is not enrolled in the program) or Duplicate
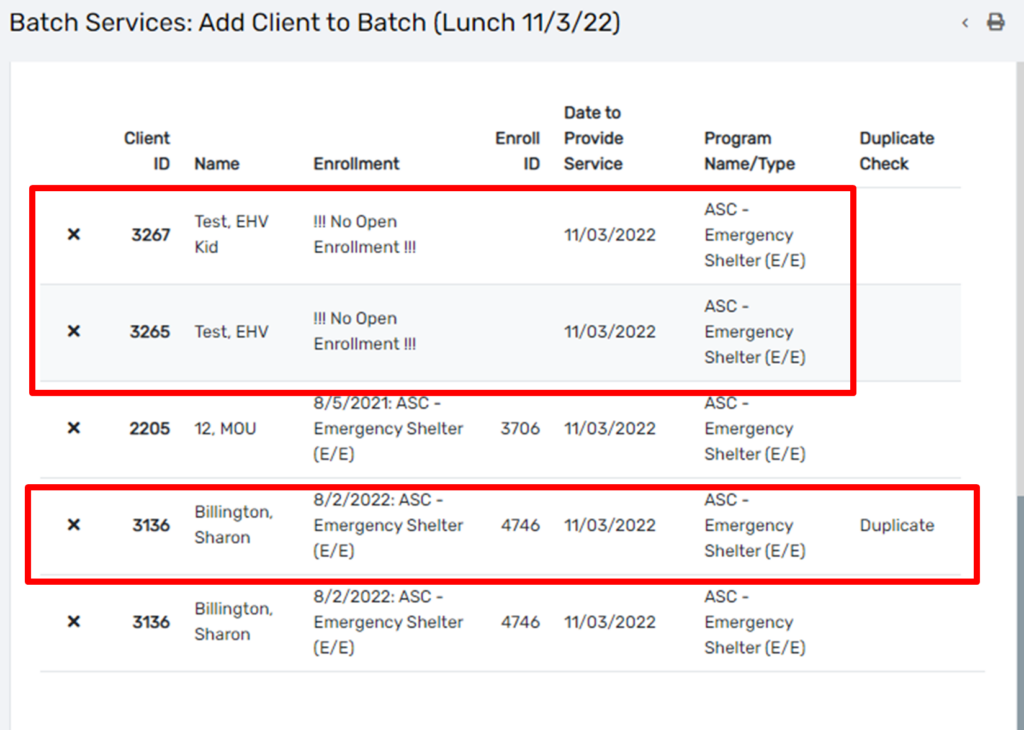
For the No Enrollment issue, you may enroll the client and reload the batch, or delete the entry by selecting the X on the left.
For the Duplicate issue, select the X on left to remove the entry.
After deleting one of the No Enrollments and the Duplicate, below is the posting services screen.
You can use the Quick Services – Multiple Clients feature when you are recording a service with the following criteria:
1. Navigate to your Home Workspace

2. In the menu, select Quick Services – Multiple Clients.

3. Complete the required fields:

4. Scroll down and check the box next to each client who received the service on this service date.

Note: If you do not see a client here, they do not have an active enrollment in your program. A service must be attached to an enrollment in HMIS, so you will need to enroll your client before recording this service for them.
5. Click Save and Close. You may want to go spot-check 1 or 2 client records to confirm the service was correctly recorded.
Download document:

2. Navigate to your Home Workspace, click My ClientTrack and then select My Services from the menu.

You will be taken to the My Services page where you can filter by Client ID, Service, and Service Date. By default, search results will be limited to services recorded today.
3. Enter the information needed to find the service you are needing to delete. Click Search

After clicking Search, you’ll see a list of services that match your search criteria. Each record displays Enrollment Program and Enrollment date associated with the service, Client ID, Service, and Service Date.
4. To delete a service record, click the “x” to the left of the service record.

5. You’ll then see a pop-up asking you “Delete Service Record?”. Click “Yes” to confirm.

1. Navigate to your Clients Workspace and find your client in the system
2. On the client’s Dashboard,
a) Scroll down to confirm that your client has an active enrollment in your program for the date the service will be recorded.
b) In the Services section, click [Client’s] Services

3. The Services page displays all of the client’s services. Use the Add New Service button to record a new service for the client.

4.On the New Service page, select the enrollment this service will be tied to. All services must be tied to an enrollment. Then complete the required fields:
a) Service: choose the service the client received
b) Date: defaults to today, update if backdating
c) Unit: number of these services the client received
d) Unite value: value of 1 of these services, if applicable
NOTE: This can be left at $0.00 if desired. Tracking the value of services in HMIS is part of agency data collection protocols and is not determined by HUD, the CoC, or the HMIS Team.

5. Click Save to record the service.
A clients’ recorded services can be seen on the Services page.

The client’s Dashboard will also display a list of the most recent services recorded.

Incorrectly recorded services must be deleted by an HMIS Admin. To request that a service be deleted, please submit a Spiceworks help desk ticket.
Download document: