Client ties to a particular area are required to be recorded for EHV referrals. Thanks to an HMIS update on 8/20/21 Area Ties can now be recorded inside the CAS workflow as a part of the CAS Diversion & Intake assessment
Area Ties can also be recorded or viewed outside of the CAS Intake workflow, from the Client Dashboard.
2. On the Area Ties page of the worklow, go to step 4 below.
From the Client Dashboard
1. Log in to ClientTrack and navigate to your Client Workspace.
2. Search for your client in the system and select the client to go to their Dashboard.
3. In the menu on the left, click Other Assessments, then select Area Ties. This page allows you to view Area Ties. To add a new Area Tie, click the Add New button in the top right corner.
4. Record the date associated with the client’s ties to the area being added
5. Under Area Ties, record a tie using the list of drop-down options.
6. Under How, select the closet match for how the client is tied to the selected area.
7. Continue adding as many Area Ties as needed. Click Save & Close.
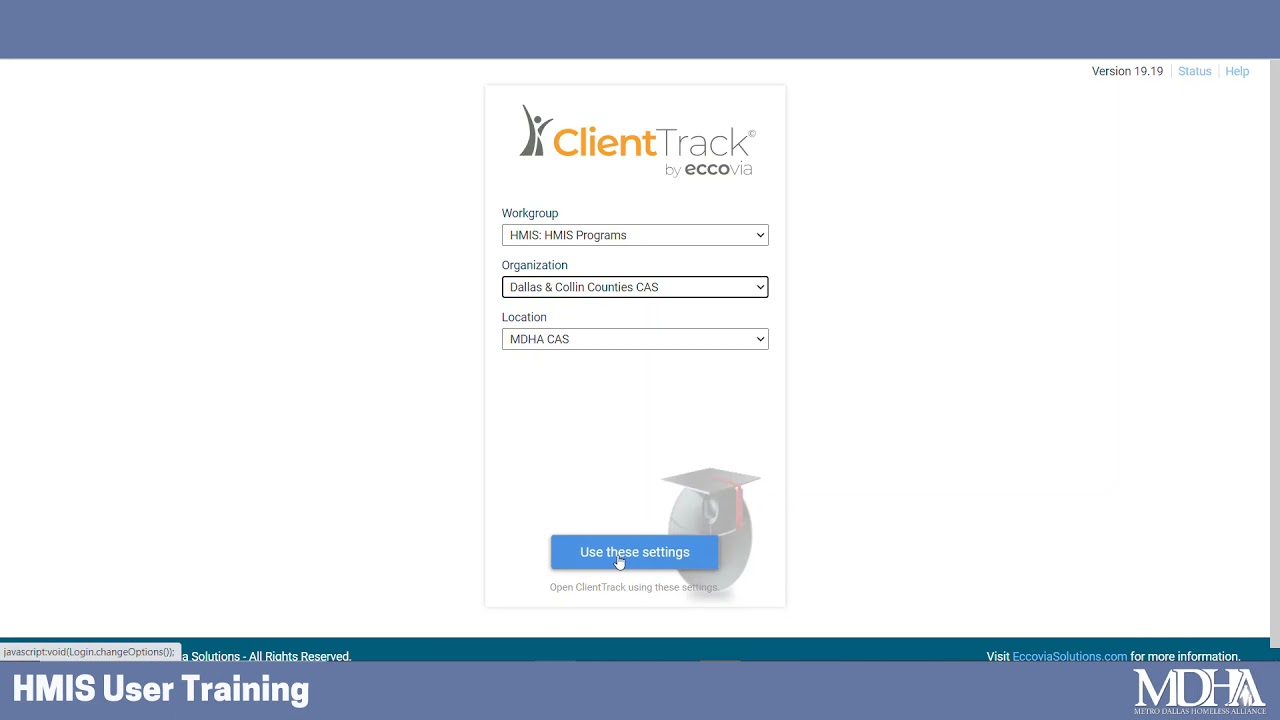
1. Log in to ClientTrack and navigate to your Clients Workspace.
2. Confirm or apply the correct Organization and Workgroup Settings
Organization: Dallas & Collin Counties CAS
Workgroup: HMIS Programs
Find Existing Client Records
3. Search for an existing Client Record for your neighbor using Find Client.
Existing Client Record Found: Click on the client in the results list to select their record, then continue to Step 6, option (a) below.
No Records Found: Continue to Step 6, option (b) below.
Initiating CAS & Diversion Intake Workflow
4. In the menu on the left, click Coordinated Access System (CAS).
5. Select CAS & Diversion Intake.
NOTE: Once you see the Workflow Progress Bar, it is advised that you continue the entire workflow until you click “Finish” to close the workflow.
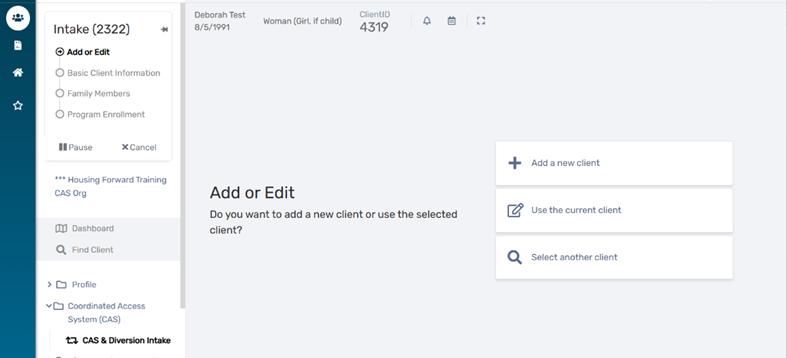
6. Choose the appropriate intake option depending on whether you find an existing record in your Find Client search (Step 3 above).
(a) Existing Client Record: Choose Use the Current Client
(b) No Existing Client Record: Choose Add a New Client
Avoid the “pause” or “cancel” buttons on the Workflow Progress Bar.If you realize you are recording the workflow in error, you can record “Data Not Collected” for all fields, submit the workflow, and either edit or request deletion of the workflow as needed.
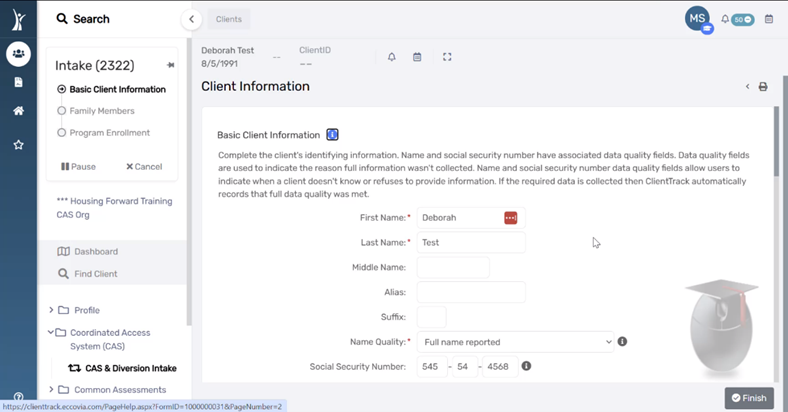
Client Information Page
7. Enter the client’s identifying information in all required fields.
Name and Social Security Number have associated data quality fields. Data quality fields are used to indicate the reason full information wasn’t collected. If the required data is collected, ClientTrack automatically records that full data quality was met.
Race & Ethnicity and Gender are multiselect fields. Select all that apply according to the client’s self-reported information.
Record Contact Information when available.
Family Members Page
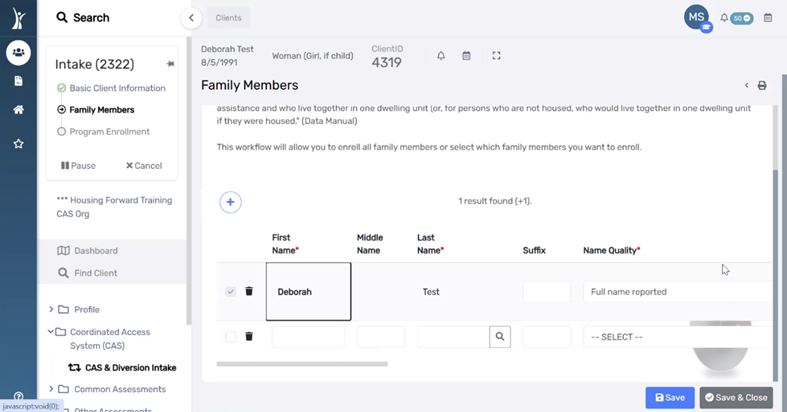
8. Enter or confirm the identifying information all family members in the client’s household.
For clients with existing HMIS records, any associated family members with an existing HMIS record will display.
You may search for existing clients to add to this family or add new clients to the database and associate them with this family.
The next page of the workflow (HUD Program Enrollment) will allow you to enroll all family members in the household or select which family members are enrolling into the project.
HUD Program Enrollment Page
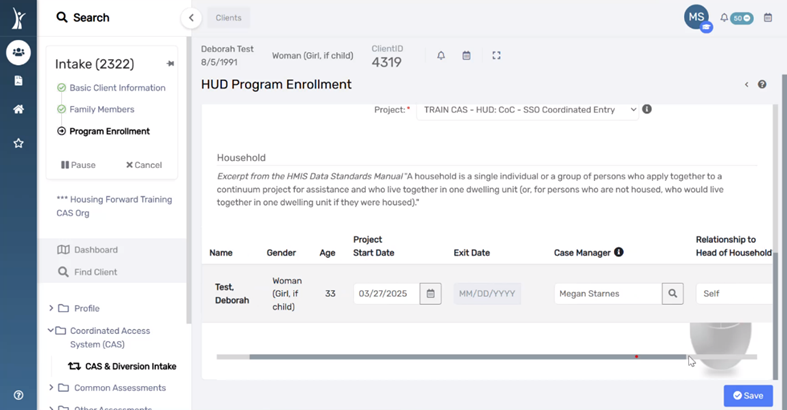
9. Select the HMIS Project for enrollment and all household members enrolling into the select project.
For CAS, choose the project: DCC CAS – Coordinated Entry
Scroll down and check the box next to each household member participating in the intake process.
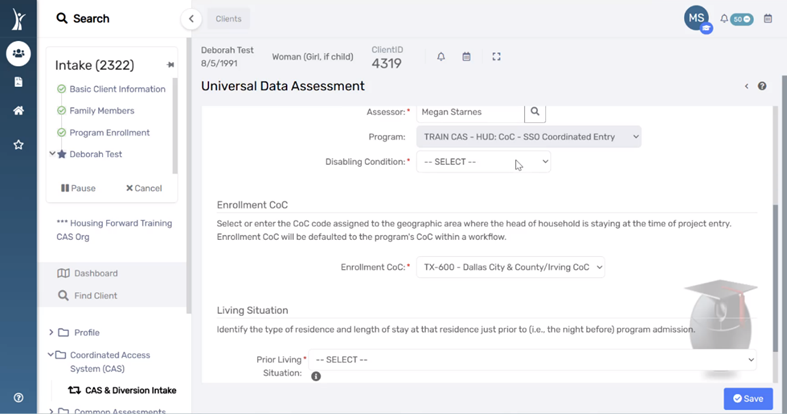
Universal Data Assessment Page
10. Record answers for Disabling Condition and Prior Living Situation according to the client’s self-reported information.
Disabling Condition will indicate whether the client has any of the conditions on the Barriers list (full list below). Items with (*) must be considered indefinite and impacting housing to be considered as a Disabling Condition.
Alcohol Use Disorder*
Chronic Health Condition*
Developmental Disability
Drug Use Disorder*
HIV/AIDS
Mental Health*
Physical Health*
Prior Living Situation will display all answer options specified in the HMIS Data Standards Manual.
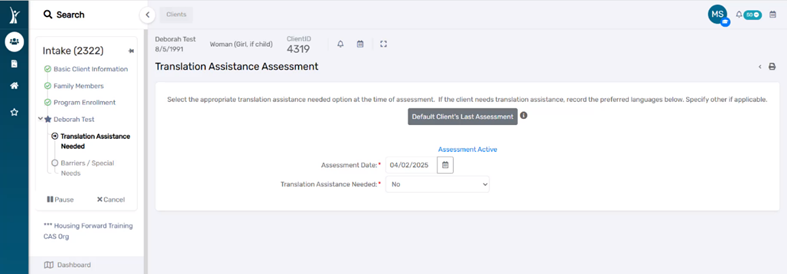
Translation Assistance Page
11. Select the appropriate Translation Assistance Needed option at the time of assessment. Specify “Other” if applicable and enter the client’s language of preference.
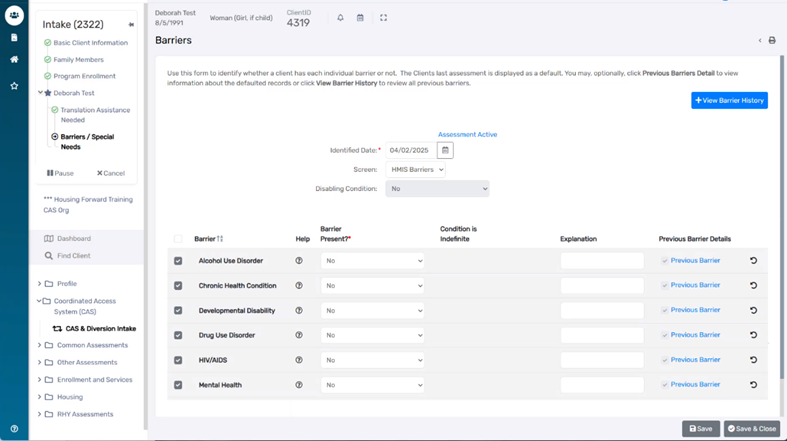
Barriers Page
12. Complete the Barriers page of the workflow by recording an answer for each condition listed.
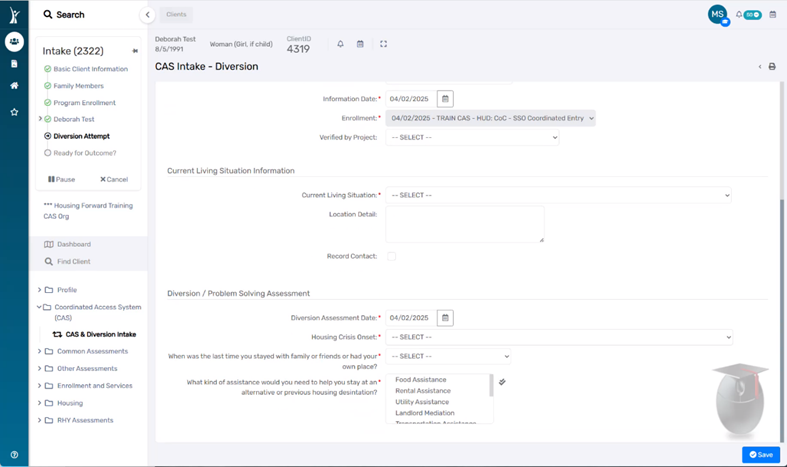
CAS Intake – Diversion Page
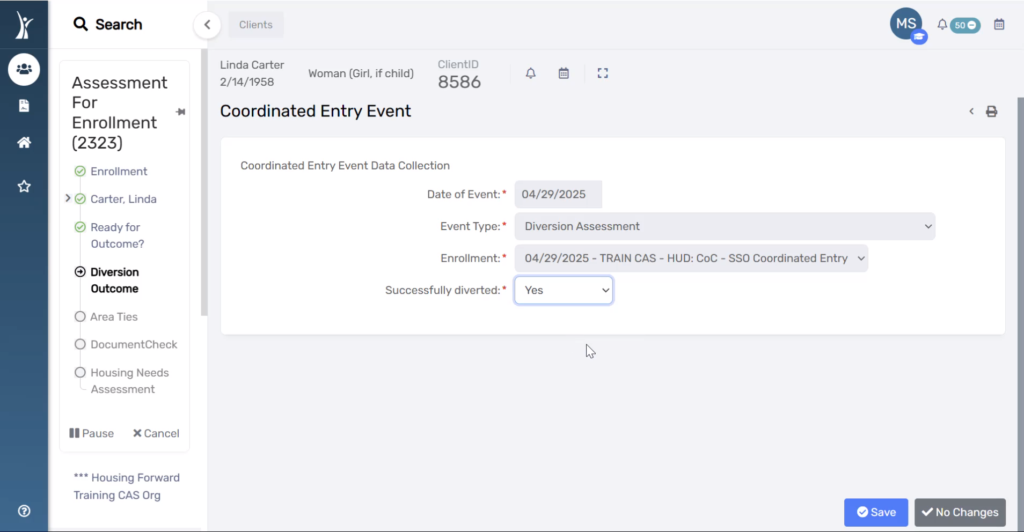
13. Record Current Living Situation and answers to the Diversion / Problem Solving Assessment.
Diversion / Problem Solving Assessment answers general questions about the client’s current housing crisis. Note that these fields are intended to track specific information and should not be treated as as a script.
Diversion Assessment Date
Housing Crisis Onset
When was the last time you stayed with family or friends, or had a place on your own?
What kind of assistance would you need to help you stay at an alternative or previous housing destination?
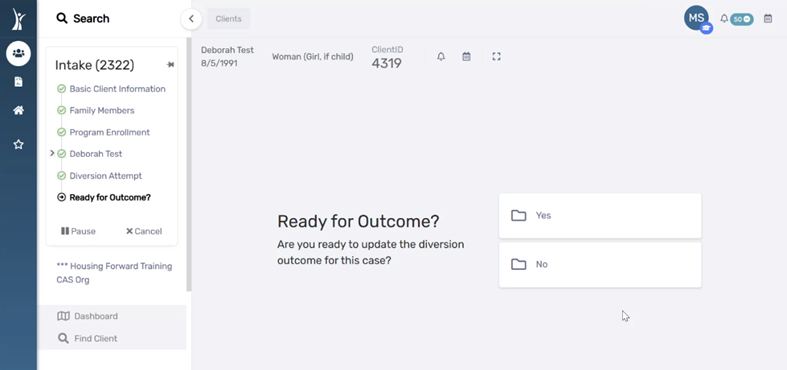
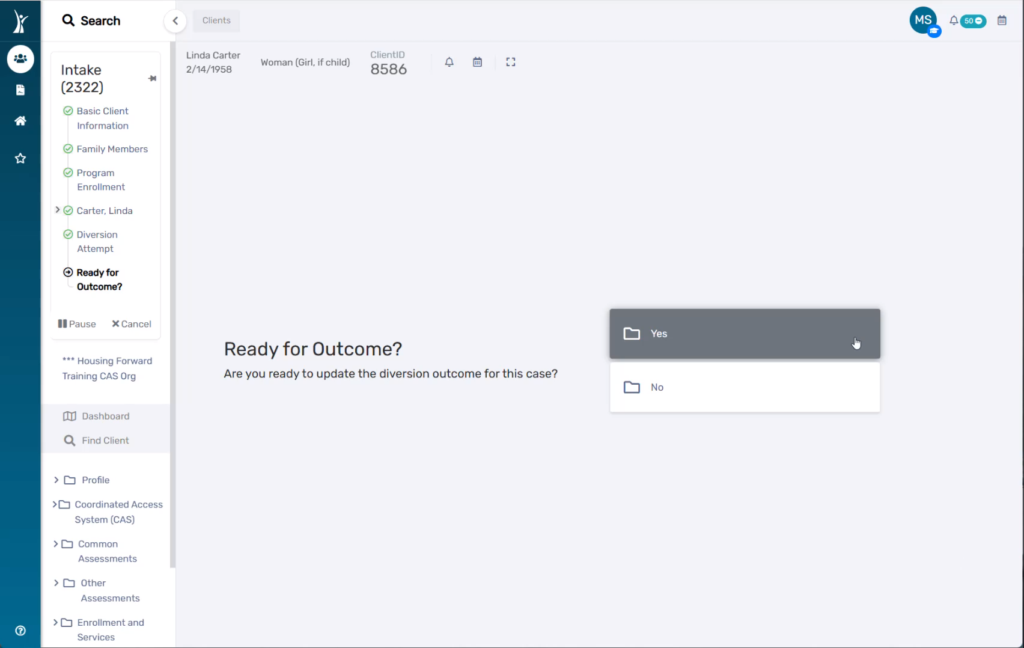
Ready for Outcome? Page
This page of the workflow asks if you are ready to record a diversion outcome for the household.
Answer “Yes” and continue to Step 14 when:
You know whether the household has been successfully diverted, OR
You know that the household cannot be diverted and should be added to the CAS Queue for housing prioritization, match, and referral.
Answer “No” and complete the workflow with an outcome of “Pending” when:
You are waiting on the outcome of Diversion referral or services.
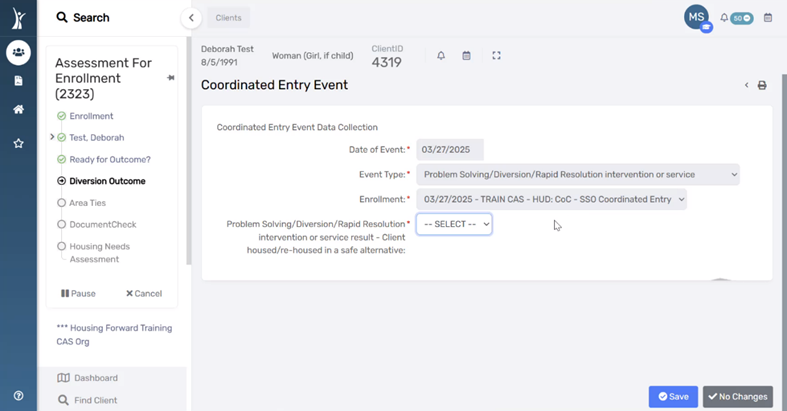
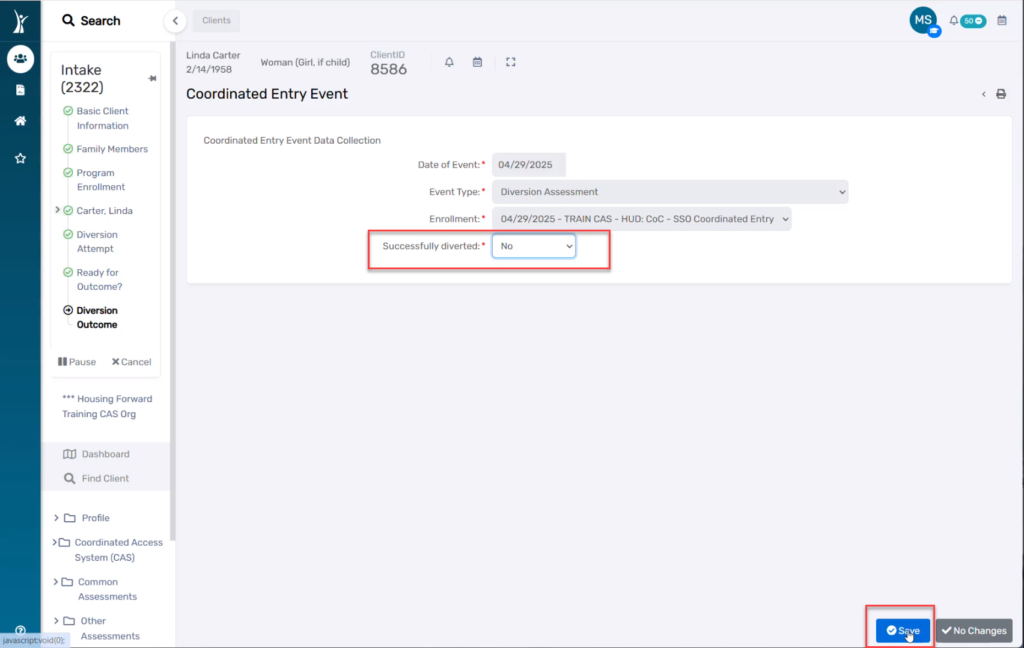
Diversion Outcome Page
You will only continue to the page of the workflow when you have selected “Yes” for “Ready for Outcome?”
14. Select an answer for Problem Solving / Diversion / Rapid Resolution intervention result.
Answer “No” and continue to Step 15 when:
The household is not being diverted, OR
Diversion was attempted by unsuccessful.
Answer “Yes“, and continue to the CAS Exit Assessment workflow when:
The household was successfully diverted and no longer needs CAS services.
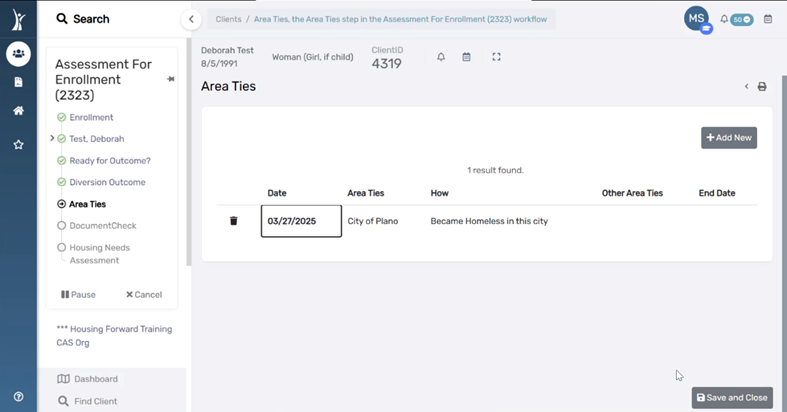
CAS Area Ties Page
You will only continue to the page of the workflow when you have selected “No” for “Problem Solving/Diversion/Rapid Resolution intervention result”
15. Confirm any listed Area Ties, or use + Add New to record a new Area Tie.
CAS Document Check Page
16. Upload any documents available during the intake/HPS conversation.
Use Document Checklist to select a document category.
Check the box next to the document type.
Select the Acceptable Document option.
Enter Comments, Issuance Date, and Expiration Date when available and relevant to the type of document being uploaded.
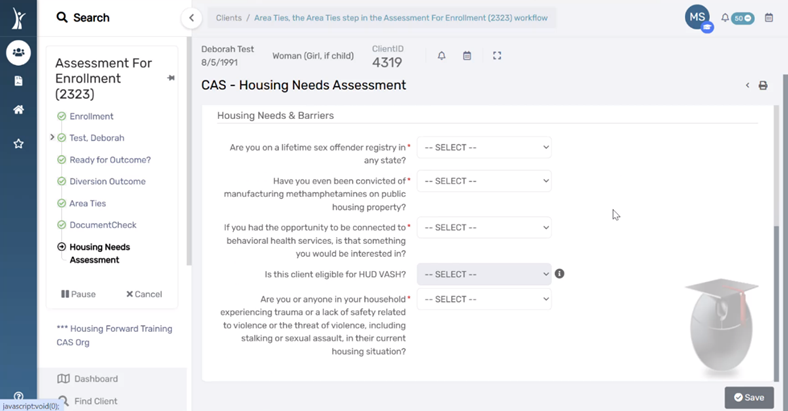
CAS – Housing Needs Assessment Page
17. Answer all questions on this page using information from any Triage, Intake, and HPS conversations with the client.
Housing Needs & Barriers
Are you on a lifetime sex offender registery in any state?
Have you even been convicted of manufacturing methamphetamines on public housing property?
If you had the opportunity to be connected to behavioral health services, is that something you would be interested in?
Is this client eligible for HUD VASH? *This question will only be editable for veteran service providers.
Are you or anyone in your household experiencing trauma or a lack of safety related to violence or the threat of violence, including stalking or sexual assault, in their current housing situation?
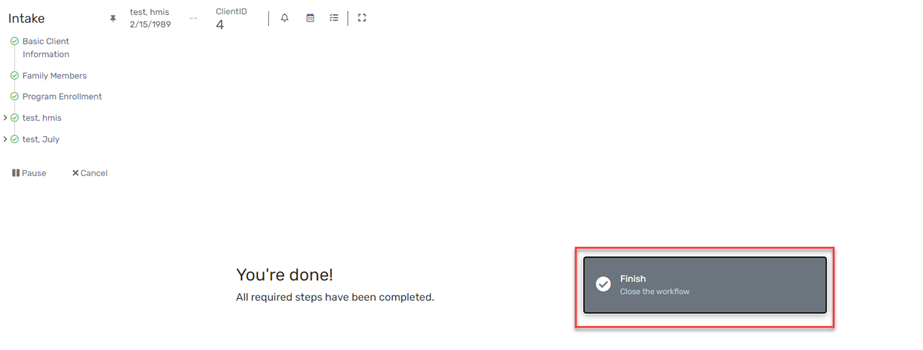
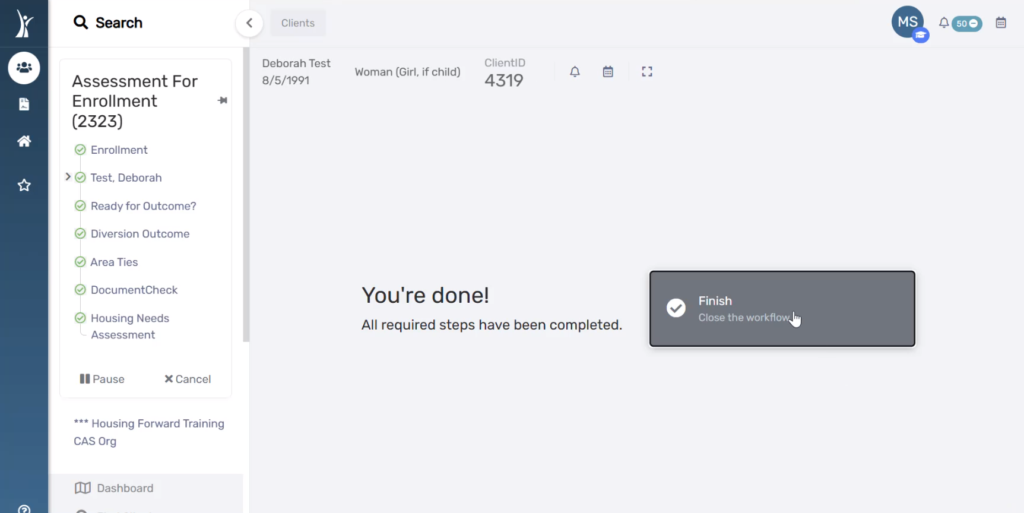
Finish Workflow
18. Click the Finish button to close the workflow.
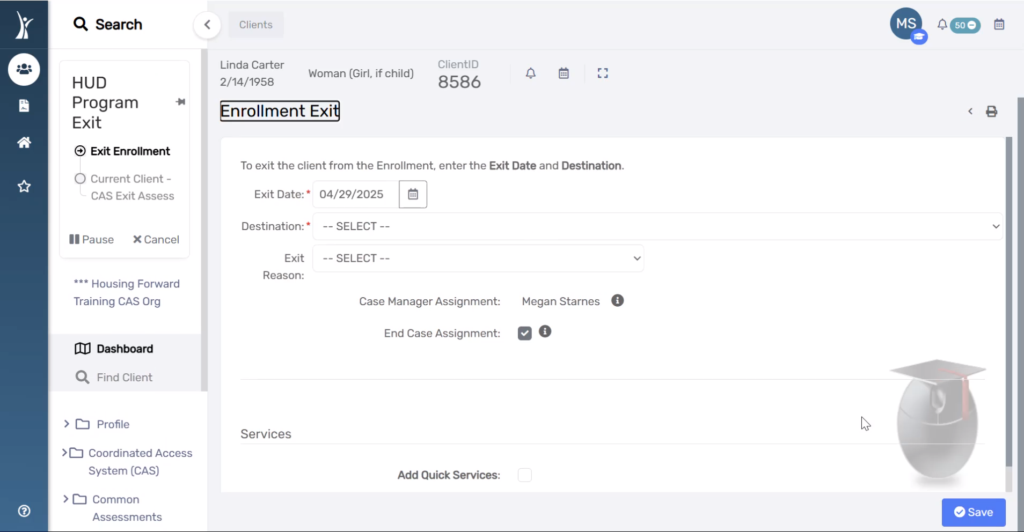
CAS Exit Assessment Workflow for Successful Diversion
You will be immediately prompted to complete a CAS Exit assessment if you selected “Yes” to “Successfully Diverted” in Step 14, meaning the household was successfully diverted and no longer needs CAS services.
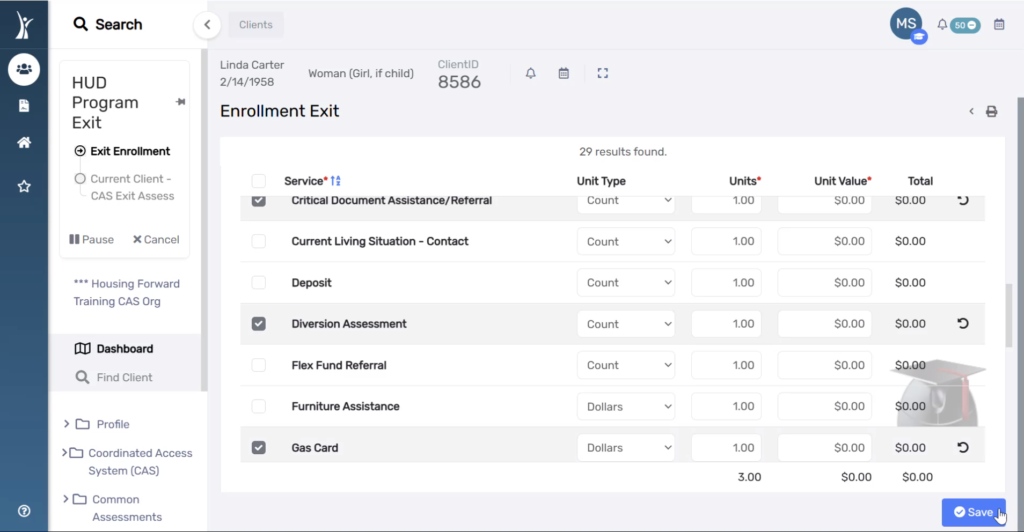
Exit Assessment & Diversion Services Page
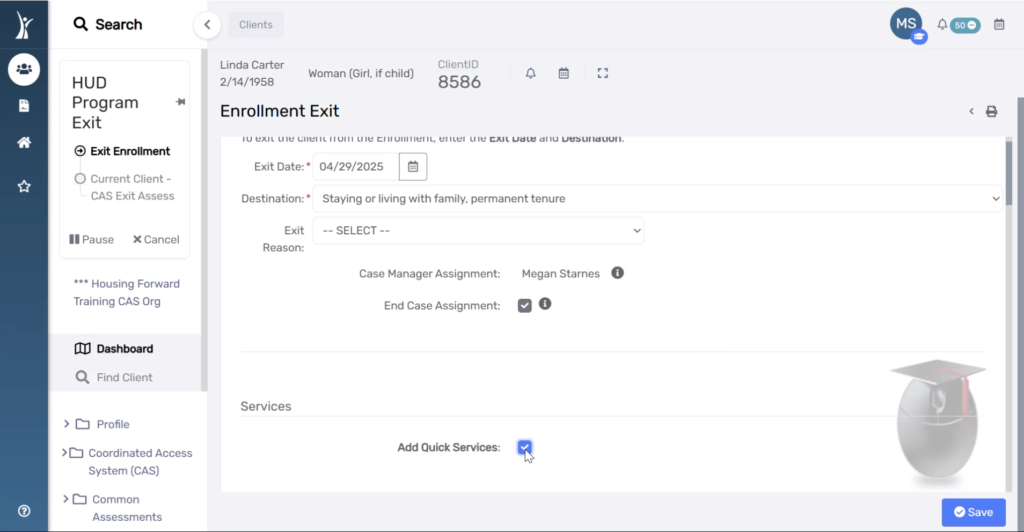
1. Enter the appropriate Exit Destination.
2. Check the box to End Case Assignment. This removes the neighbor from your Active CAS Caseload
3. Check the box to Add Quick Services. A service is required for CAS Exits resulting in a successful diversion.
4. Select any service provided that contributed to this successful diversion. Note the option for “Successful Diversion Other” if you do not see the specific service you provided in the list.
If you choose “Successful Diversion Other” as the service provided, please record a Case Note detailing the service that led to successful diversion.
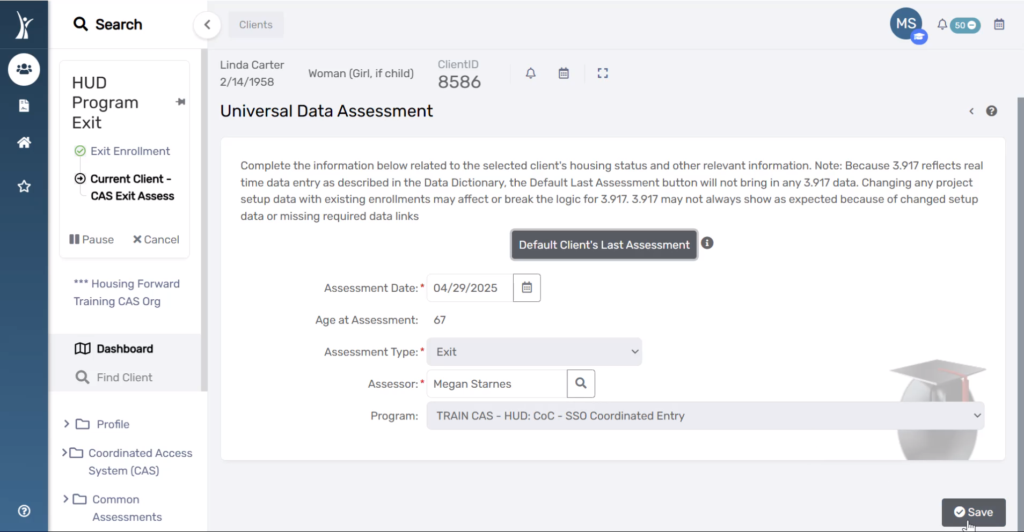
Universal Data Assessment
Fields on this page default and do not need to edited, except in the case of back-data entry. Select Save to continue to the next page of the workflow.
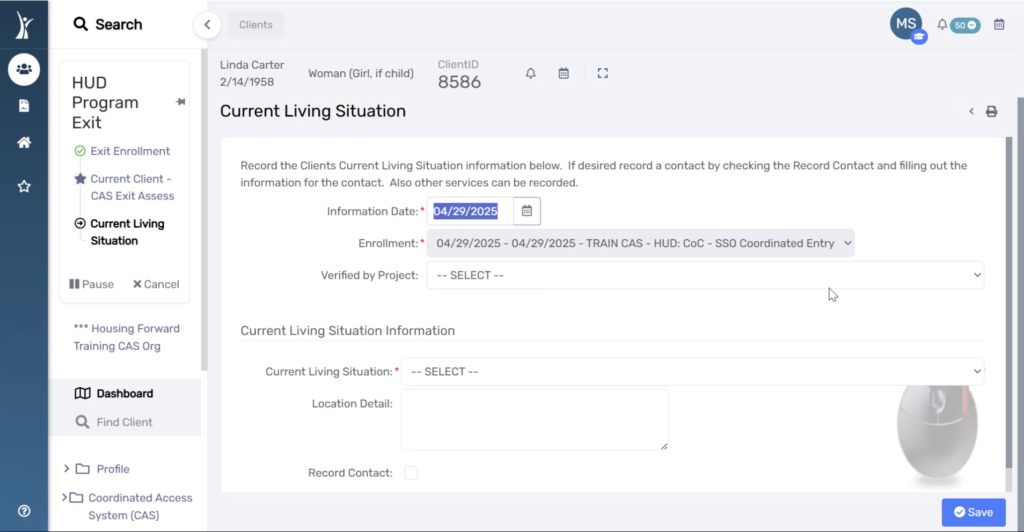
Current Living Situation
You will see this field again in the workflow to record the data in association with the Exit Assessment. Choose the living situation that corresponds to their Exit Destination.
Confirm the Information Date
Record if the Current Living Situation was reported by a different project
Record the Current Living Situations
NOTE: Some responses may produce additional required questions. Answer all questions that appear in response to recording Current Living Situation.
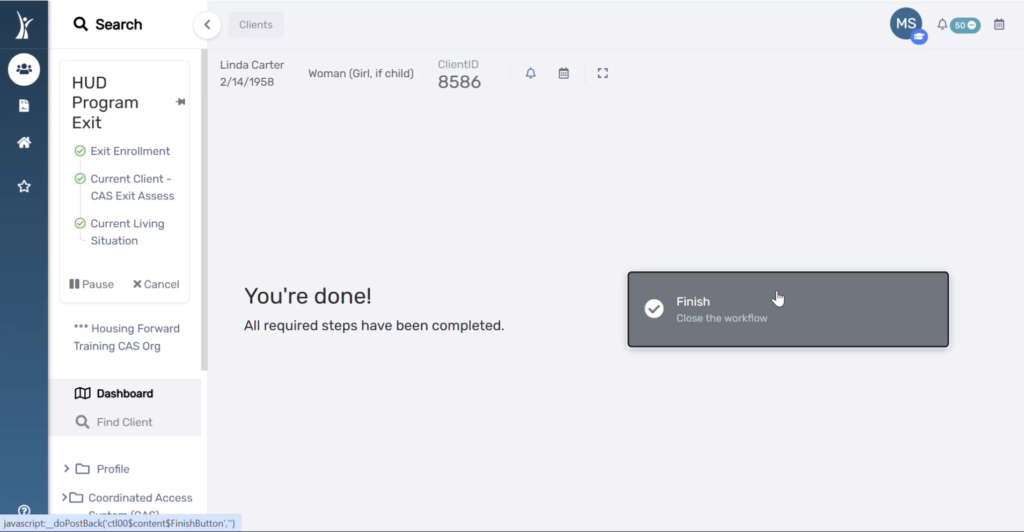
Finish Workflow
18. Click the Finish button to close the workflow.
The Document Check feature should only be used for documents that are uploaded for the purposes of CAS, meaning the documentation is needed to get your client onto the HPL or referred to housing. Note that documents uploaded to Document Check are visible to all users with access to the Dallas and Collin Counties CAS organization, which could include users from different agencies.
Uploading Documents
1. Log in to ClientTrack and navigate to your Clients Workspace.
2. Click on your current Organization to open your account settings and change your Organization to Dallas and Collin Counties CAS. If you do not have access to this organization, submit a Spiceworks Helpdesk ticket to request access.
NOTE: You should only change your organization from the Clients Dashboard or from the Home Workspace. Do NOT change your organization at all from the CAS Document Check page. Doing so may causes errors in your document uploads.
3. Find your client by searching using their name or client ID.
4. On the Favorites Menu, under Profile, select Document Check.
5. The Document Check History page displays all documentation currently uploaded for this client. Use the Add New Document Check button to upload a new document.
6. Complete the required fields (marked by *). Note that not all fields are required. However, for Verification of Disability, an Upload File is required for your client to be referred to housing.
Follow the steps below based on whether you are uploading Documentation of Homelessness of Verification of Disability.
Documentation of Homeless
Document Checklist: Homeless
Item Requiring Verification: select the type of verification you are uploading
Housing Status
Identity
Homeless
Acceptable Document: select the document type on file for the client
Comments: only if needed (optional)
Confirm the Verification Date is correct
Click Choose File to upload the file
Click Save
Verification of Disability
Document Checklist: Disability
Item Requiring Verification: Disability
Acceptable Document: select the type of document you are uploading
Disability Letter
SSI Awards Letter
Comments: only if needed (required)
Confirm the Verification Date is correct
Click Choose File to upload the file (required)
Click Save
7. Once you have uploaded all documents, return to your Client Dashboard. Then, change your organization back to your agency.
This page is a review of the process with general instructions. For detailed cheat sheet with step-by-step instructions and screenshots, go to the Detailed Cheat Sheet section below and download the PDF document.
View Incoming Referrals
1. Log into ClientTrack and navigate to your Home workspace.
2. In the menu, click Coordinated Access System (CAS), then Incoming Housing referrals.
3. Find client on the list. You can filter by project or referral result if needed.
Accept Referral and Enroll Client
1. Click the Start HMIS Intake button.
2. Complete intake for your program as usual (see cheat sheet on Entry Assessments for assistance).
3. Record the Referral Outcome.
Refer from Provider: “Dallas & Collin Counties CAS”
NOTE: Do NOT type this in. Click the magnifying glass. In the search box that appears, leave all fields blank and click Search. Find this provider in the list that appears.
Provider Result: “Client Enrolled Into Project”
Referral Result: “Successful: client accepted”
Reject Referrals & No Shows
1. Click the Referral Outcome button.
2. Confirm the Result Date.
3. Enter the Refer from Provider using the following steps:
Click the magnifying glass next to the field.
Leave all fields blank and click Search.
Choose Dallas & Collin Counties CAS
4. Enter the Provider Result, either:
“Rejected”
“No Show”
Enter the Referral Result.
If Provider Result = Rejected, select “Unsuccessful: Provider rejected”
If Provider Result = No Show, select “Unsuccessful: Client rejected”
CAS has been set up in HMIS to provide notifications to
CAS Admins – users at the lead agency (MDHA)
Case Managers – users with clients assigned to their caseload in HMIS
CAS Contact for each housing provider – one user determined by each agency
Prioritizing Agency Users – users with access to the Dallas and Collin Counties CAS organization in HMIS
Please review following information about each notification, how it is triggered, and what actions are taken by the system or are required by the person receiving the notification
Managing Notifications
Notifications in ClientTrack display in several ways. There is no standard or best practice for managing these notifications. You may choose to manage the notifications and alerts in any way that allows you to get the information needed to take the actions required.
Pop-up Window
You can Snooze or Dismiss individual notifications by hovering over them (shown above). Snoozing the notifications will allow them to pop up again in several minutes. Dismissing notifications marks them as acknowledged and no longer displays them in the pop-up. You also have the option to Dismiss All at the top of the pop-up.
Notification Bell
You will see a red circle with a number inside next to the bell when you have new notifications. Click the bell to view the notifications.
Clicking on the notification allows you to edit the details and alerts for that notification.
Calendar View
Click Open Calendar to see the notifications in a calendar view. The notification will display on the date you received the notification.
Viewing All Notifications
You can view previous notifications that you have dismissed, acknowledged, or otherwise marked as completed. Click View Notifications to see them all and filter to by action you’ve taken on them so far.
Documents are uploaded – While your client is enrolled in CAS, you will need to update their documentation by uploading documents to CAS Document Check. As a best practice you should also complete an update assessment any time you upload a document outside of the entry workflow.
The Outcome of a diversion conversation or attempt changes.
Current Living Situation is a required page of the Update Assessment. The following is an excerpt from the HMIS Data Standards produced by HUD:
“Contacts: CE projects are expected to record every direct contact made with each client in the HMIS via data element 4.12, Current Living Situation. A contact is defined as an interaction between a worker and a client designed to engage the client. Contacts include activities such as a conversation between the street outreach worker and the client about the client’s well-being or needs, an office visit to discuss their housing plan, or a referral to another community service. A Current Living Situation (4.12) must be recorded anytime a client is met, including when a CE Assessment (4.19) or CE Event (4.20) is recorded on the same day.
On occasion, it is expected that a Continuum project that does not participate in HMIS by collecting and entering client-level data will be a source of information about the whereabouts of a client. The Current Living Situation data element will be one factor in reporting to determine whether a CE client is still actively seeking assistance. As a result, it may be necessary for the CE project to record that element on behalf of a nonparticipating project. In those cases, the CE project will use the field ‘Living Situation verified by’ to document the Project Name of the project that reported an updated status for the client during case conferencing.”
Completing the Update Assessment
Login and Navigation
1. Log in to ClientTrack and navigate to your Clients Workspace.
2. Confirm or apply the correct Organization and Workgroup Settings
Organization: Dallas & Collin Counties CAS
Workgroup: HMIS Programs
Find Existing Client Records
3. Search for an existing Client Record for your neighbor using Find Client.
Initiating the Update Assessment
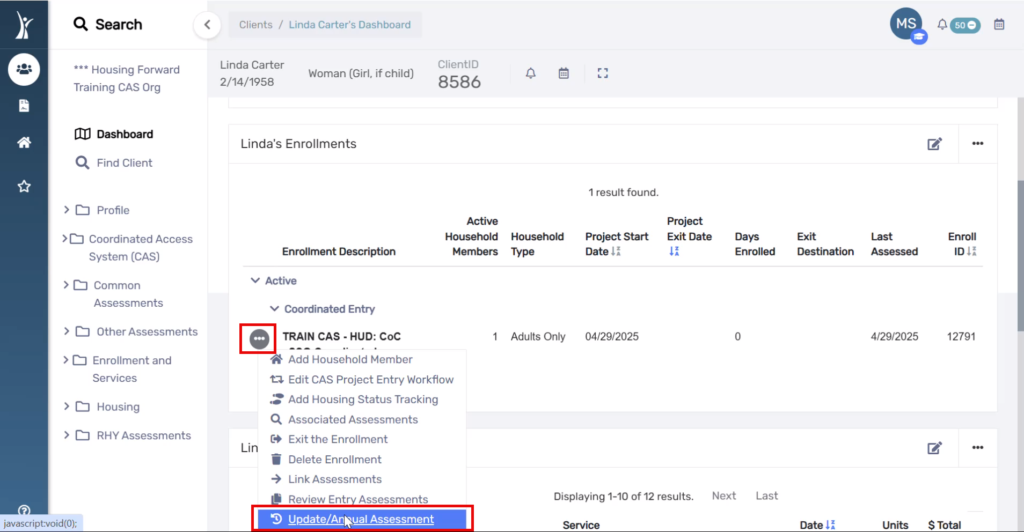
4. On the client’s Dashboard, find the CAS enrollment and select the action menu button. Then choose Update/Annual.
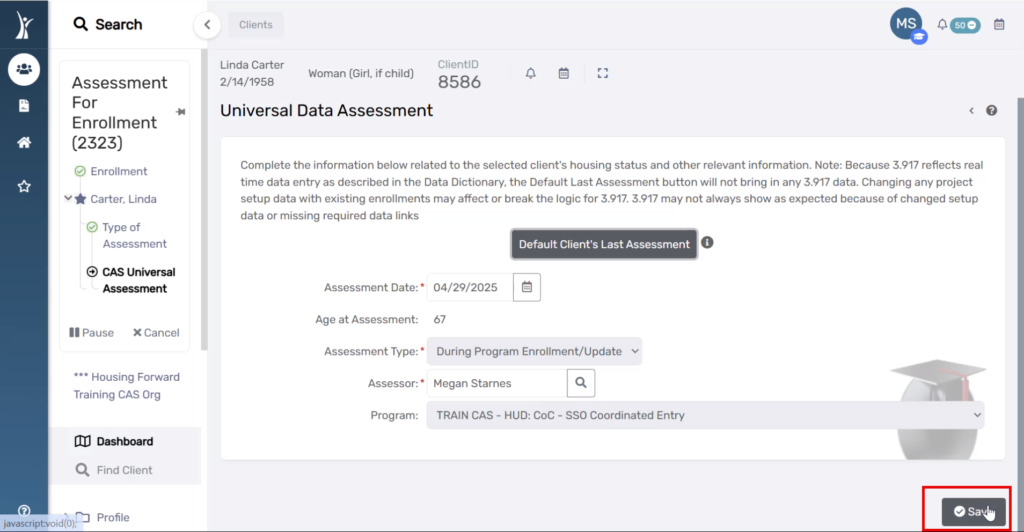
Universal Data Assessment Page
5. Confirm the accurate Assessment Date and select Save.
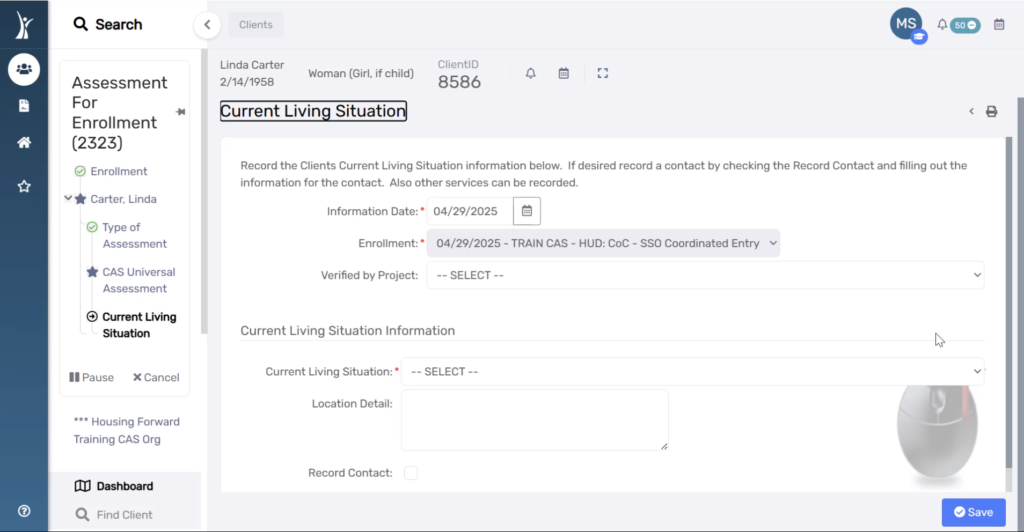
Current Living Situation Page
6. Record the client’s Current Living Situation and select Save.
Confirm the Information Date
Record if the Current Living Situation was reported by a different project
Record the Current Living Situations
NOTE: Some responses may produce additional required questions. Answer all questions that appear in response to recording Current Living Situation.
Ready for Outcome? Page
This page of the workflow asks if you are ready to record a diversion outcome for the household.
Answer “Yes” and continue to Step 6 when:
You know whether the household has been successfully diverted, OR
You know that the household cannot be diverted and should be added to the CAS Queue for housing prioritization, match, and referral.
Answer “No” and complete the workflow with an outcome of “Pending” when:
You are waiting on the outcome of Diversion referral or services.
Diversion Outcome Page
You will only continue to the page of the workflow when you have selected “Yes” for “Ready for Outcome?”
7. Select an answer for Problem Solving / Diversion / Rapid Resolution intervention result.
Answer “No” and continue to Step 15 when:
The household is not being diverted, OR
Diversion was attempted by unsuccessful.
Answer “Yes“, and continue to the CAS Exit Assessment workflow when:
The household was successfully diverted and no longer needs CAS services.
CAS Area Ties Page
You will only continue to the page of the workflow when you have selected “No” for “Problem Solving/Diversion/Rapid Resolution intervention result”
8. Confirm any listed Area Ties, or use + Add New to record a new Area Tie.
CAS Document Check Page
9. Upload any documents available during the intake/HPS conversation.
Use Document Checklist to select a document category.
Check the box next to the document type.
Select the Acceptable Document option.
Enter Comments, Issuance Date, and Expiration Date when available and relevant to the type of document being uploaded.
CAS – Housing Needs Assessment Page
10. Answer all questions on this page using information from any Triage, Intake, and HPS conversations with the client.
Housing Needs & Barriers
Are you on a lifetime sex offender registery in any state?
Have you even been convicted of manufacturing methamphetamines on public housing property?
If you had the opportunity to be connected to behavioral health services, is that something you would be interested in?
Is this client eligible for HUD VASH? *This question will only be editable for veteran service providers.
Are you or anyone in your household experiencing trauma or a lack of safety related to violence or the threat of violence, including stalking or sexual assault, in their current housing situation?
Finish Workflow
11. Click the Finish button to close the workflow.
CAS Exit Assessment Workflow for Successful Diversion
You will be immediately prompted to complete a CAS Exit assessment if you selected “Yes” to “Successfully Diverted” in Step 6, meaning the household was successfully diverted and no longer needs CAS services.
Exit Assessment & Diversion Services Page
1. Enter the appropriate Exit Destination.
2. Check the box to End Case Assignment. This removes the neighbor from your Active CAS Caseload
3. Check the box to Add Quick Services. A service is required for CAS Exits resulting in a successful diversion.
4. Select any service provided that contributed to this successful diversion. Note the option for “Successful Diversion Other” if you do not see the specific service you provided in the list.
If you choose “Successful Diversion Other” as the service provided, please record a Case Note detailing the service that led to successful diversion.
Universal Data Assessment
Fields on this page default and do not need to edited, except in the case of back-data entry. Select Save to continue to the next page of the workflow.
Current Living Situation
You will see this field again in the workflow to record the data in association with the Exit Assessment. Choose the living situation that corresponds to their Exit Destination.
Finish Workflow
18. Click the Finish button to close the workflow.
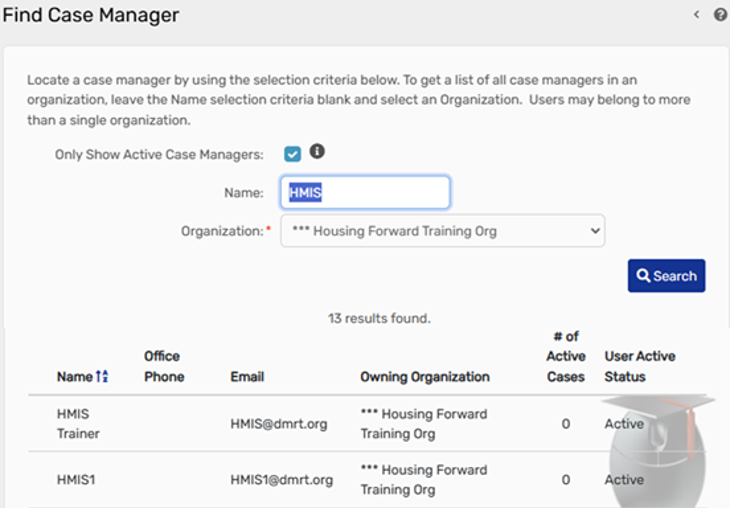
Every HMIS user in ClientTrack is assigned “Case Manager” access, regardless of their role or job title at their agency. The assigned case manager inside ClientTrack is the HMIS user assigned to that client’s enrollment in a given program. A client can have multiple case managers assigned to their enrollment(s).
The case manager is automatically assigned to the HMIS user completing the intake (entry/enrollment) assessment for a client.
Case Manager Assignments
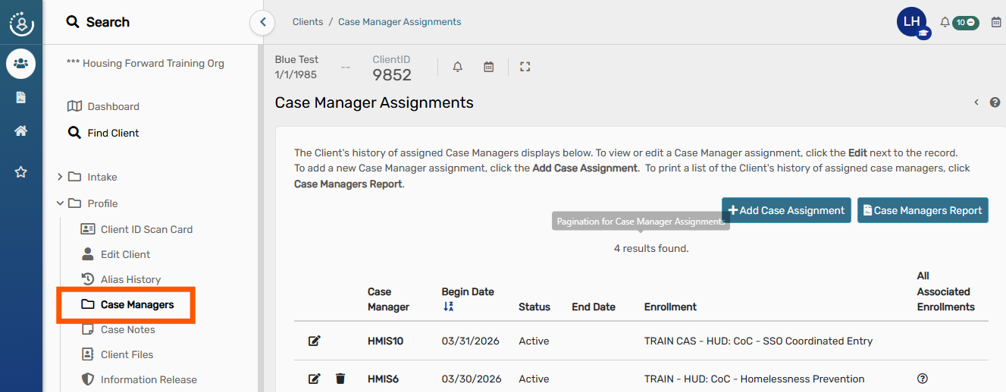
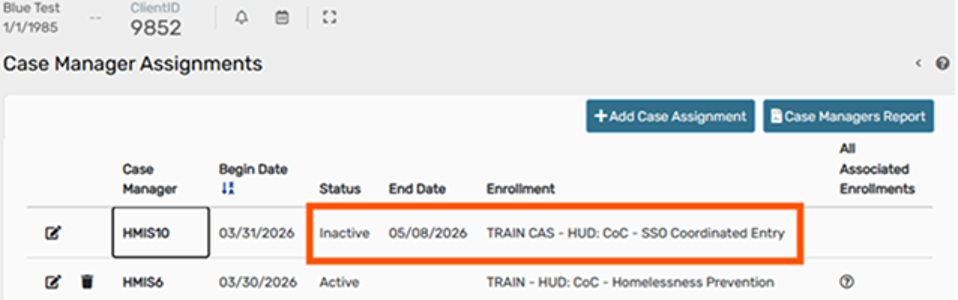
Locate the neighbor using Find Client, once on the client’s dashboard select Profile and then Case Managers.
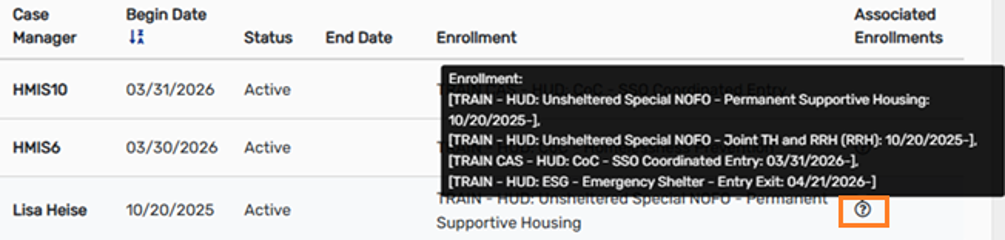
Case manager assignments are grouped. By hovering over the question mark, one can see all the active assignments.
Steps to Reassign via Case Manager Assignments
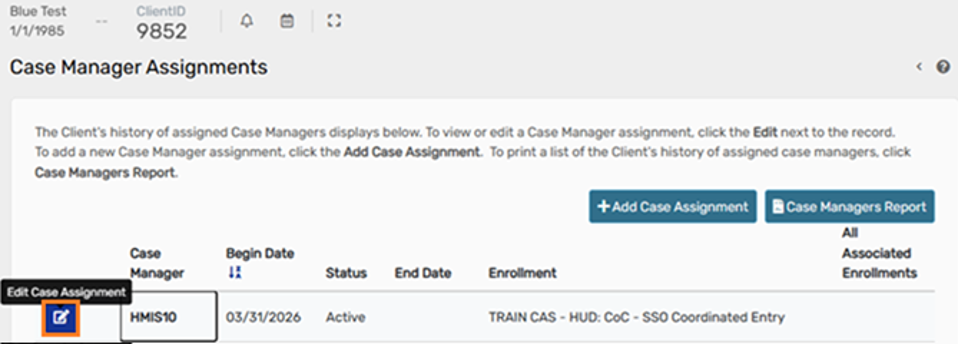
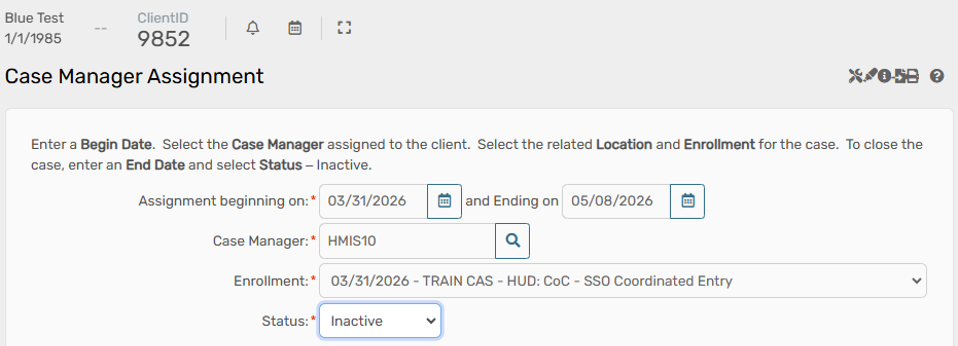
On the Case Manager Assignments page, select “Edit Case Assignment” next to the previous case manager for the enrollment.
Add an End Date for the assignment, and set the Status to “Inactive”
Now the assignment shows that the case manager is inactive on the date selected.
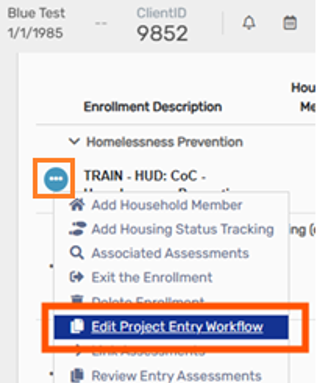
Steps to Reassign via Enrollment
On the neighbor’s dashboard under the Enrollments section, locate the enrollment for your project, edit the project entry workflow via the three dots.
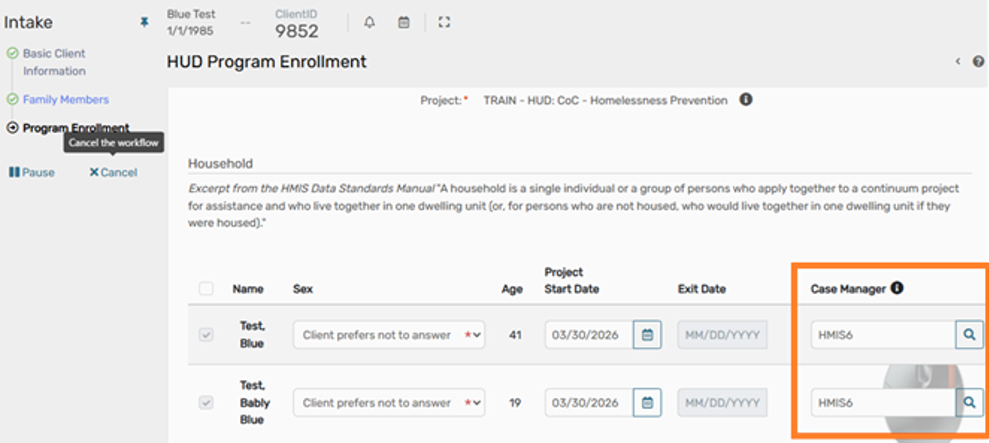
Continue through the workflow to the HUD Program Enrollment page and select the search button for the Case Manager assignment(s) you wish to change.
Search for the Case Manager by inputting their name. Select the Case Manager you wish to assign to the enrollment.
Once the new Case Manager is selected, you will see the update on the HUD Program Enrollment page. Select “Save” and continue through the workflow.
ClientTrack access is assigned based on your organization. Typically you will only have access to your organization. Some users may also have access to an organization called Dallas and Collin Counties CAS for the purposes of CAS.
If you have access to multiple organizations, you can easily switch between them using the following steps.
Changing Organizations
1. Log in to ClientTrack and navigate to your Clients Workspace.
2. Click on your current Organization to open your account settings. Use the Organization drop-down menu to select the organization you need to access. Then click Apply. You should see the Organization in the top right corner update to the organization you just selected.
Edits to the CAS Entry Workflow need to be made when:
You recorded any incorrect information in the CAS & Diversion Intake
You need to update the client’s CAS & Diversion Intake from a previous version of the workflow
You need to update the client’s Disabling Condition
Most updated version of the workflow published: 4/30/2025. All clients should have an entry assessment or edit to the entry assessment after this date
Steps
1. Log in to ClientTrack and navigate to your Clients Workspace.
2. Confirm or apply the correct Organization and Workgroup Settings
Workgroup: HMIS Programs
Organization: Dallas & Collin Counties CAS
3. Search for an existing Client Record for your neighbor using Find Client.
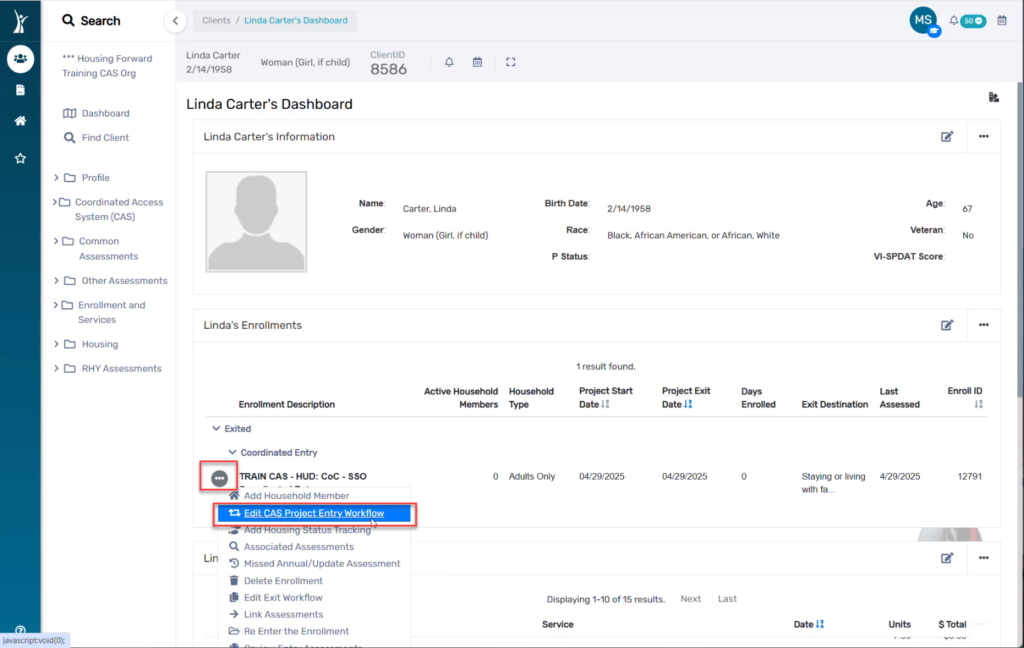
4. On the Client Dashboard, select the action menu next to the enrollment in question and choose Edit CAS Project Entry Workflow.
5. You are now in the Entry Workflow. You only need to make changes on pages with incorrect information. You can click No Changes or Save & Close on any page where you do not need to make changes.
NOTE: This is where you can correct the Project Start Date. However, if you edit this date, you will need to edit the Assessment Date on each subsequent page of the workflow, and the Master Assessment. See the Master Assessment section below for more details.
6. Edit any pages in the workflow that needs to be edited.
If you changed the project start date, check the dates on each of the pages in the rest of the workflow to be sure they match the project start date.
Examples of pages you may see in the workflow are shown below, but are dependent on project type. The date of each assessment page is highlighted below for easy reference, but all information on these pages can be edited as needed.
Universal Data Assessment
Barriers/Special Needs
Domestic Violence Assessment
Ready for Outcome – Workflow Decision Point
“Yes” to this question continues to either a Diverted or Placed on Queue outcome for this CAS workflow.
“No” to this question ends the workflow here, resulting in the client being enrolled in CAS but not placed the CAS Queue.
Successfully Diverted? – Workflow Decision Point
“Yes” to this question directs the workflow into a CAS Exit and records a successful diversion to alternative permanent housing.
“No” to this question continues the workflow into the CAS Queue Placement pages of the workflow, resulting in the client being placed on the CAS Queue for referral.
NOTE: When recording an answer on this page during an Edit to the Entry Workflow, be sure to select “Save” at the bottom of the page.
7. When you have edited all pages and clicked through the entire workflow, click Finish to close the workflow.
Edit Master Assessment
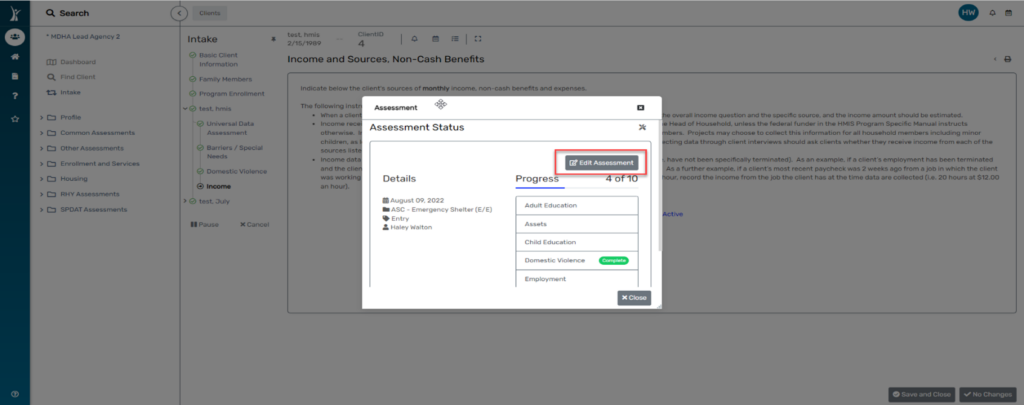
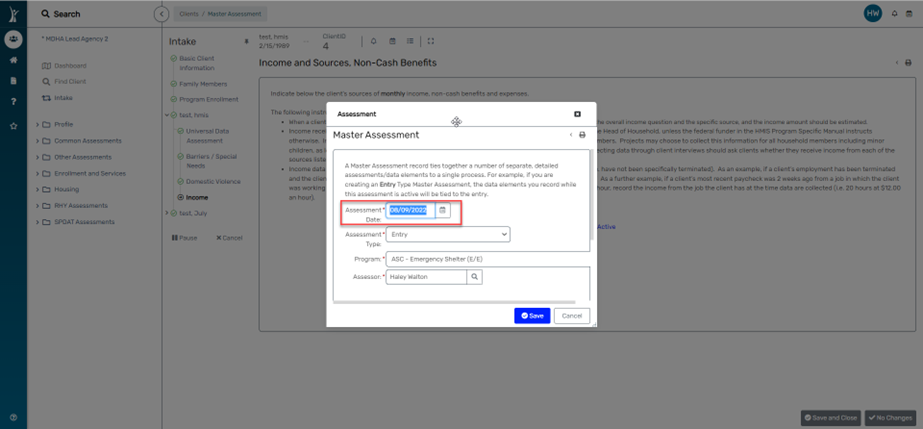
This edit will be required if you are editing the Project Start Date or the Income Assessment Date. 1. On any page of the workflow, click Assessment Active link (shown on Income page above in Step 5). 2. Click Edit Assessment.
3. Edit the Assessment Date to match the Project Start Date.
4. Click Save, then Close the Master Assessment popup box to go back to the workflow.
While the CAS Queue has several ways to filter and search for information while viewing the queue inside ClientTrack, there is some helpful information that is not visible on the queue in real time. For example, the CAS Queue cannot be filtered or sorted by the case manager assigned to the client. The steps in this cheat sheet describe how to export the CAS Queue for the purposes of case load management. Exporting the list allows case managers to filter and only view their assigned clients on the queue.
2. From the CAS Queue, select the Excel Export option.
3. On the Excel Export pop-up window, choose Export as XLSX. This will download an Excel file to your computer.
4. Open the downloaded file. Filter the document for only your clients. Now you have a list of your assigned clients, their CAS Intake Status, and more for the purposes of managing your case load.
Adding a Filter
1. Select the row with the column headers. In this example, the header row is Row 1. Hint: Click the label on the row (1, 2, 3, etc.) to select the entire row at once.
2. Click Data, then Filter.
3. Select the arrow next to a header to filter the data by the information in that column. For this example, filter Column L by your name to find clients which you’re assigned to as Case Manager. Filter Column M to see only clients with a certain CAS Intake Status. This can be done with any column.
Hint: More than 1 filter can be applied at once. If you are missing data from a list, be sure to check the filters and remove filters that may be filtering out some clients.
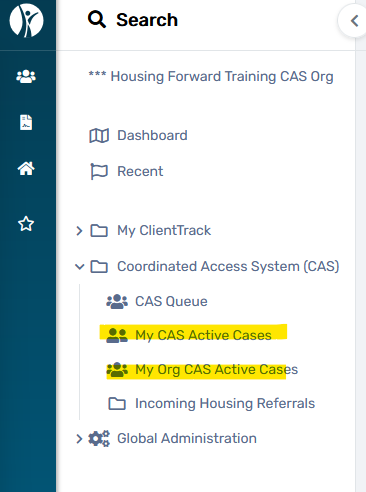
Two forms have been created for use as a CAS Case Management Tool. Both are located in the Home Workspace under Coordinated Access System (CAS) and provide information for case managers to manage their CAS case load through the CAS process.
My CAS Active Cases
This page automatically displays the CAS case load for the user that is logged in. ClientTrack automatically assigns the user completing the CAS & Diversion intake assessment as the “active case manager” on a client’s CAS enrollment. Users can change the assigned active case manager using these instructions.
On the My CAS Active Cases page, users can filter and sort the results using the fields at the top of the screen. The following information will display for each case:
Client ID
Client Name
Enroll Date
Days Enrolled in CAS
Date Exited
Prioritization Status
CAS Intake Status
Date of last assessment
Date of Most Recent Service
Most Recent CLS and date
Referral status and information
And documents uploaded (SS Card, BC, ID, etc.) (still in development)
My Org CAS Active Cases
This page allows the user to filter active CAS cases to view all active cases assigned to users at their Access Point organization (for all organizations they can access in ClientTrack).
This page functions in the same manner as the My CAS Active Cases page, and displays the following information:
Client ID
Client Name
Enroll Date
Days Enrolled in CAS
Date Exited
Prioritization Status
CAS Intake Status
Date of last assessment
Date of Most Recent Service
Most Recent CLS and date
Referral status and information
And documents uploaded (SS Card, BC, ID, etc.) (still in development)
Program Managers and team leaders can use this page to review CAS active cases assigned to members of their teams, to assist in caseload management and coordination.
In the event that you have a client who has been referred through CAS, you can view details about the client’s referral from the CAS Queue. This information can be helpful during case conferencing and collaborating across the system to support clients in the referral process.
Steps to View Referral Details
1. Viewing a referral for a client begins at the CAS Queue. If you need assistance navigating to the CAS Queue, please see the cheat sheetViewing the CAS Queue, then continue to step 2 of this cheat sheet.
2. Search for your client on the CAS Queue.
3. After locating your client in the list, click the action arrow next to their name and choose “Referrals” from the options that appear.
4. On the referrals page, check the box for “Only Show Referrals Made” and click Search. This will allow you to see referrals that have been made for this client, and view the Referral Result. You will be able to view the project where the client was referred, the provider, the date, and other details listed in the sort bar at the top of the referral list.
5. If you want to see more details about the referral, click the View button next to the the referral. The referral details screen should be viewable, but not editable.
Users can confirm that their client has been placed on the CAS Queue (digital HPL) after enrolling the client in Coordinated Entry and choosing “Placed on prioritization list” on the last page of the CAS Diversion & Intake workflow.
Steps to View
1. Log in to ClientTrack and confirm your organization is Dallas & Collin Counties CAS. If you do not have access to this organization and feel that you should, please submit a Spiceworks ticket requesting access.
2. Navigate to your Home workspace.
2. In the menu, click Coordinated Access System (CAS), then select CAS Queue.
3. The CAS Queue will display. Note that the clients do not display in priority order. There is currently no way for users to determine priority from this list.
Use the search fields to locate your client(s) on the list. For example, you can search by name or client ID to find a specific client. Or you can search by status to see a list of clients with that status.
Filtering and Sorting
7/26/2021
New Filter: Chronic is now also a filter available to all users. If Chronic = yes, only clients with a chronic status will display.
Sorting: A header row with sorting arrows for each column now displays at the top of the queue, allowing all users to sort Client ID, (VI-)SPDAT Score, P-Status, Household Type, Family Count, Referrals Status to be sorted in ascending or descending order.
ATTN 8/3/21: The known issue involving the VI-SPDAT was resolved as of 8/1/21. Previous guidance given on 6/23/21 on this page for the VI-SPDAT workaround is no longer needed.
I only have a client’s name, and there are multiple records displaying in HMIS with a similar name. I don’t have any other information to allow me to deduplicate or determine if the client is one of these existing records. What should I do?
Enter the client into HMIS with a new record. Note the client ID so that you can return to this specific client as you build rapport with the client and record more information. Once you have enough information to determine whether this is a duplicate, you can go back and compare this client’s record to other clients with a similar name. If you see a client that is clearly a duplicate, submit a Spiceworks ticket and we can merge the records. The HMIS Team also regularly merges records for clients who are clearly duplicates. Ultimately, it is better to have a new, duplicated record of that client which we can correct over time than to not have a record of that client in the system.
I encountered a client for the first time, but when I found them in HMIS, they already were enrolled in CAS. What should I do?
Confirm your organization is Dallas & Collin Counties CAS. Then complete a CAS Update Assessment for that client on their CAS enrollment. If you have new documentation, upload it! Do not complete a new enrollment or new VI-SPDAT. Your documentation upload will help the client stay active on the CAS Queue, and your update assessment will ensure that we have the data we need to match your client to the most appropriate intervention.
If I’m enrolling my client in CAS, or Coordinated Entry, why do I also need to enroll them in my program?
Coordinated Entry (CE) is a shared program across the whole community with the goal of facilitating collaboration between programs to connect the client to housing. The purpose of the CE program, and the data collected for it in HMIS, are different than the purpose of your program. For example, a street outreach program will provide services to clients unique to the program that are not provided by Coordinated Entry. Both program’s enrollments and services need to be tracked in HMIS.
Program-specific data elements also differ across program types, and your program will be required to collect data that is not required by Coordinated Entry. Completing the entry assessment for your program ensures that this data is collected.
Can I use the “default last assessment” button on my program enrollment after enrolling a client into Coordinated Entry?
Yes, you can use the default button on any assessment in the system. Remember that this is only a tool to have the system pull the most recently recorded information for the client. It does not take the place of a conversation with the client. You should always confirm with the client that the information is correct.
If I placed a client on the CAS Queue, how will I know when my client is referred to a program?
Access Point case managers are strongly encouraged to attend weekly Access Point case conferencing calls in support of their clients. Case Managers can also view a client’s referral status on the CAS Queue, and view a client’s CAS referral details once a referral is made to aid in case conferencing and collaboration with the referral provider.
After the diversion assessment, if a client or family is at risk of homelessness, can I still add them to the CAS Queue?
No, if the client/family is diverted, they are not enrolled in Coordinated Entry and not placed on the CAS Queue. The purpose of the CAS Queue is to identify and track individuals experiencing homelessness and connect them to housing, so a diverted client/family would not go on this list.
Is there a way to turn off notifications after I have enrolled a client?
There is not a way to turn off all notifications inside ClientTrack. If you enroll a client but are not the best person to receive notifications about their status, you can reassign the case manager on the client’s enrollment to the person who should receive those notifications.
I have enrolled a client in Coordinated Entry. When do I exit them?
Clients should be exited from CAS if:
They are no longer in need of permanent housing resources.
They have left the CoC geographic area.
They are enrolled into a permanent housing (RRH/PSH) program.
If your client has been inactive for longer than 90 days, you should leave enrolled and inactive in CAS and:
Your client is added to the CAS Queue when they are enrolled in Coordinated Entry. After they are enrolled, a CAS Admin must review their record and determine if they are ready for referral or if additional work is needed before the client can be referred. The client’s status in this process is tracked by the Intake Status on the CAS Queue. You can review your client’s status on the Queue at any time by viewing the CAS Queue. For information and actions needed for each status, see below.
Pending
Your client is enrolled in CAS and on the CAS Queue (HPL). Their record is pending because a CAS Admin needs to review it for completeness before they can be referred. No actions are needed from you at this time.
NOTE: Case Managers should NOT change a status from Pending to Pending Second Review.
Incomplete Documentation
Your client’s record is missing something necessary for referral. It could be any or multiple of the following depending on program type of the program the client is being matched to.
Action: Upload VOD in the form of Dr.’s letter or SSI awards letter.
Pending Second Review
Case Managers can assign this status to a client using the Case Manager Review to communicate to the CAS Admin that the requested actions from the Incomplete Documentation step above have been completed and that the client is ready or another status review.
NOTE: Case Managers should NOT change a status from Pending to Pending Second Review.
Approved
Your client is ready for referral. No other actions are needed for now. When you receive information about referral or eligibility decisions, notify your client within 24 hours and perform a warm handoff with their housing case manager.
What documents are required for my client to be referred?
Please read the CAS Queue Status Guide for a list of documentation under the Incomplete Documentation section that summarizes the needs for clients being referred to RRH or PSH.
Should I upload this document under Client Files or Document Check?
Use Client Files for things like IDs, SSC, etc. which the client may need in a number of given scenarios. This will allow any HMIS user who can see the client’s record to access their critical documents. Because it is easy to lose track of these types of documents over time, this document management is just one way that we can use ClientTrack to provide additional support to our community.
Use Document Check for documentation of homelessness or disability documentation, especially documents with medical information or diagnosis, as we want to provide as many layers of protection for clients’ information as possible. Since only trained users of CAS have access to Document Check, uploading these documents here allows that extra security. Documents uploaded here also display for CAS Admins to review before referral.
What should I put in the comments section of a document upload?
Include your agency and the time period for which the document is applicable, especially for documentation of homelessness. If there are multiple documents of the same type (for example, 3rd party letters) for one client, a short label to distinguish the documents from each other is helpful. For example “MDHA – Dallas Library – Apr 2020-May 2020” or “The Bridge – Parkland Hospital – March 2021”. These types of labels in the comments will allow anyone to easily distinguish between documents when there are multiple documents uploaded for a client.
ClientTrack will send a notification to your designated CAS Contact via email and ClientTrack notifications. Agencies may need to determine internal policies about how this contact person communicates referrals internally and to whom. Any HMIS user at a given agency can navigate to the incoming referrals page in ClientTrack to see referrals sent to that agency.
Will we automatically get referrals, or will we still need to request them?
Referrals will be pushed based on the available units displaying in ClientTrack for your program’s housing facility. Providers should regularly check clients in and out of units to keep their available inventory accurate and up to date. If units will be taken by clients who are not being referred from CAS, providers should reserve the unit by creating a reservation for the client.
Our housing inventory fluctuates and the number of units we have set up in HMIS may not always be accurate. How do we communicate that to CAS Admins?
MDHA is working on a new process for housing facility setup to alleviate this issue. Until that new process is in place, providers should regularly attend the weekly HPL meetings to communicate directly with the CAS Admins about extenuating circumstances that would cause the inventory displaying in the system to be inaccurate.
Over-referring: The system allows CAS admins to over-refer to a program in the even that a unit will become available soon but is currently full.
Under-referring: The only way for CAS admins to know that they should not refer to available units is for that agency to attend the HPL meetings to communicate the discrepancy in their availability. If a program is consistently “under-referred”, meaning units are consistently being left as “available” in the system when there is no actual availability with that program, the HMIS team may request that those units be taken offline so that the system can be used the way it is intended, and CAS admins can use the available units to know which programs can receive referrals.
The tracking documents included in this toolkit (below) are not required. They are an optional tool for use in tracking and managing your client’s documentation to ensure that you have the required documents per HUD guidelines.
About Chronic Homelessness
An individual or household is considered chronically homeless when the individual or head of household
has a disability affecting their physical or mental health and ability to live independently
currently lives in a place not meant for human habitation (street, car, etc.), safe haven, or emergency shelter, and
has 12 months of documented homeless history, either
12 consecutive months working backward from the current day, or
a total of 12 months across 4 episodes in the last 3 years.
The official definition of chronicity is detailed in HUD’s Final Rule defining “chronically homeless”. No information in this toolkit is meant to supersede the definition and requirements detailed in that document.
If you are unsure whether or not your client is considered chronically homeless, use this flowchart created by HUD to help you make this determination.
Powered By EmbedPress
Documentation Requirements
It is extremely important to correctly document a client’s homelessness so that chronicity can be determined and used for program eligibility. This toolkit will allow service providers to track the Homeless Documentation and Verification of Disability Documentation required.
Consider the following when determining months, episodes, and breaks in homelessness.
One day of documented homelessness in a month is evidence for the entire month, unless there is evidence of a break (see below).
One episode spanning multiple months may combine various forms of documentation for that single episode.
Breaks in homelessness occur with any stay of seven or more consecutive nights in non-homeless living situations (including a friend or family member’s home, transitional housing*, a hotel paid for by the client, etc.) or institutional facilities longer than 90 days.
Please note the following regarding Transitional Housing:
A stay longer than 7 nights in a transitional housing facility constitutes a break in homelessness. The only exception to this is veterans who are assessed for chronic homelessness at intake, who remain “chronically homeless” even if they are enrolled in VA-funded transitional housing.
Documentation of Homelessness
Homelessness can be documented in a number of ways, including:
HMIS Data or HMIS Comparable Database (VSP), including
Enrollment in Emergency Shelter
Enrollment in Safe Haven
Current Living Situation documented in combination with enrollment in Street Outreach
Street Outreach Worker Observation and Letter
Discharge paperwork from a stay less than 90 days in an institutional facility
Referral by another homeless service provider
Third-party letters by community members describing physical observations of living conditions
Powered By EmbedPress
Verification of Disability
The term homeless individual with a disability’ means an individual who is homeless, as defined in section 103, and has a disability meets one of these three criteria:
“Is expected to be long-continuing or of indefinite duration, meaning that it
Substantially impedes the individual’s ability to live independently;
Could be improved by the provision of more suitable housing conditions; and
Is a physical, mental, or emotional impairment, including an impairment caused by alcohol or drug abuse, post-traumatic stress disorder, or brain injury;
Is a developmental disability, as defined in section 102 of the Developmental Disabilities Assistance and Bill of Rights Act of 2000 (42 U.S.C. 15002), meaning that the individual qualifies for or receives Supplement Security Income (SSI); or
Is the disease of acquired immunodeficiency syndrome or any condition arising from the etiologic agency for acquired immunodeficiency syndrome.”
In the case of a forgotten password, follow the steps below!
Navigate to the Housing Forward Coordinated Access System Sign In Page
Click on “Forgot your password?” under the “Log In” button
2. Enter your agency email in the “email” field.
3. Click “Send me reset password instructions”
4. Navigate to your email inbox.
5. Locate an email from “Housing Forward CAS” with the subject line “Reset Password Instructions”. Be sure to check your spam folder!
6. In the email click the “Change my password” link.
7. Once you click the above link, this temporary password screen will open up in a new browser. Create a new password that you will remember and save it somewhere secure should you need to access it. Click “Change my password”.
8. Clicking “Change my password” will take you to a confirmation page confirming that your password has been changed and that you are signed in!
Green River CAS allows providers to decline a match for the following reasons:
The client will not be eligible for services
The client will not be eligible for the housing type
The client will not be eligible based on funding type
The client has another housing option
The reason “other” should only be used in extenuating circumstances and after confirming with the Housing Forward CAS team that the reason is acceptable.
This feature allows the provider to send the match back to the CAS Administrator who can then make a more appropriate match or close the match if the client is no longer in need of housing.
How to Decline
You can Decline for an acceptable (listed) reason any time you see the Decline option on the match page.
Decline FAQ
Q: What if I do not see the reason I need to decline my client listed?
A: Check the Park reasons and consider whether you need to Decline or Park the client. If you do not see any reason listed that relates to your client’s situation, submit the Decline with reason “Other” and provide details if possible. This option should only be used as a last resort, and should not be used to circumvent federal and local policies and procedures regarding acceptable reasons to reject a referral through our community’s Coordinated Access System.
Green River CAS allows us to “park” a client matched to a route. Parking the client has the following effect:
The client will be removed from the case load of the agency they were assigned to via the match.
The agency’s vacancy will become open again to accept a new client via match.
The client will be placed in a “hold” back on the queue, to be referred again on or after the date that the agency lists when they submit the client to be parked.
This feature allows us to essentially press “pause” on a client’s match. When the park ends, the client is able to be re-matched and pick up where they left off in the process.
In short, providers should park the client in the case that the client cannot be immediate served due to reasons, including but not limited to:
The client disengaged or cannot be contacted
The client declined services
The client needs a higher level of caare
The client was incarcerated for a short period of time
The client is deceased
There are a few other less common reasons for parking. All acceptable reasons to park a client are listed on the Park form in Green River. The reason “other” should only be used in extenuating circumstances and after confirming with the Housing Forward CAS team that the reason is acceptable.
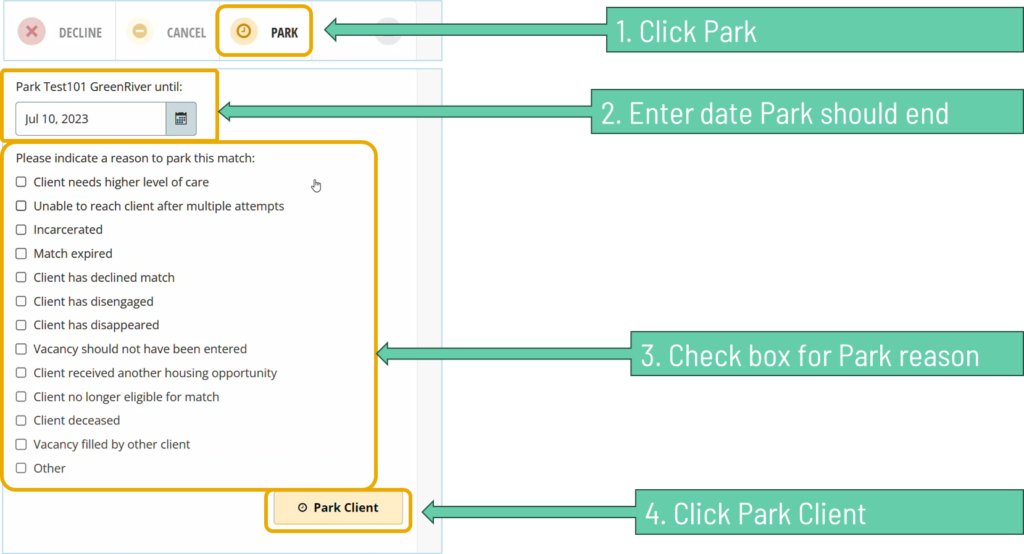
How to Park
You can Park for an acceptable (listed) reason any time you see the Park option on the match page.
Parking FAQ
Q: How do I determine the date the park should end?
A: If the client is being parked for a reason that has a natural ending date, such as a short-term incarceration, list the natural ending date of the event. If a client is being parked for an indefinite reason, such as being deceased or receiving another housing opportunity, leave the date blank if possible. If the system will not allow you to leave the date blank, you can enter 1 year from the current date. For clients who have disengaged or disappeared, choose a date 30 days from the current date.
Q: What if I do not see the reason I need to park my client listed?
A: Check the Decline reasons and consider whether you need to Park or Decline the client. If you do not see any reason listed that relates to your client’s situation, submit the Park with reason “Other” and provide details if possible. This option should only be used as a last resort, and should not be used to circumvent federal and local policies and procedures regarding acceptable reasons to reject a referral through our community’s Coordinated Access System.
Q: How many times can a neighbor be parked?
A: Our community does not currently have a limit to the number of times you can park a client. This feature allows our system to be flexible in meeting the needs of the neighbors we serve, and limiting parking would work against that goal.
Green River CAS will show that a match stalled when the time from when the match was sent to when the provider responds exceeds our community’s policy for responding to referrals. As of the date of publishing, our community’s policy asks providers to respond within 10 days.
When the match is about to be considered stalled, a notification will display under the match.
Once the match is stalled, a similar notification will appear stating the date the match stalled.
How to Manage Stalled Matches
Program Managers/designated leads are responsible for responding to matches, including stalled matches. The response options will appear on the Match page once the match has stalled. Respond based on whether the client is engaging or not engaging with services and list the reason why the the match has stalled, or not yet been responded to (accepted or declined).
Stalled Match FAQ
Q: What date do I enter for “client last seen” if the client cannot be contacted or located?
A: If you have made initial contact with the client since receiving the match, list the last date the client was contacted. If you were never able to make contact with the client upon receiving the match, list the referral/match date.
Q: Does due diligence still apply?
A: Yes. The use of Green River CAS to match, prioritize, and refer does not change or affect our community’s due diligence policies.
The CoC Admin accepting the match triggers Green River to:
Notify the Access Point contacts that a client has been assigned to navigation
Notify the Navigation Agency Contact
Generates a referral event
Navigator enrolls client into HMIS and works to secure a voucher.
2. When a voucher is secured, the date issued is recorded.
Navigator and client continue normal housing activities (unit search, RFTA signature, etc.).
3. Upon the submission of the RFTA to PHA, Navigator checks box in Green Riverand clicks “Accept Match”.
This action notifies the CoC Admin to make EHV Case Manager referral. The CoC Admin assigns a Case Manager Agency Contact and the Case Manger takes over the workflow.