When a neighbor/client turns 18, these are the following data elements that must be added/updated.
How will I know if a neighbor becomes 18, and updates are required?
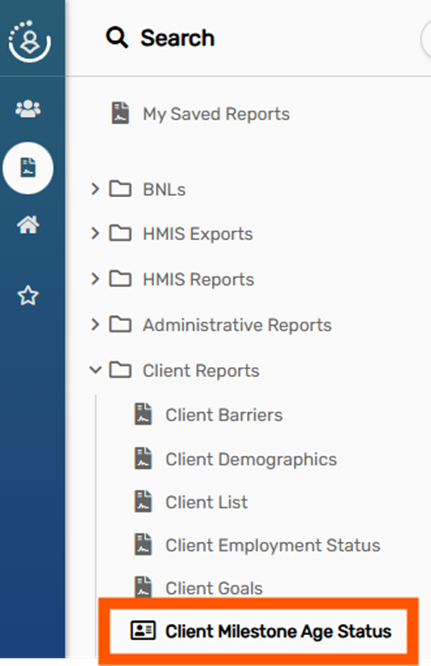
Please run the “Client Milestone Age Status” report.
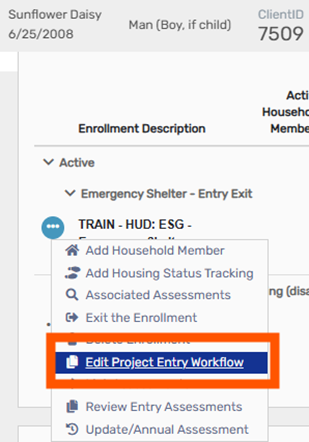
To update Veteran Status and PLS, please go to the 18-year-old’s Dashboard and select “Edit Project Entry Workflow” for the enrollment(s) affected.
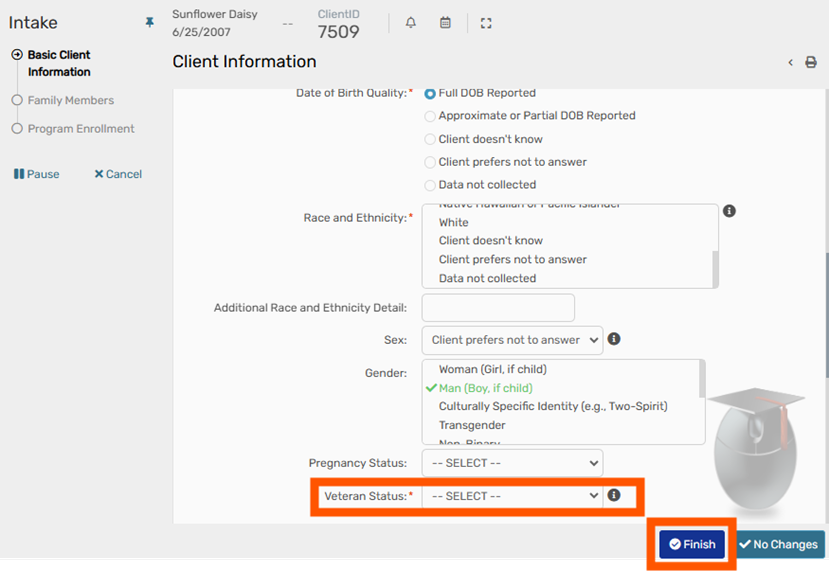
Select their Veteran Status via the Basic Client Information page.
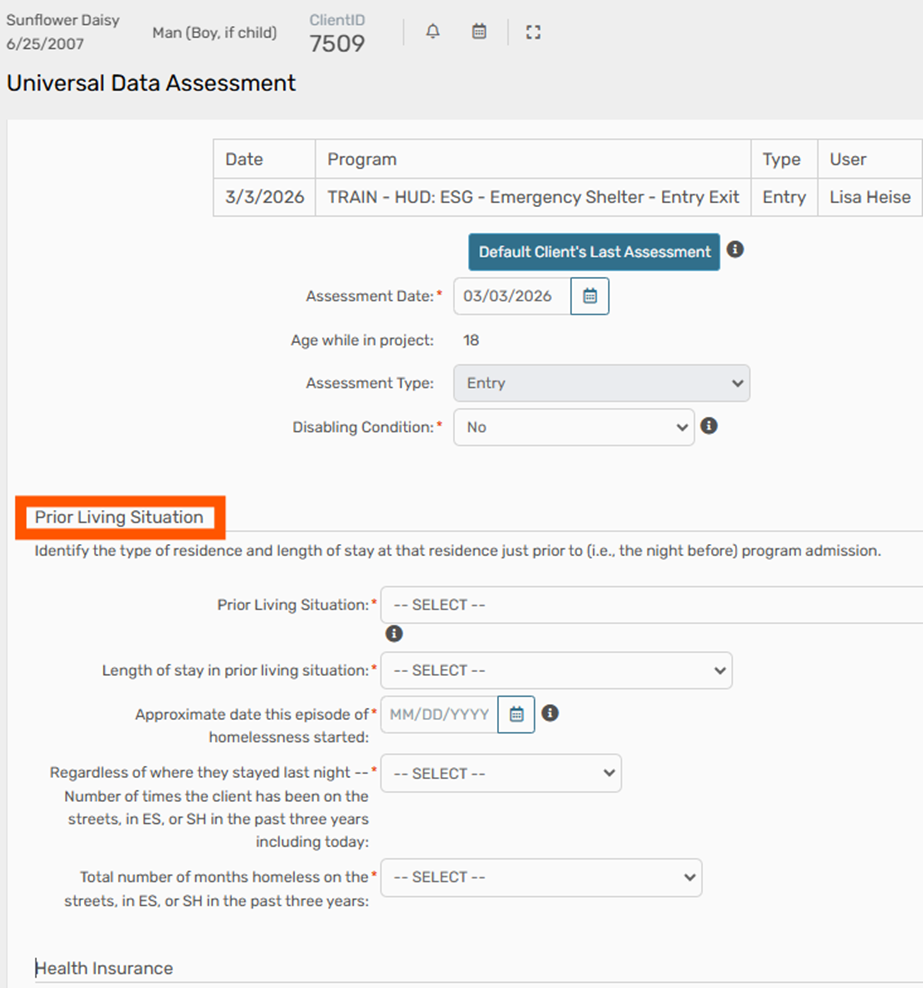
Continue through the workflow and update the newly turned 18-year-old’s Prior Living Situation. The PLS choices may appear different to you, as the questions are tied to Project Type.
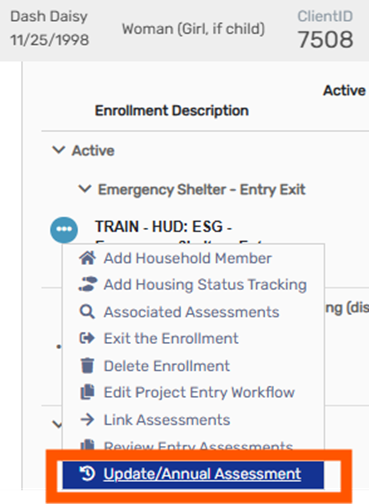
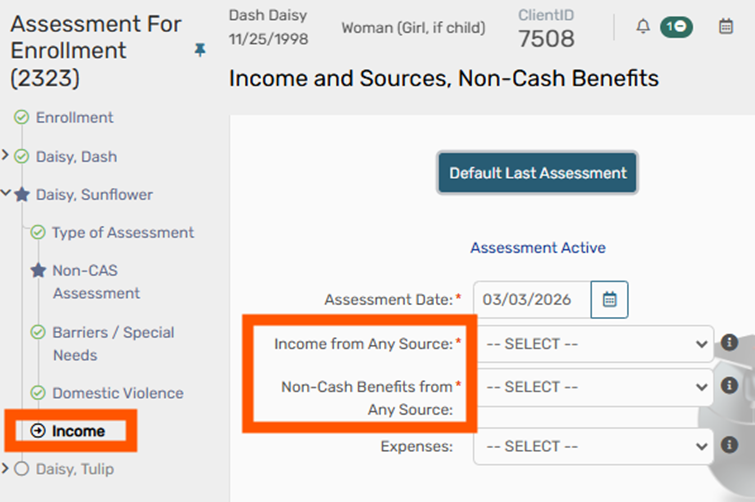
Income and Non-Cash Benefits will not appear when editing the Workflow, so an Update Assessment is required to add those fields. Please return to the Dashboard and select Update Assessment via the three dots.
Now that the client is over 18 Income and Sources, and Non-Cash Benefits will be editable.
1. Log in to ClientTrack and navigate to your Clients Workspace. Find your client in the system.
2. Click the action arrow and select “Update/Annual Assessment” on the enrollment you wish to add an Update Assessment to.

NOTE: If your client has already been exited, you will choose the “Missed Update/Annual Assessment” option instead.

3. The HUD Program Enrollment screen allows you to verify enrollment information. Typically you will click No Changes here however, there are some options to record data here depending on your program type. You may see:

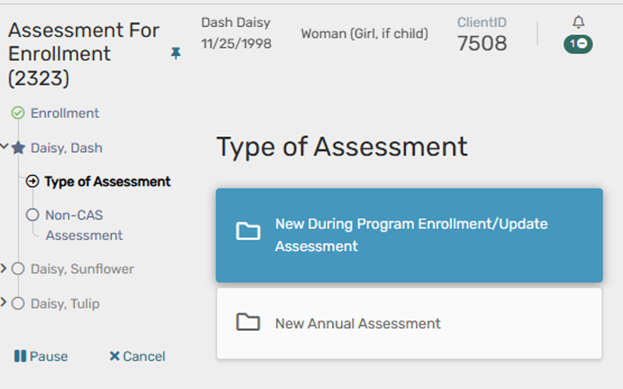
4. Next, select whether you are recording an Update (During Program Enrollment) Assessment, or an Annual Assessment.
NOTE: Annual assessments may only be completed within a 60-day window – within 30 days prior to and 30 days after the anniversary of the project start date.

NOTE: If an update or annual assessment has already been recorded, first you will see the option to create a new assessment or “edit existing”. If you need to create a new assessment, choosing that option will then prompt you to choose Update or Annual.
5. Complete the assessment with all the client’s updated information. Use the default button on each page first, when available, to have the system pre-populate the most recently recorded information for the client. Then you can edit the information based on what is accurate and true for the client on the day of assessment. If there are no changes to a certain data element, use the default button and save to continue.

6. Complete the workflow for any family members. Choose the same option here that you chose for your head of household.

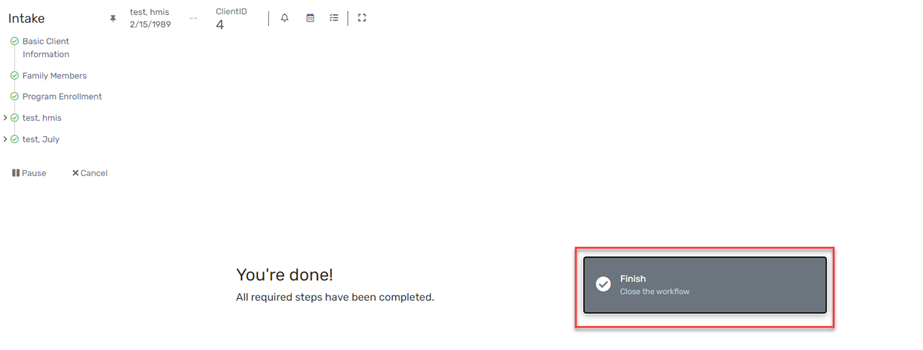
7. Always work to the end of the workflow and click Finish to close the workflow.

Edits should be made to the workflow when data was recorded incorrectly and needs to be edited to be accurate.
1. Log in to ClientTrack and navigate to your Clients Workspace. Find your client in the system.
2. On the Client Dashboard, click the action menu next to the enrollment in question and choose Edit Project Entry Workflow.

3. You are now in the Entry Workflow. You only need to make changes on pages with incorrect information. You can click No Changes or Save & Close on any page where you do not need to make changes.
NOTE: This is where you can correct the Project Start Date. However, if you edit this date, you will need to edit the Assessment Date on each subsequent page of the workflow, and the Master Assessment. See the Master Assessment section below for more details.

4. Edit any pages in the workflow that needs to be edited.
If you changed the project start date, check the dates on each of the pages in the rest of the workflow to be sure they match the project start date.
Examples of pages you may see in the workflow are shown below, but are dependent on project type. The date of each assessment page is highlighted below for easy reference, but all information on these pages can be edited as needed.
Universal Data Assessment

Barriers/Special Needs

Domestic Violence Assessment

Income
If you edit the Income assessment date, you will also need to edit the Master Assessment date to ensure no reporting errors. See the Master Assessment section below for more details. You will receive an error alert if you need to complete this edit.

5. When you have edited all pages and clicked through the entire workflow, click Finish to close the workflow.
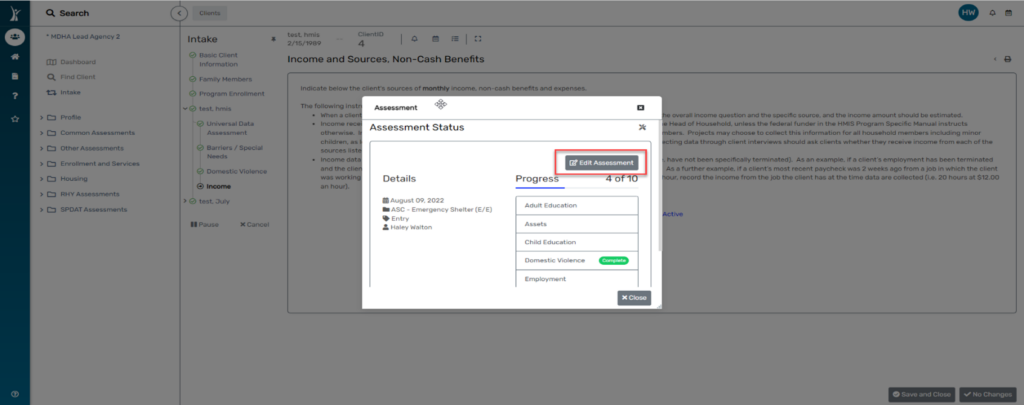
This edit will be required if you are editing the Project Start Date or the Income Assessment Date.
1. On any page of the workflow, click Assessment Active link (shown on Income page above in Step 5).
2. Click Edit Assessment.
3. Edit the Assessment Date to match the Project Start Date.
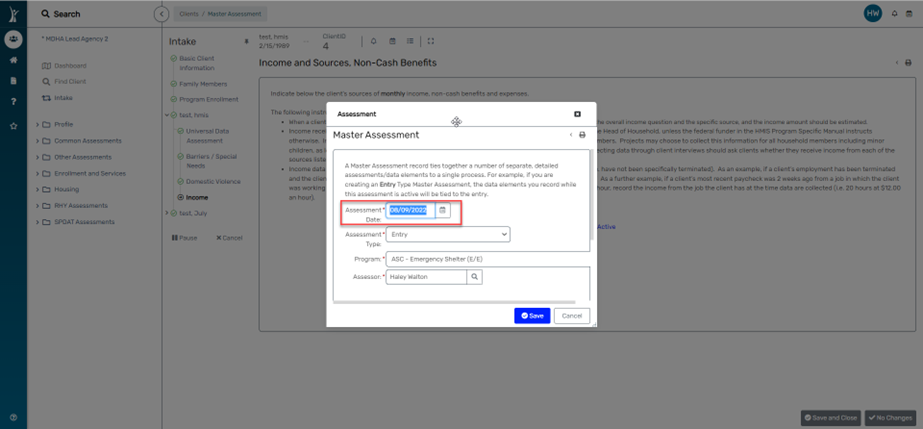
4. Click Save, then Close the Master Assessment popup box to go back to the workflow.

1. Log into ClientTrack and navigate to the Clients Workspace.
2. Find your client in the system.
3. From the client’s Dashboard, scroll down to the enrollments section and click the action arrow next their enrollment in your program. Click the “Edit Exit Workflow” option.

4. Work through each page of the assessment, making any edits where necessary. On any page you make an edit, click Save to continue. If you make no edits to a page, click No Changes to continue.

5. If there are other family members in this household, repeat step 4 for all family members.
6. Work through the entire assessment workflow and click the button that says “Finish” to close your workflow.

It is important to understand the difference between an update assessment and the need for an edit to an existing assessment. Update assessments should be completed any time the client’s information has changed, i.e. the client did not have insurance and now they do, or the client now has more regular income. An edit should be performed any time the original assessment was recorded incorrectly, i.e. the user entered the wrong type or amount of income.
Edits to update and annual assessments are completed in the same manner.
1. Log into ClientTrack and navigate to the Clients Workspace.
2. Find your client in the system.
3. From the client’s Dashboard, scroll down to the enrollments section and click the action arrow next their enrollment in your program. Click the “Update/Annual Assessments” option. This will say “Missed Update/Annual Assessment” if the client has been exited from the program.

4. On the HUD Program Enrollment page, you can make edits to any project-specific data elements like Housing Move-in Date or Date of Engagement. If you edit these data elements, click Save to continue. If you are not making any edits to these data elements, click No Changes.
Data that was recorded in the entry assessment (like Project Start Date and client demographic information) should be edited from the assessment where it was initially recorded.
5. On the next page, if an Update or Annual Assessment has already been recorded, the system will prompt you to select New Assessment or Edit Existing. To edit a previously recorded assessment, choose Edit Existing.

6. The system will display all existing Update/Annual assessment for the select client. Click on the assessment you want to edit to continue.

7. Work through each page of the assessment, making any edits where necessary. On any page you make an edit, click Save to continue. If you make no edits to a page, click No Changes to continue.
8. If there are other family members in this household, you will receive the same prompt starting at step 5 above. For each family member, you should choose the same type of assessment as you chose for the head of household. So, if for the head of household you chose “Edit Existing” and then chose to edit an update assessment recorded on 12/19/2021, you should make the same choices when prompted for each of their family members.
9. Continue steps 5-8 for each additional family member in the household.
10. Work through the entire assessment workflow and click the button that says “Finish” to close your workflow.

1. To record an Entry Assessment for a client, be sure you are on the Clients Workspace.

2. Click the Intake button in the top left corner. This will start a workflow.

3. Click Add a new client.

4. Enter ONLY the first three letters of the client’s first name and the first three letters of the client’s last name. This will search the system to see if the client has an existing HMIS record. Click Next in the bottom right corner.

5. The system will search to see if the client has an existing record. Be sure to select the existing record if the client returns in the search results. Doing so will add the enrollment to the existing record. If the client does not have an existing record, click Next to create a new record.

6. Continue to fill out the Basic Client Information screen and click Finish when done.
7. Starting with the first blank row, record ONLY the first three letters of the client’s first name and the first three letters of the client’s last name. Use the tab key or the magnifying glass. A Find Client screen will open.

8. Click the Search button to see if the client has an existing record. If so, be sure to click on that record to add that client to the enrollment workflow. If the client does not have an existing record, simply close the box.
9. Record the client’s full information.
10. Repeat this step for each family member.
11. Be sure each family member’s name has a check mark for the name.
12. Click Save & Close.
13. Select the Project for which the client will be enrolled in from the dropdown box.

14. Place a check mark next to all family members. Doing so will add each person to the
enrollment and default the Project Start Date to today’s date.

15. Confirm the Project Start Date. Make corrections if necessary. Outreach project types should record the Date of Engagement if necessary.
16. Click Save.
17. Record all information for the client. The Assessment date should be equal to the project start date.

18. Click Save.
19. Record all information for the client. The Identified Date should be equal to the project start date.

20. Save & Close
21. Record all required information for the client. The Assessment date should be equal to the project start date.

22. Save & Close
23. Record all required assessment for each family member. You will come to the end of the workflow. Click Finish.

Download document:

1. On the Client Workspace, use Find Client to find the client you want to exit.
2. On the client’s Dashboard, identify the active enrollment that you need to exit.

3. Click the action arrow, then click Exit the Enrollment.

4. Confirm the Exit Date on the first screen. You can backdate this assessment here, if needed. Check the box next to “End Case Assignment” to remove this client from the user’s case load inside HMIS (the caseload displays on the My Case Assignments section of the user’s Home Dashboard).

Note about Exit Destinations: If your client has disappeared and you are not able to complete an exit interview you can choose “No exit interview completed” for exit destination.
5. Record any services provided at exit. Click Save to continue to the next page of the workflow.
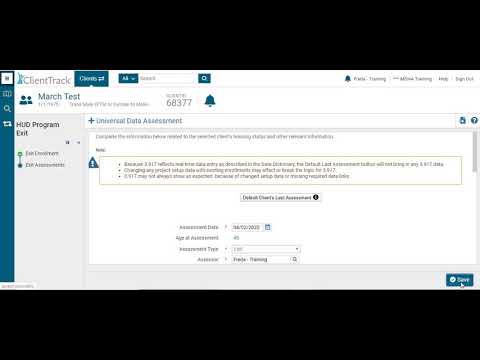
6. For each remaining page of the workflow, complete the questions with answers that are true and accurate for your client on their exit date.
Note: If you chose “No exit interview completed” for exit destination, use the “Default Last Assessment” button on each page to complete the assessment.
7. Continue the workflow for all family members. When you come to the end of the workflow, click Finish to close the workflow.

Download document:
This document will show how to utilize the HMIS Annual Assessment Tool.
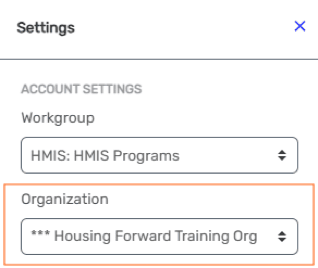
1. Log into ClientTrack and navigate to your Settings Icon (your initials).

2. Set Organization to Your Agency, if necessary.
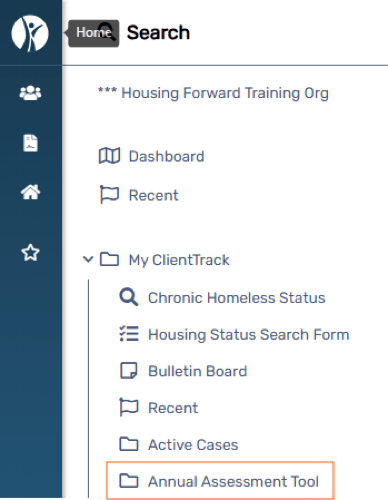
3. Navigate to your Home workspace and select Annual Assessment Tool
Home -> My ClientTrack -> Annual Assessment Tool
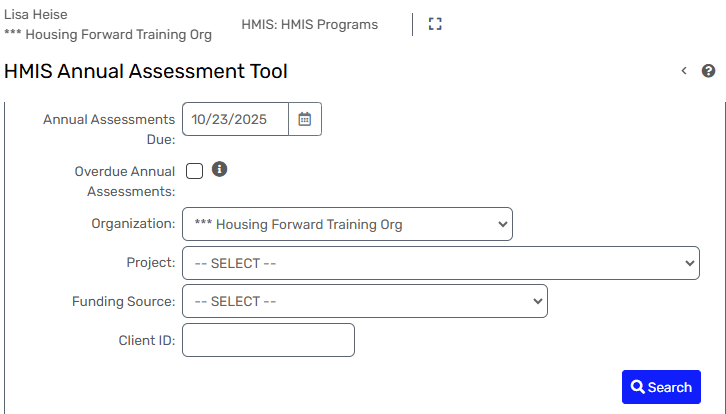
4. This tool is intended to assist in finding Annual Assessments that needs to be completed.
The Annual Assessments Due date will include filter to show all open enrollments where an annual assessment has not been completed, and the date selected is within the sixty-day window of allowed for annual assessments.
To use this tool, select the Due Date (defaults to the current date).
You may also filter by Organization, Project, Funding Source or Client ID.
5. You may view this report through HMIS.
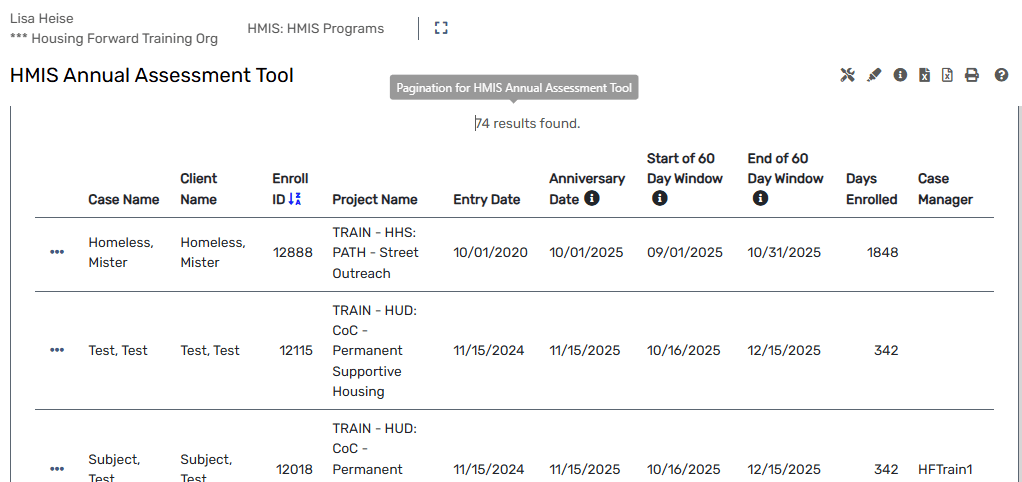
6. You may download it as pictured below.

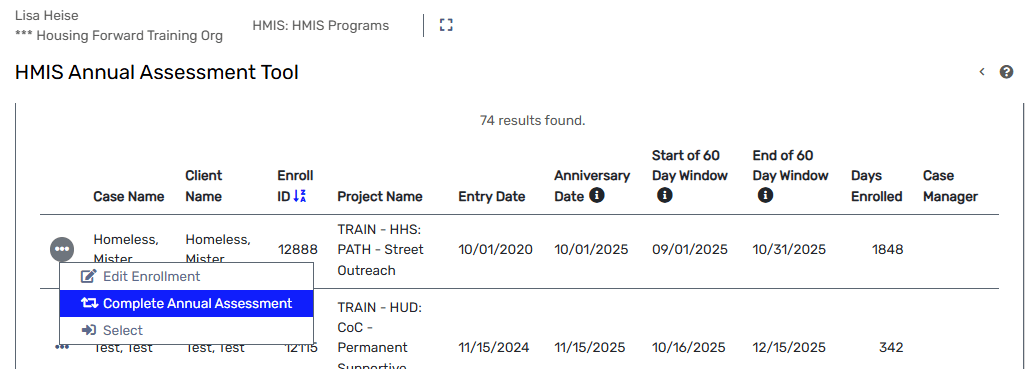
7. By selecting the action dots, you will see options to Edit the Enrollment, Complete the Annual Assessment, or choose Select to view the neighbor’s Dashboard.
Always remember to log out of the system when it is not in use!
Download document:
If a client has been incorrectly exited from the program, use the Reenter Enrollment feature to enter the client back into the program. This option is only available to HMIS users for 90 days. If the client has been exited for more than 90 days, submit a request to the HMIS admin to delete the exit.
1. Begin on your Client Workspace and find the client whose record you need to edit.
2. On the Client Dashboard, find the enrollment that was incorrectly exited and click the action arrow and select “Re Enter the Enrollment”.

4. Check for a popup confirming that the enrollment has been reentered and click OK.

